Wie können wir Ihnen weiterhelfen?
Haben Sie Fragen zu Ihrem FlyNex Account? Wir haben Ihnen Antworten auf häufig gestellte Fragen in unseren FAQs zusammengefasst.
Sie finden nicht die richtige Antwort auf Ihre Frage?
Kontaktieren Sie hier unseren Support bei Fragen zu Ihrem Account oder zur FlyNex Enterprise Suite. Wir setzen uns mit Ihnen schnellstmöglich in Verbindung, um Ihre Frage zu beantworten.
Häufig gestellte Fragen.
1) Wechseln Sie zur Karte.
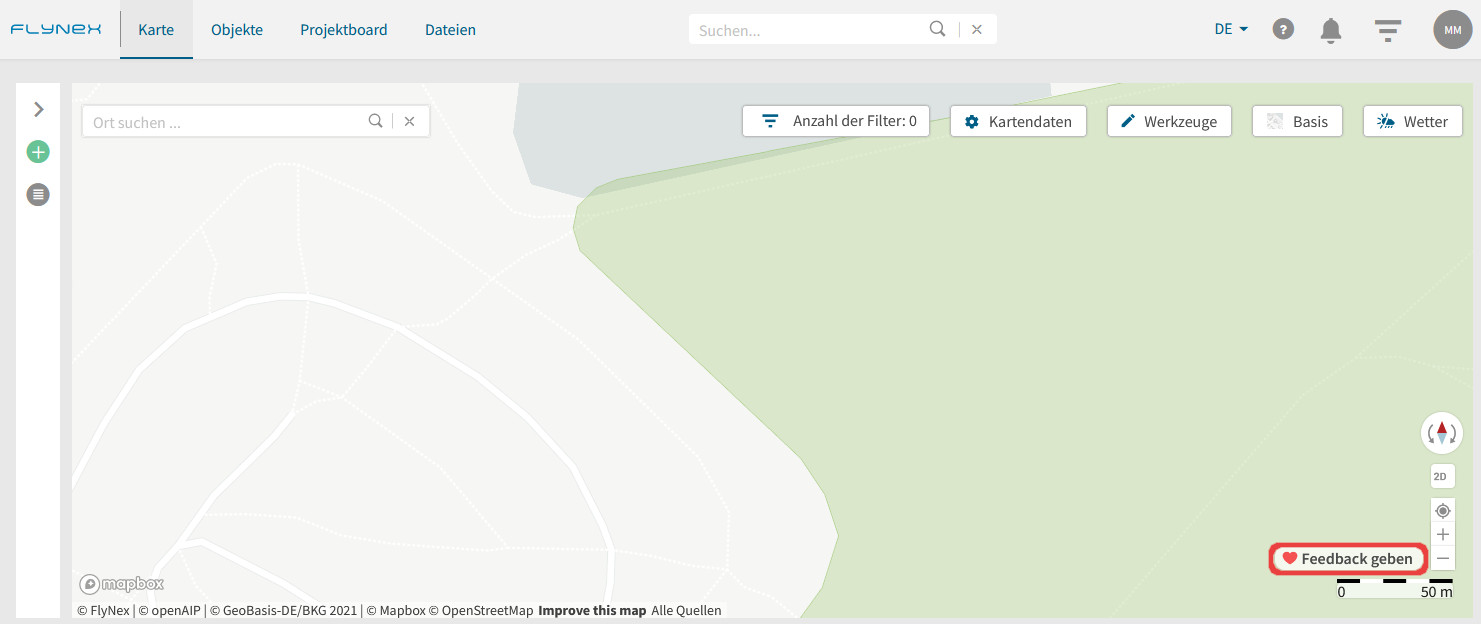
2) Klicken Sie unten rechts in der Kartenansicht auf Feedback geben.
2) Klicken Sie im Pop-Up-Fenster auf Benutzerfeedback und erstellen Sie ein neues Ticket.
3) Bewerten Sie die Plattform über die Anzahl der Drohnen und hinterlassen Sie uns gerne eine kurze Beschreibung.
4) Klicken Sie auf Feedback senden.

Danke für Ihre Hilfe
Das Feedback geht direkt an unsere Produktentwicklung. Wir freuen uns auch stets über Ihr ehrliches und offenes Feedback zu unserer Software. Nur so können wir unsere Produkte immer besser machen und Sie dabei unterstützen, Ihre Projekte noch effizienter und sicherer umzusetzen.
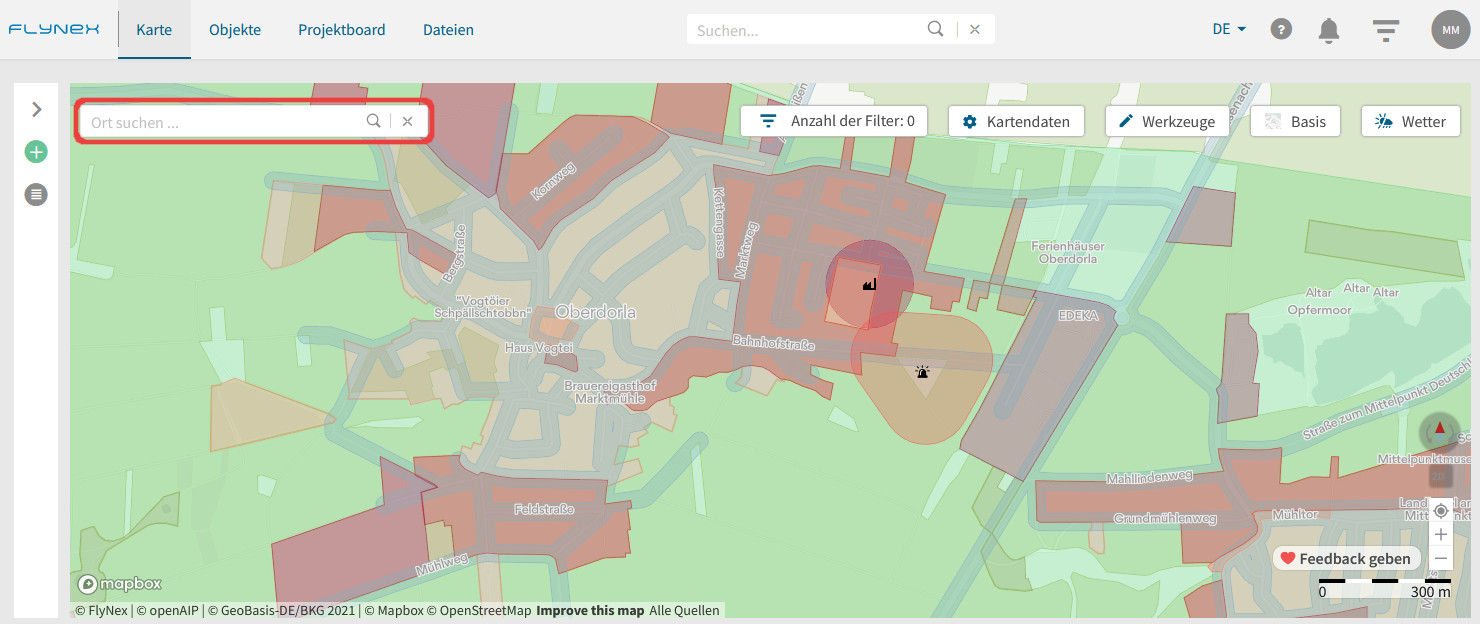
Die Karte bietet Ihnen die Möglichkeit erste Informationen zum Standort des Objekts oder Projekts einzuholen. Starten Sie zu Beginn mit der Suche nach dem gewünschten Ort, über die Eingabe am oberen linken Rand.
Nutzen der Kartenfunktionen

Anzahl der Filter
Hinterlegen Sie passende Filter, um nur ausgewählte Objekte oder Projekte auf der Karte auszugeben.
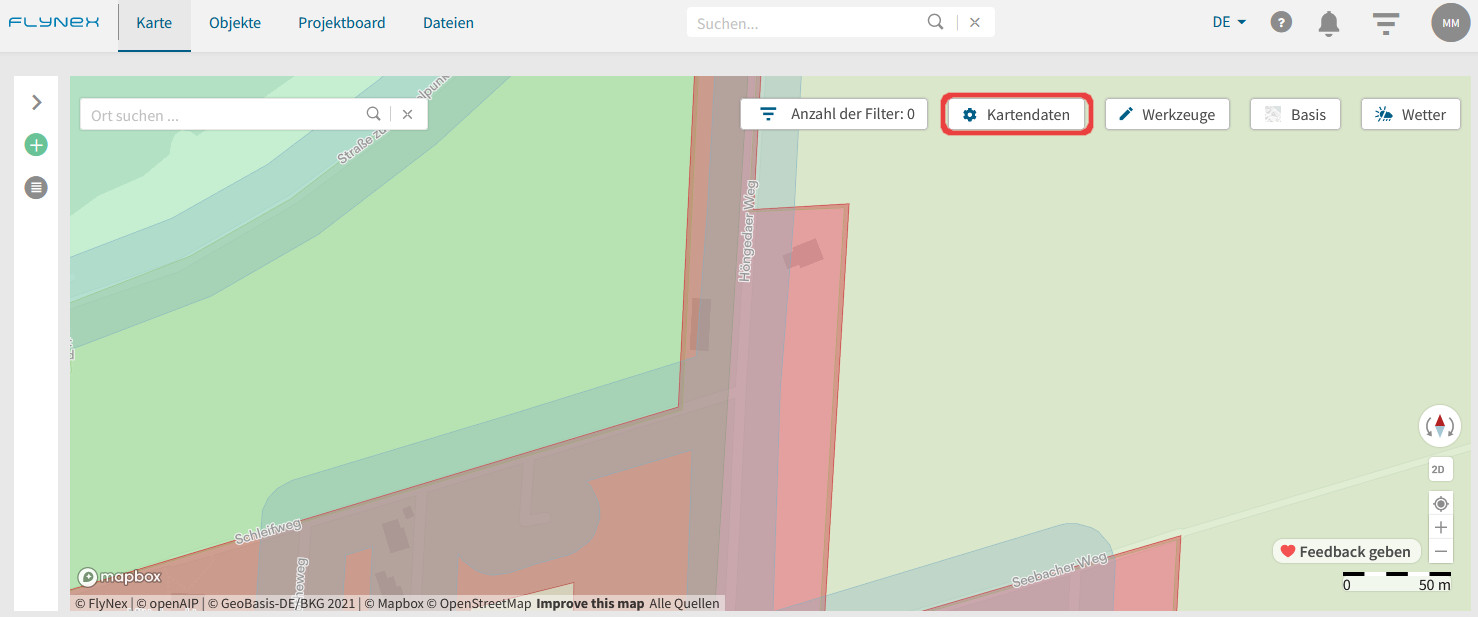
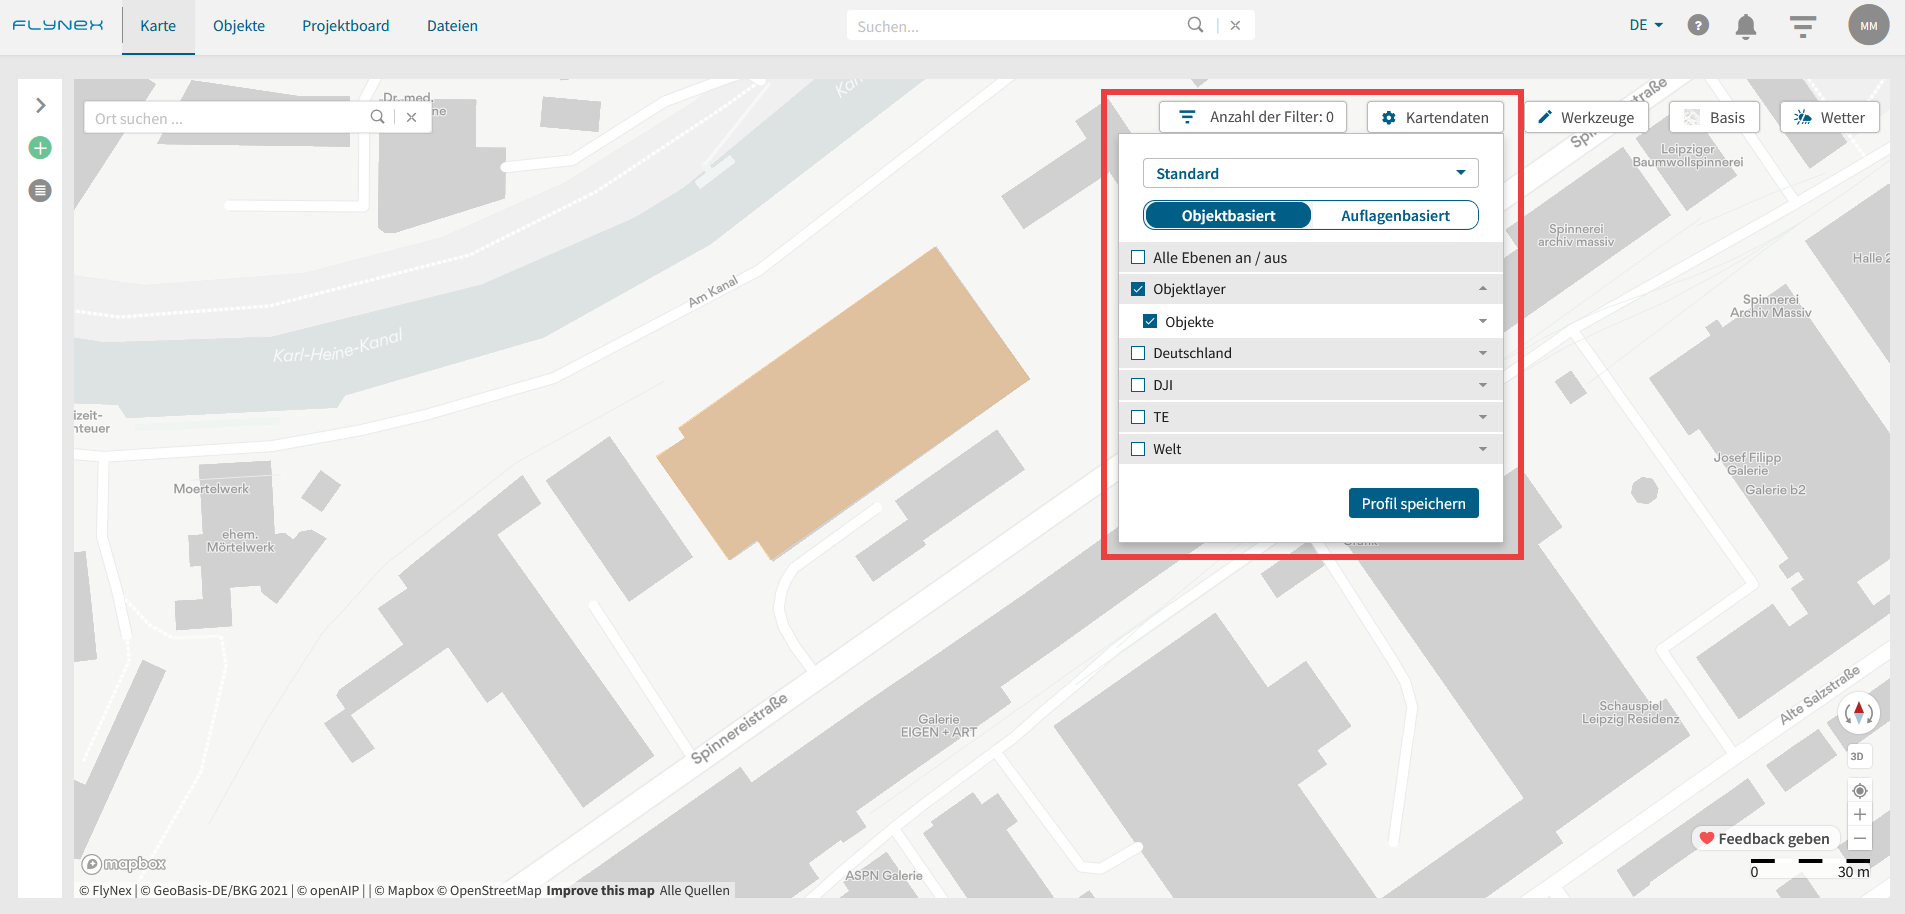
Kartendaten
Aktivieren Sie passende Kartenlayer, um rechtliche Informationen für das gewünschte Fluggebiet zu erhalten.
Werkzeuge
Vermessen Sie Strecken und Flächen im gewünschten Gebiet.
Kartentyp
Nutzen Sie verschiedene Kartentypen (z. B. Standard oder Satellit) für eine bessere Orientierung.
Wetter
Holen Sie sich aktuelle Wetterdaten für das Zielgebiet ein.
Navigationstools der Karte
Nutzen Sie hilfreiche Navigationstools zur besseren Orientierung auf Ihrer Karte. Sie finden alle Navigationstools in der rechten unteren Ecke.

1) Wechseln Sie zur Karte.
2) Klicken Sie unten rechts in der Kartenansicht auf Feedback geben.
3) Klicken Sie im Pop-Up-Fenster auf Kartenfeedback und erstellen Sie ein neues Ticket. Klicken Sie den Marker an und platzieren Sie diesen auf der fehlerhaften Kartenposition. Die Adresse des Markers wird automatisch übernommen.
4) Beschreiben Sie den Fehler so ausführlich wie möglich im Feld Beschreibung.
5) Klicken Sie auf Ticket hinzufügen.

Danke
Unsere Geo-IT-Spezialisten werden sich umgehend der Meldung widmen und Ihnen entsprechend Rückmeldung geben. Sie können nun in diesem Feedback Pop-Up sowohl Ihre bisherigen Tickets und deren Status verfolgen als auch weitere Tickets erstellen.
In der objektbasierten Anzeige werden Ihnen verschiedene Farben zu den entsprechenden Klassen (z. B. Schulen, Bundesstraßen, Agrargebiet) angezeigt. Nutzen Sie diese Ansicht, wenn Sie erfahren möchten, welche Auflagen zu welcher Klasse gehören.
In der auflagenbasierten Anzeige wird Ihnen in einem Ampelsystem die Schwierigkeit angezeigt, welche sich aus den regulatorischen Auflagen für Ihren Drohnenflug ergibt. Gelbe Bereiche haben weniger komplexe Auflagen als orange oder rote Bereiche. Diese Anzeige gibt Ihnen somit einen schnelleren Überblick und zeigt Ihnen Routenoptimierungspotenzial auf.
Kartenlegende und Daten
Die in der Karte angezeigten Informationen (Kartenlayer) sind in Objektklassen (z. B. Lufträume, Energie) unterteilt. In den Optionen zu den Kartendaten können Sie einstellen, ob und welche Objektklassen auf der Karte angezeigt werden. Jede Objektklasse besitzt dabei ihre eigene Farbe.
Hinweis: Auch bei deaktivierten Kartenlayern werden Ihnen unverändert die Informationen angezeigt, die Ihre Flugplanung betreffen. Das heißt bei Rechtsklick in die Karte oder späterer Routenvalidierung werden alle Auflagen angezeigt.
Hinterlegen von Profilen für Kartenlayer
Speichern Sie Profile für individuelle Kartenlayer-Zusammenstellungen.
1) Wechseln Sie zu der Karte.
2) Öffnen Sie die Funktion Kartendaten.
3) Wählen Sie Ihre persönliche Zusammenstellung von Kartenlayern.
4) Klicken Sie auf Speichern und vergeben Sie einen Namen für das Profil.
Für Informationen zur Lizenz, dem Plan und Ihren Funktionen folgen Sie diesen Schritten:
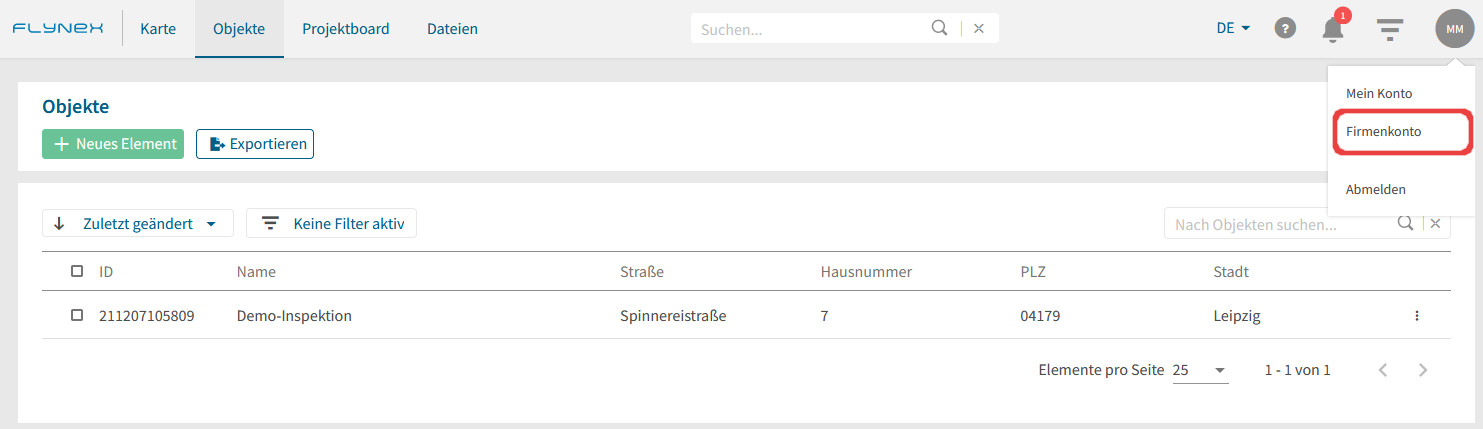
1) Wechseln Sie zu Ihrem Firmenkonto.
2) Öffnen Sie die Funktion Lizenz & Bezahlung und erhalten Sie alle Informationen zu Ihrem Plan.
Mithilfe von Firmenrollen behalten Sie einen Überblick über die Aufgabenbereiche und Berechtigungen Ihrer Teammitglieder. Jedes Teammitglied kann gleichzeitig mehrere Firmenrollen erhalten. Aktuell haben Sie die Wahl zwischen folgenden Firmenrollen:
Administrator
Ein Administrator besitzt alle Verwaltungsrechte für alle Bereiche der Plattform. Administratoren können außerdem anderen Benutzern Administratorrollen zuweisen. Um das Risiko für Ihre Organisation zu verringern, begrenzen Sie bitte die Zahl der Administatoren.
Projektmanager
Ein Projektmanager besitzt alle Verwaltungsrechte für die Bearbeitung von Projekten. Projektmanager haben Zugriff auf alle Projekte ihres Standorts, ohne explizit zugewiesen zu sein.
Connect-User
Connect-Nutzer können die FlyNex Connect App auf ihren Drohnencontrollern benutzen, um Flüge zu tracken sowie aufgenommenen Daten mit der Plattform zu synchronisieren.
Objektmanager
Ein Objektmanager besitzt alle Verwaltungsrechte für die Bearbeitung von Objekten. Objektmanager haben Zugriff auf alle Objekte ihres Standorts sowie alle darin enthaltenen Projekte, ohne explizit zugewiesen zu sein.
Benutzer
Diese Rolle ist die Standardrolle bei der Erstellung neuer Nutzer. Ein Benutzer kann an eigenen oder zugewiesenen Projekten arbeiten, d.h. Projekte erstellen, Projekte bearbeiten (wenn der Benutzer im Projekt die Rolle Projekteigentümer oder Mitarbeiter besitzt), Projekte lesen (wenn der Benutzer im Projekt mindestens die Rolle Leser besitzt).
1) Wechseln Sie zum Firmenkonto (Hinweis: Administratorechte nötig).
2) Öffnen Sie die Funktion Lizenz & Bezahlung und passen Sie Ihren persönlichen Plan nach Ihren Wünschen an.
Herzlichen Glückwunsch
Sie erhalten eine Bestätigung per E-Mail und sehen die neu erworbenen Funktionen unter Lizenz & Bezahlung.
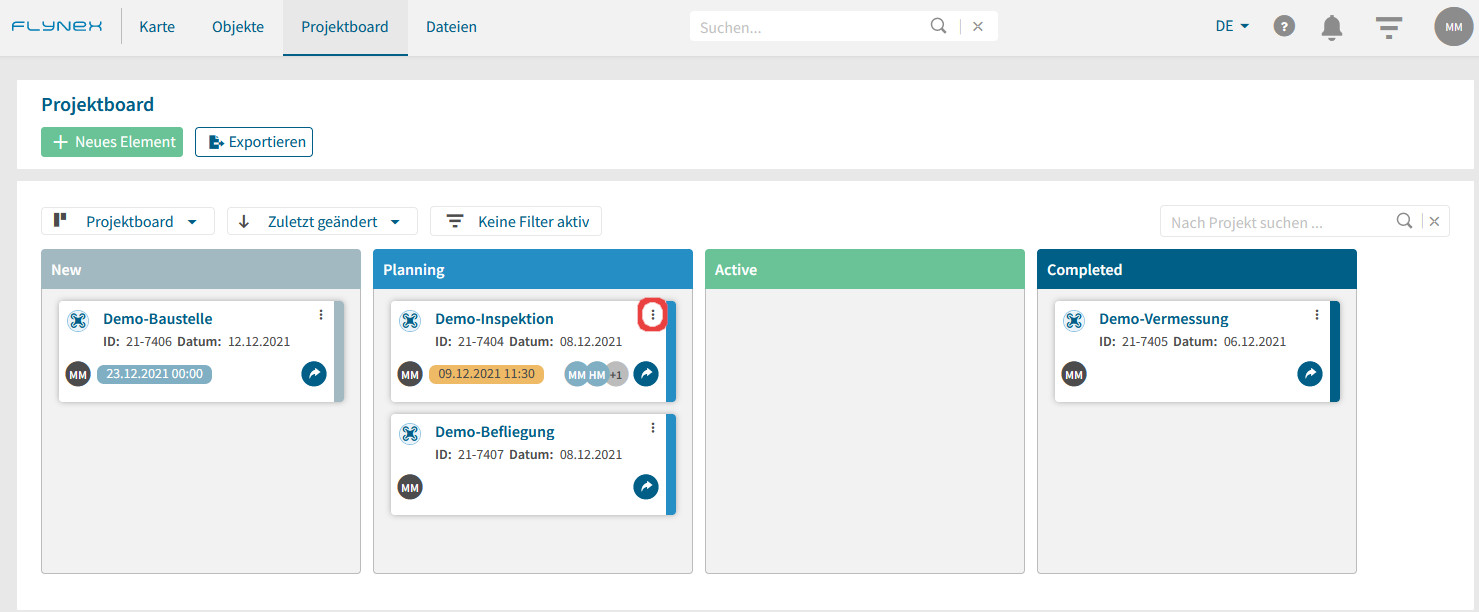
Das Projektboard zeigt Ihnen alle aktiven Projekte Ihres Kontos sowie Projekte, die mit Ihnen geteilt werden.
Sie finden das Projektboard im Hauptmenü:
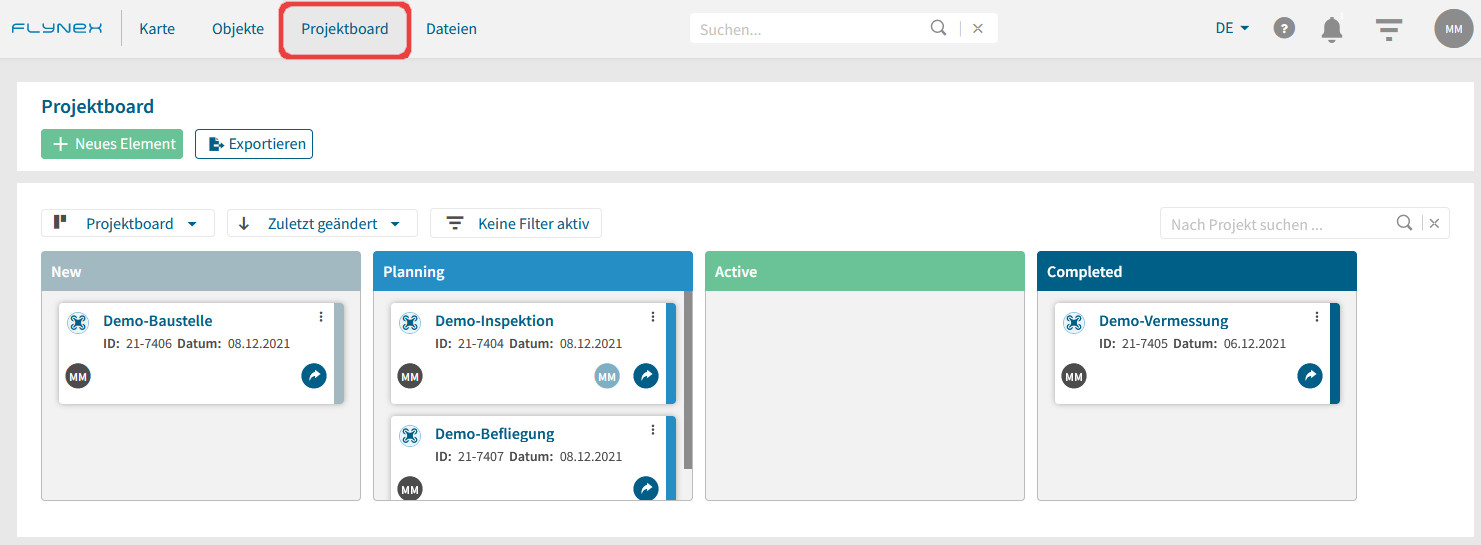
Jedes neu angelegte Projekt landet zunächst im Status Neu auf dem Projektboard. Sie können den Status des Projekts durch Verschieben der Projektkachel auf dem Projektboard per Drag & Drop in die verschiedenen Phasen ändern (voreingestellt: Neu, Planung, Aktiv, Abgeschlossen). Eine individuelle Gestaltung des Projektboards mit eigenen Phasen ist in den Einstellungen Ihres Firmenkontos möglich.
Welche Informationen trägt die Projektkachel?
A: Name des Projekts
B: Weitere Einstellungen für das Projekt
C: Starttermin des Projekts
D: Projektverantwortliche/r
E: Deadline des Projekts
F: Mitarbeiter/-innen des Projektteams

Ein Objekt dient als Grundelement Ihrer Projekte und beschreibt eine ortsgebundene, typenabhängige Einheit. Jedes Objekt besitzt über die Vergabe von Koordinaten einen festgelegten Ort. Der Typ beschreibt die Funktion des Objekts, ist jedoch zunächst auf Standard begrenzt. In Objekten können mehrere Projekte angelegt und durchgeführt werden.

Wo finde ich meine Objekte?
Sie finden alle aktiven Objekte im Hauptmenü unter Objekte.
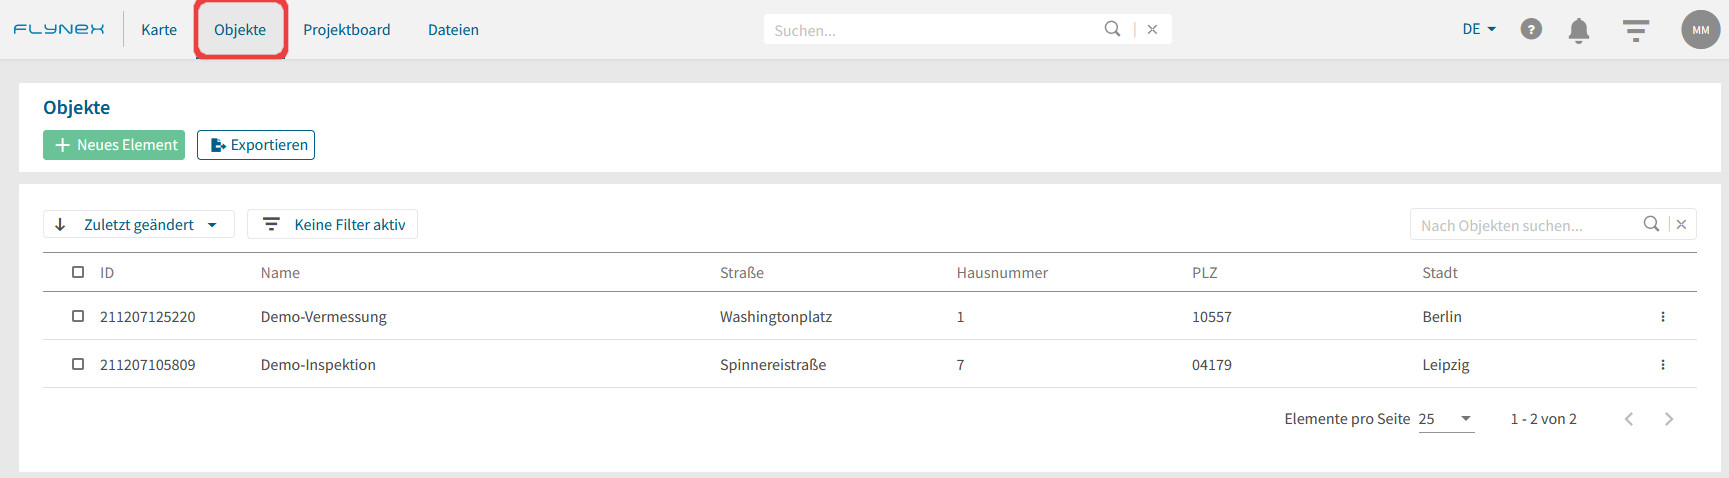
Hinweis: Bereits gelöschte Objekte können Sie in Ihrem Firmenkonto wiederherstellen.
Für das Anlegen von einem neuen Objekt finden Sie hier weitere Informationen.
Wo kann ich meine Objekte verwalten?
Nach dem Öffnen eines Objekts haben Sie die Möglichkeit Projekte, Ressourcen und Dateien für das jeweilige Objekt zu verwalten.
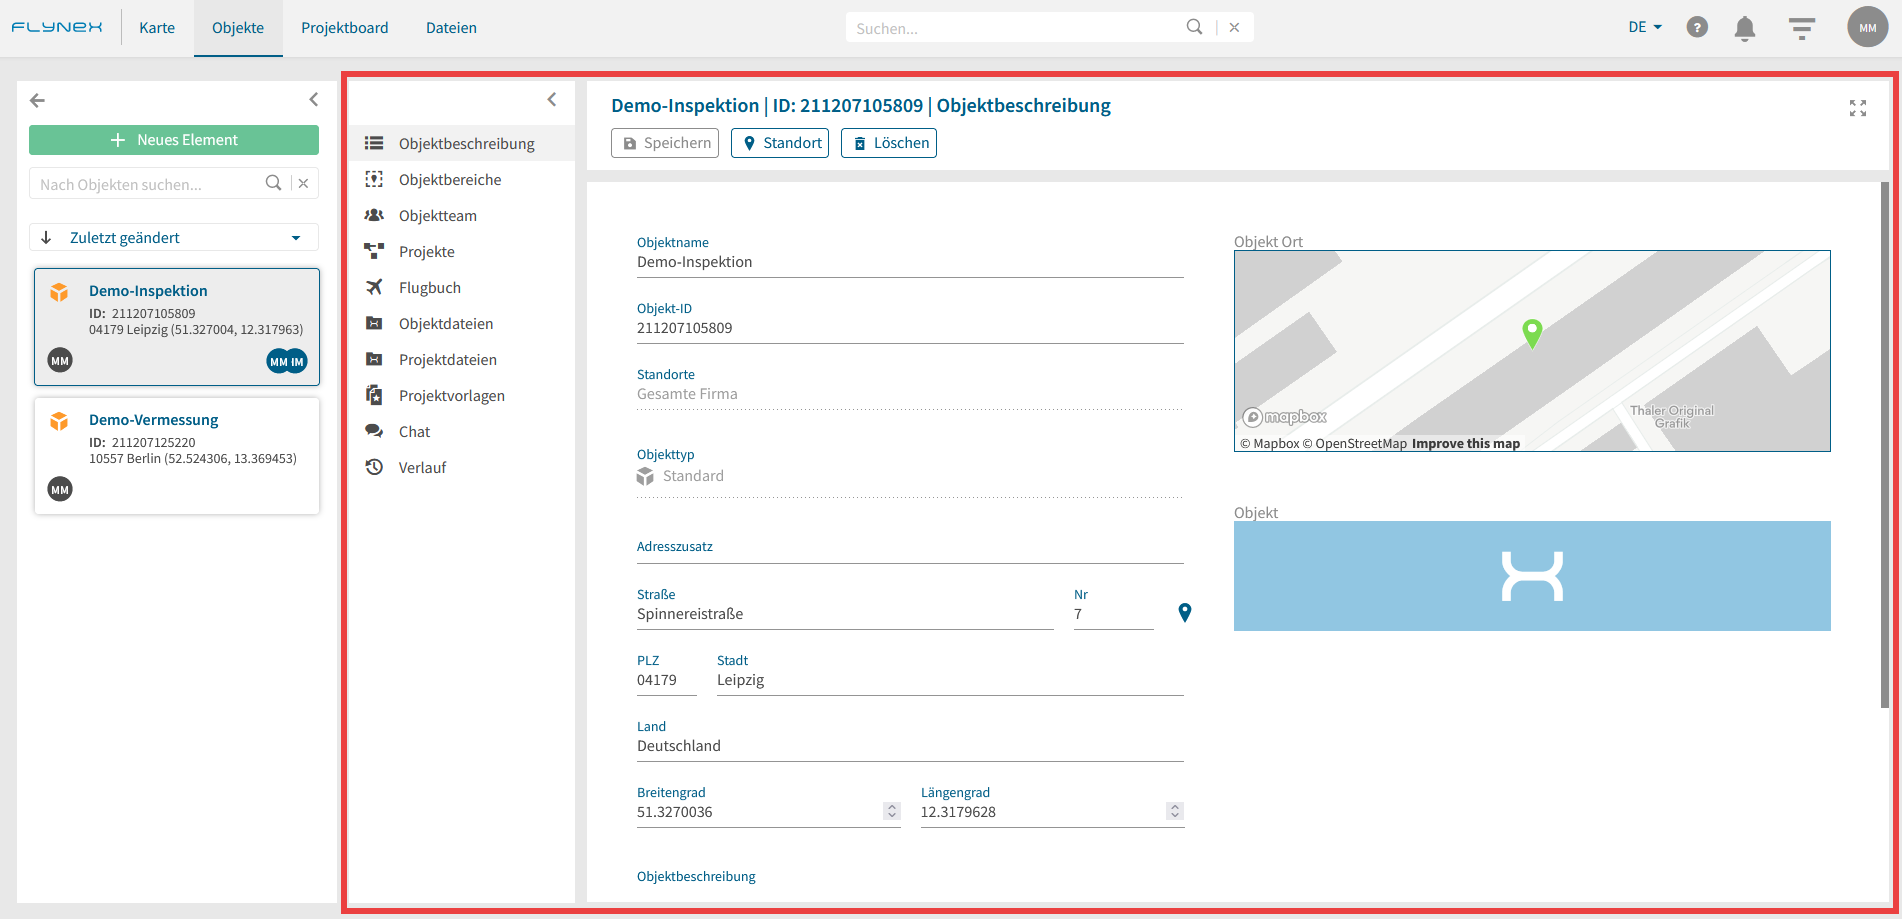
In einem Objekt sind Sie in der Lage verschiedene Projekte anzulegen. Öffnen Sie hierfür die Funktion Projekte im Objekt und klicken Sie auf Neues Element.
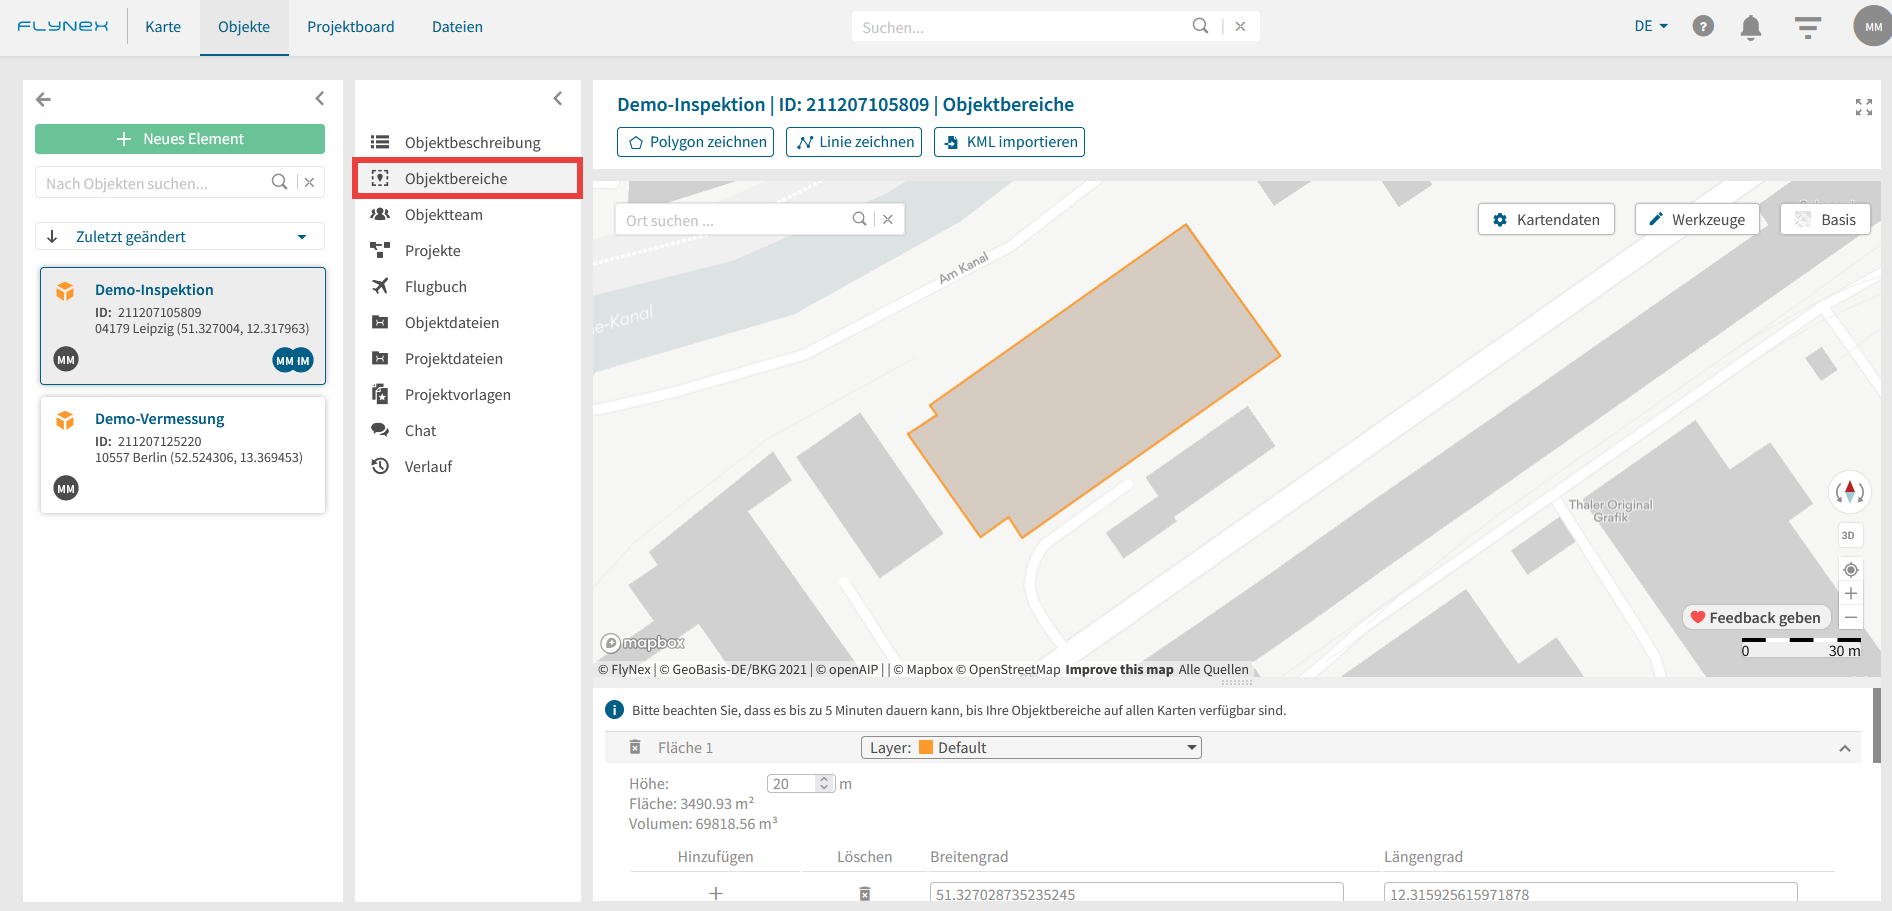
Was ist ein Objektbereich?
Mithilfe eines Objektbereiches sind Sie in der Lage ein Objekt punktgenau auf der Karte zu markieren. Ein hinterlegter Objektbereich kann die weitere Planung von Projekten am Objekt erleichtern.
Ein Orthofoto ist ein senkrecht zur Erdoberfläche aufgenommenes, perspektivisch entzerrtes und damit maßstabgenaues Luftbild. Es bietet vor allem Vorteile in Bezug auf Aktualität und Verfügbarkeit. Ein Hauptvorteil ist die Messbarkeit von Distanzen im Bild.
Das berechnete Orthofoto kann zur detaillierteren Bearbeitung in die Funktionen Flugplanung / Karte und Karten-Annotation eingebunden werden.
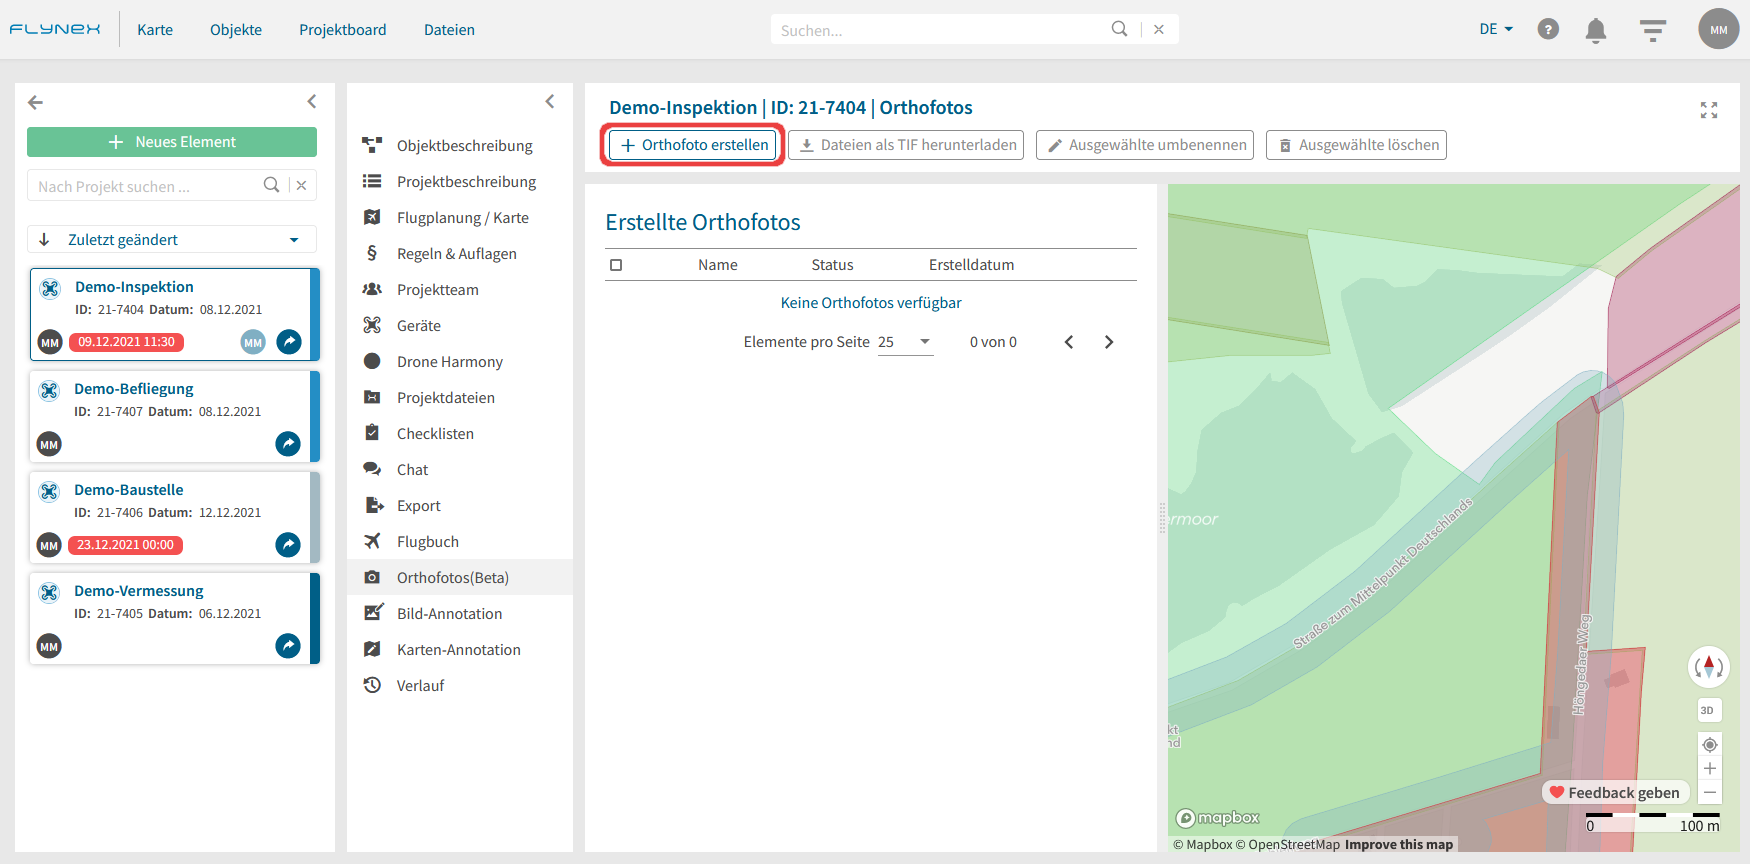
3) Laden Sie eine entsprechende Anzahl an Fotos hoch oder entnehmen Sie diese aus Ihren Projektdateien.
Hinweis: Die Qualität des Orthofotos hängt vor allem von folgenden Kriterien ab: Auflösung, Anzahl und Überlappungsgrad der Aufnahmen.

4) Sobald die Berechnung des Orthofotos abgeschlossen ist, erhalten Sie eine Benachrichtigung.
Ein Projekt beschreibt ein zeitlich begrenztes Vorhaben an einem Objekt. Eine Verknüpfung zwischen Projekt und Objekt ist für den Ortsbezug immer notwendig. Im Projekt sind vielfältige Planungs-, Management- und Analyse-Funktionen verfügbar.
Wo finde ich meine Projekte?
Sie finden all Ihre Projekte im Hauptmenü unter Projektboard. Alternativ ist es möglich über das jeweilige Objekt auf dazugehörige Projekte zuzugreifen oder das Projekt ortsbezogen über die Karte zu erreichen.
Für das Anlegen von einem neuen Projekt, finden Sie hier weitere Informationen.
Wie kann ich meine angelegten Projekte verwalten?
Nachdem Sie ein Projekt ausgewählt und geöffnet haben, sind Sie in der Lage auf verschiedene Planungs-, Management- und Analysefunktionen für Ihr Projekt zuzugreifen.
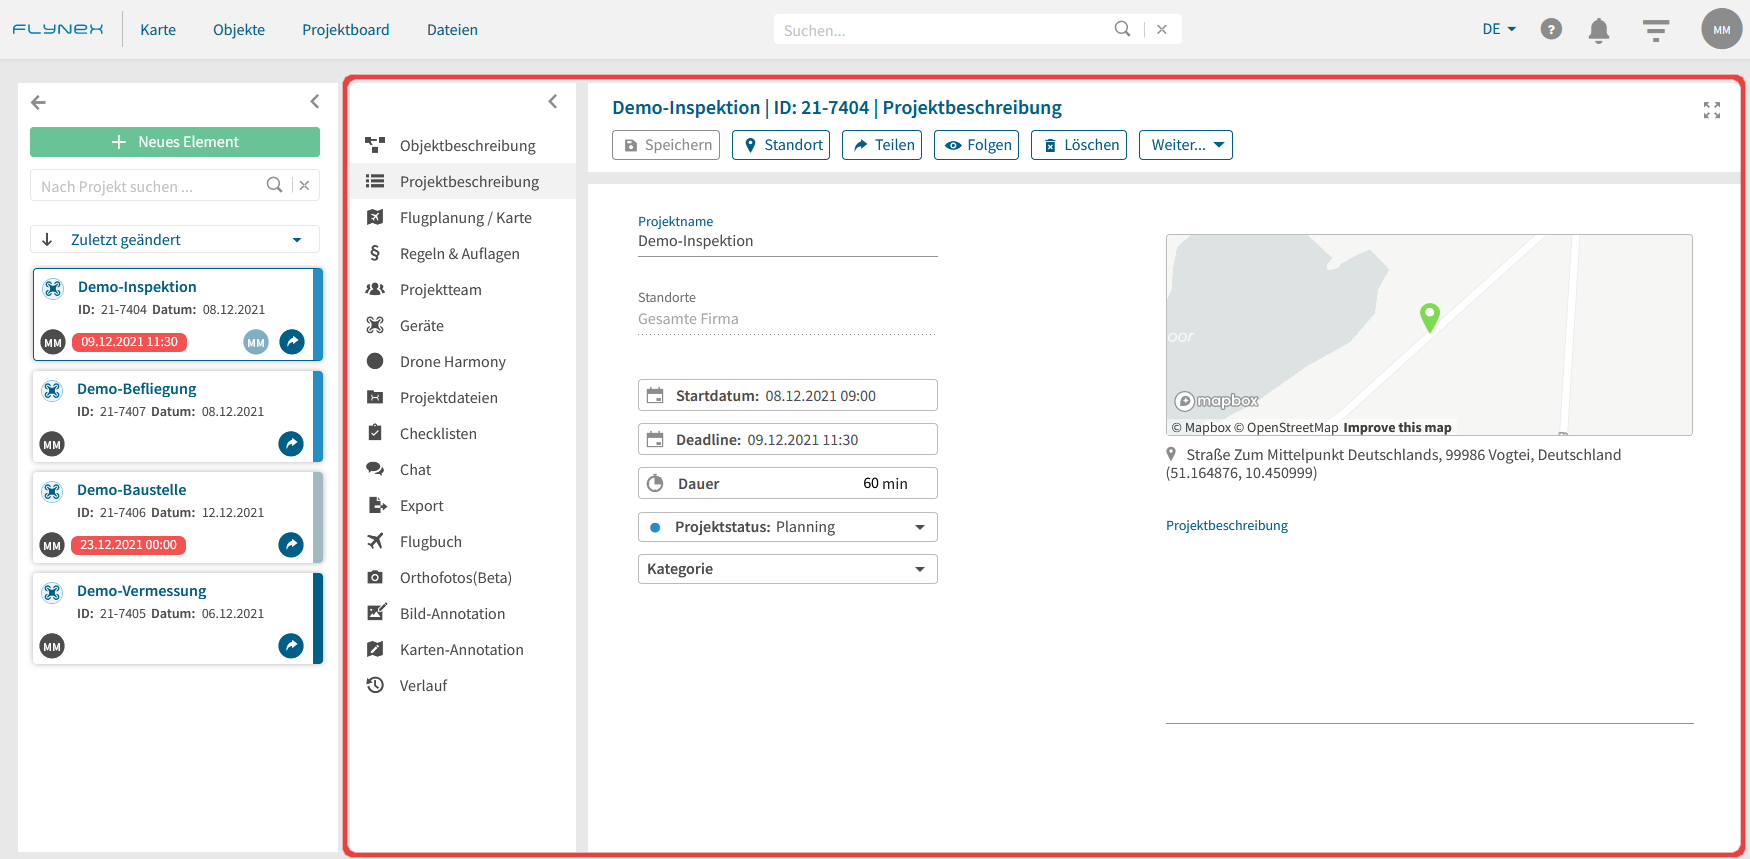
In der Vollversion stehen Ihnen folgende Funktionen zur Verfügung:
- Flugplanung / Karte
- Regeln & Auflagen
- Projektteam
- Geräte
- Projektdateien
- Checklisten
- Chat
- Export
- Flugbuch
- Orthofotos
- Livestreams
- Bild-Annotation
- Karten-Annotationen
- Verlauf
Sie sind jederzeit in der Lage einzelne Funktionen als Paket unter Lizenz hinzuzubuchen.
Auf der Karte haben Sie die Möglichkeit verschiedene Kartendaten als Kartenlayer einzubinden. Jeder Kartenlayer besitzt eine bestimmte Farbe und zeigt Ihnen, welche Eigenschaft ein bestimmter Ort für Drohnenflüge besitzt. Basierend auf den Auflagen, die sich in Ihrem Bereich befinden, müssen geltende Gesetze und Vorschriften eingehalten werden.
Zum Aktivieren/Deaktivieren eines Kartenlayers nutzen Sie das Tool Kartendaten auf Ihrer Karte.
Sie haben die Auswahl zwischen einer objektbasierten und einer auflagenbasierten Karte. Hier im Beitrag sind die Farben nach der objektbasierten Karte dargestellt. Weiterhin besteht die Legende aus fünf Oberkategorien:
1. Lufträume
2. Verkehr
3. Siedlung und Sicherheit
4. Energie
5. Umwelt.
Hinweis: Auch bei deaktivierten Kartenlayern werden Ihnen unverändert die Informationen im Hintergrund hinterlegt. Das heißt bei Rechtsklick in die Karte oder späterer Routenvalidierung werden alle Auflagen angezeigt (auch von deaktivierten Kartenlayern).

Zum Aktivieren/Deaktivieren eines Kartenlayers setzen Sie einfach einen Haken oder entfernen Sie diesen.
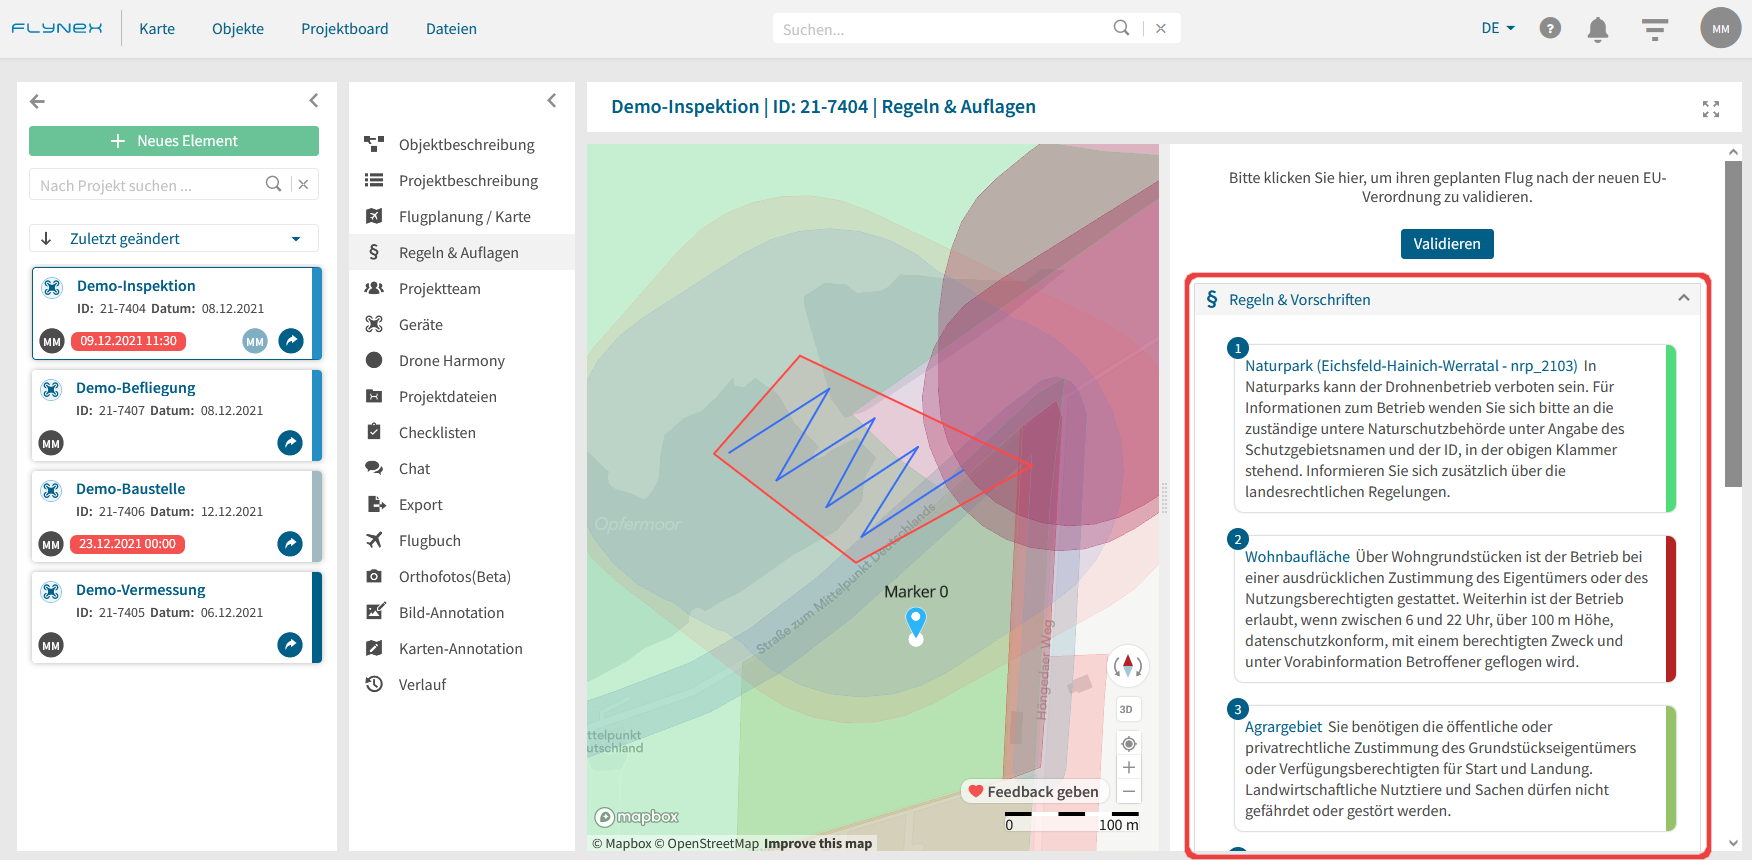
Mit Rechtsklick in der Karte am gewünschten Ort werden Ihnen die Regeln, Vorschriften und Behörden aufgeschlüsselt an der rechten Kartenseite angezeigt.
Wenn Sie mit der Maus über die Vorschriften gleiten, wird Ihnen angezeigt, für welche Fläche in der Karte die Vorschrift genau gilt, indem sie farblich hervorgehoben wird.
Mithilfe von Berechtigungen können Sie festlegen, welche Zugriffsrechte ausgewählte Objekt- oder Projektmitglieder auf das jeweilige Element (Objekt oder Projekt) haben.
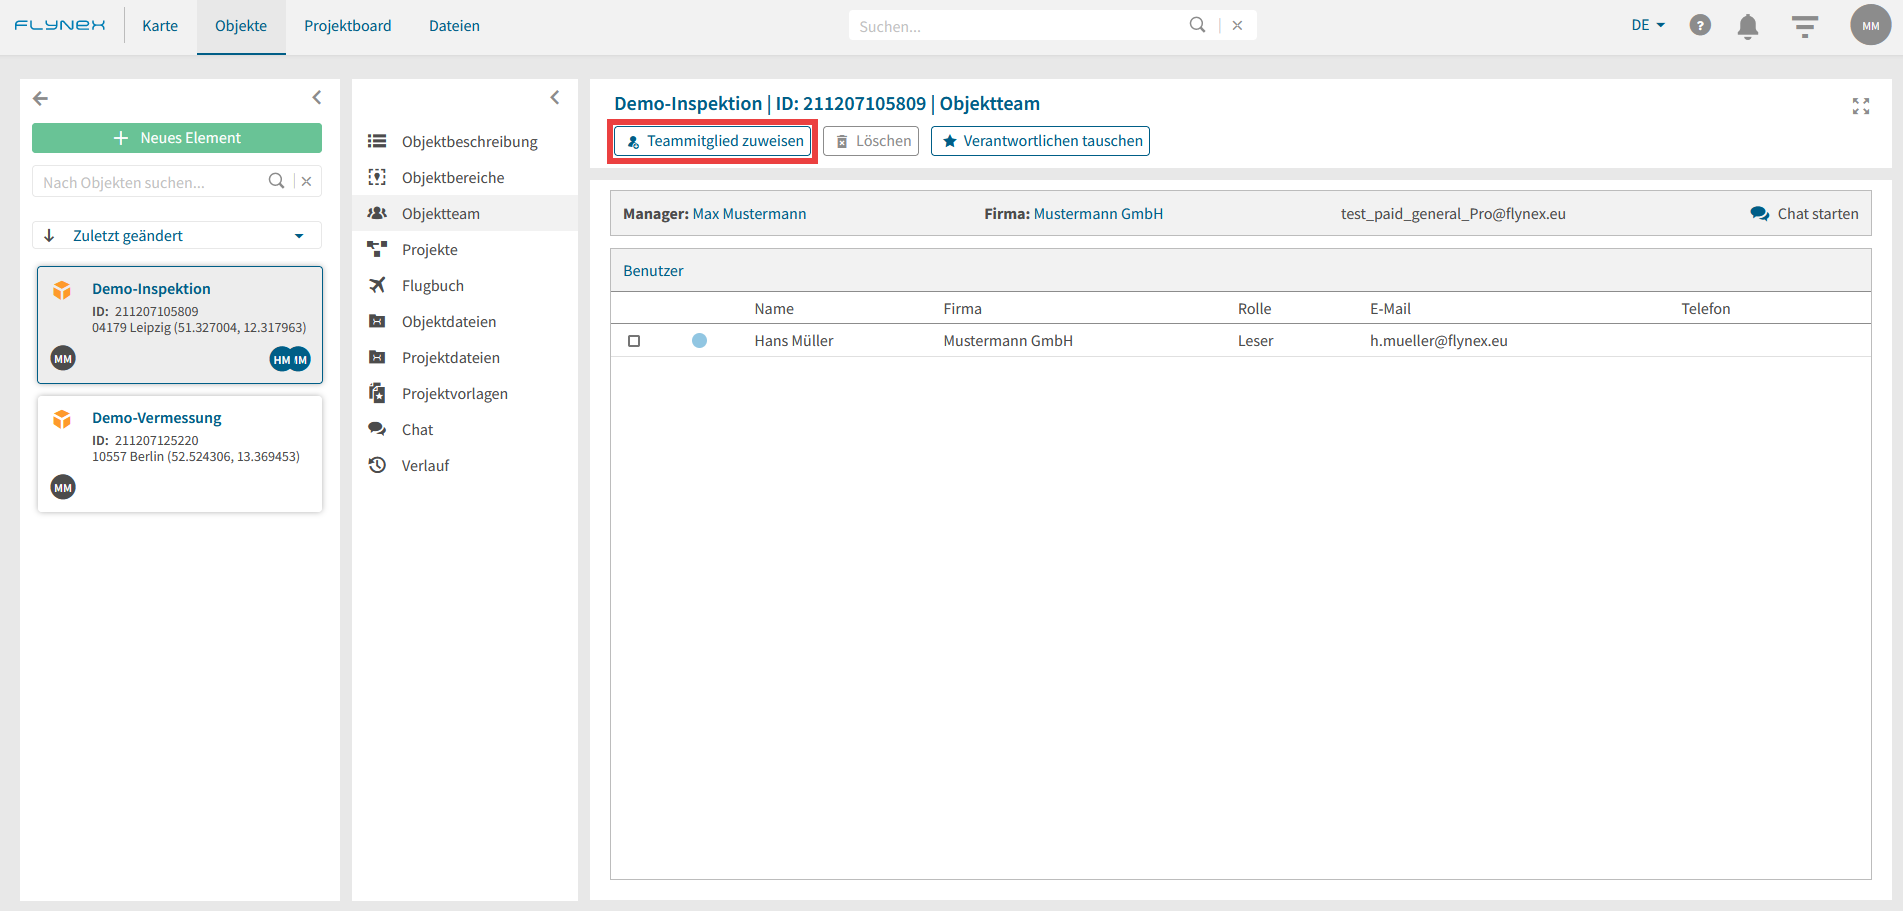
Berechtigungen von Teammitgliedern in Objekten:
Zur Vergabe von Berechtigungen an Teammitglieder in Objekten befolgen Sie diese Schritte:
2) Öffnen Sie die Funktion Objektteam.
3) Klicken Sie nun auf Teammitglied zuweisen.
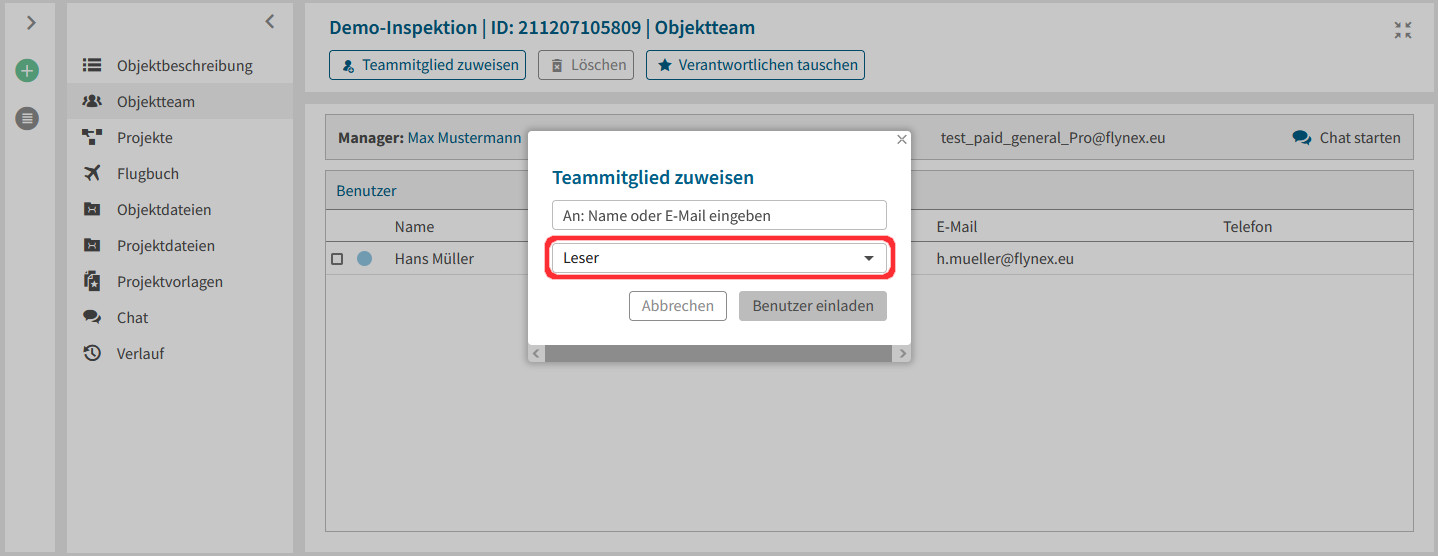
Leser: Können alle Inhalte des Objekts sowie alle dazugehörigen Projekte sehen, aber nicht bearbeiten.
Mitarbeiter: Können alle Inhalte des Objekts sowie alle dazugehörigen Projekte sehen und bearbeiten.
Objektverantwortlicher (Manager): Der Objektverantwortliche hat dieselben Rechte wie ein Mitarbeiter. Zusätzlich darf er das Objekt löschen und Rollen im Objekt vergeben oder ändern.
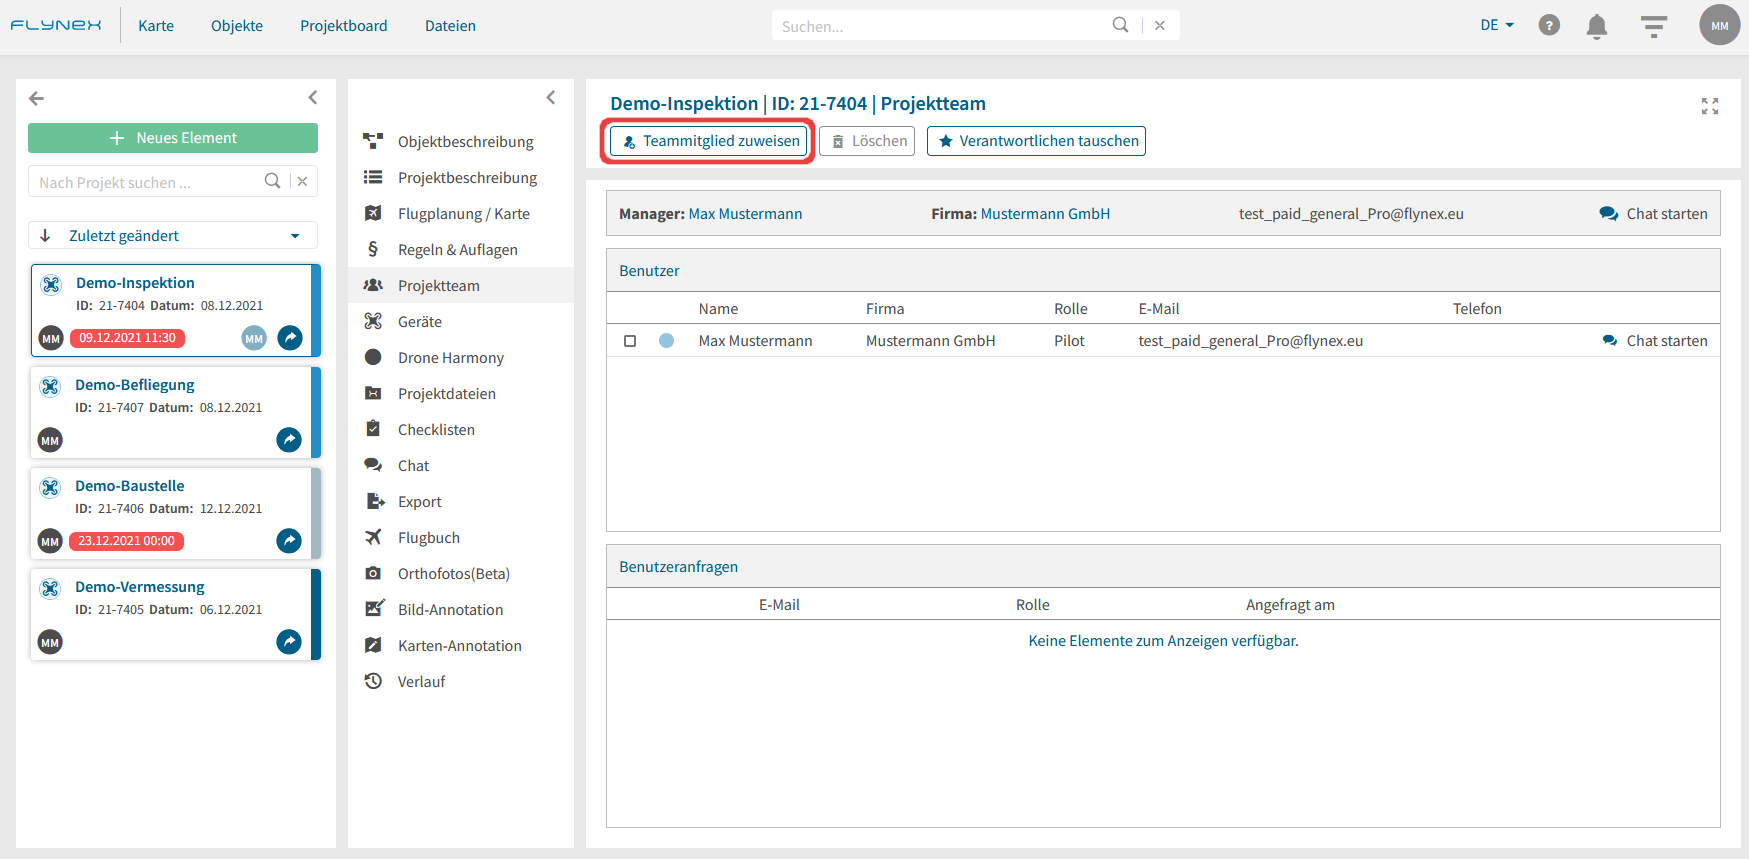
Berechtigungen von Teammitgliedern in Projekten:
Zur Vergabe von Berechtigungen an Teammitglieder in Projekten befolgen Sie folgende Schritte:
2) Öffnen die Funktion Projektteam.
3) Klicken Sie nun auf Teammitglied zuweisen.
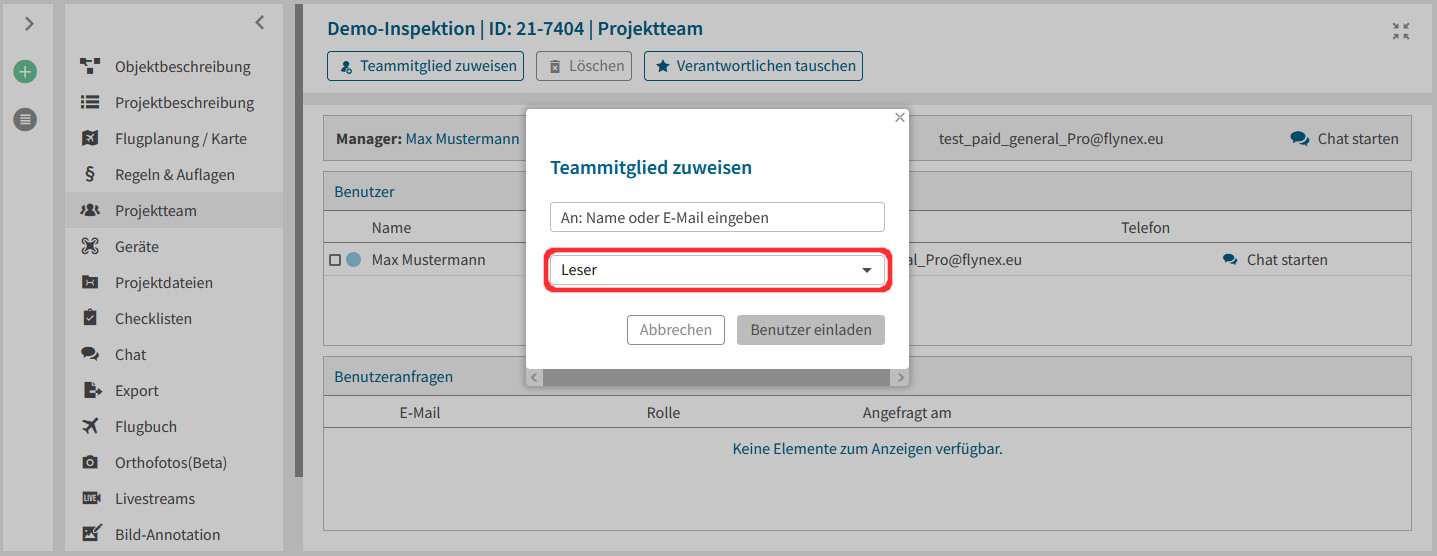
Leser: Können alle Inhalte des Projekts sehen, aber nicht bearbeiten.
Mitarbeiter: Können alle Inhalte des Projekts sehen und bearbeiten.
Piloten: Können alle Inhalte des Projekts sehen und bearbeiten. Ein Pilot im Projekt ist zudem Voraussetzung für die Validierungsfunktion unter Regeln & Auflagen.
Projektverantwortlicher (Manager): Der Projekt-Verantwortliche hat dieselben Rechte wie ein Mitarbeiter. Zusätzlich darf er das Projekt löschen und Rollen im Projekt vergeben oder ändern.
Koordinateneingabe
Zur Eingabe von Koordinaten im Suchfeld der Karte, geben Sie diese im Dezimalgrad-Format (DG) ein.
X Grad, Minuten und Sekunden (GMS): 51°19’37.2″N 12°19’05.3″E
✔ Dezimalgrad (DG): 51.327002, 12.318130
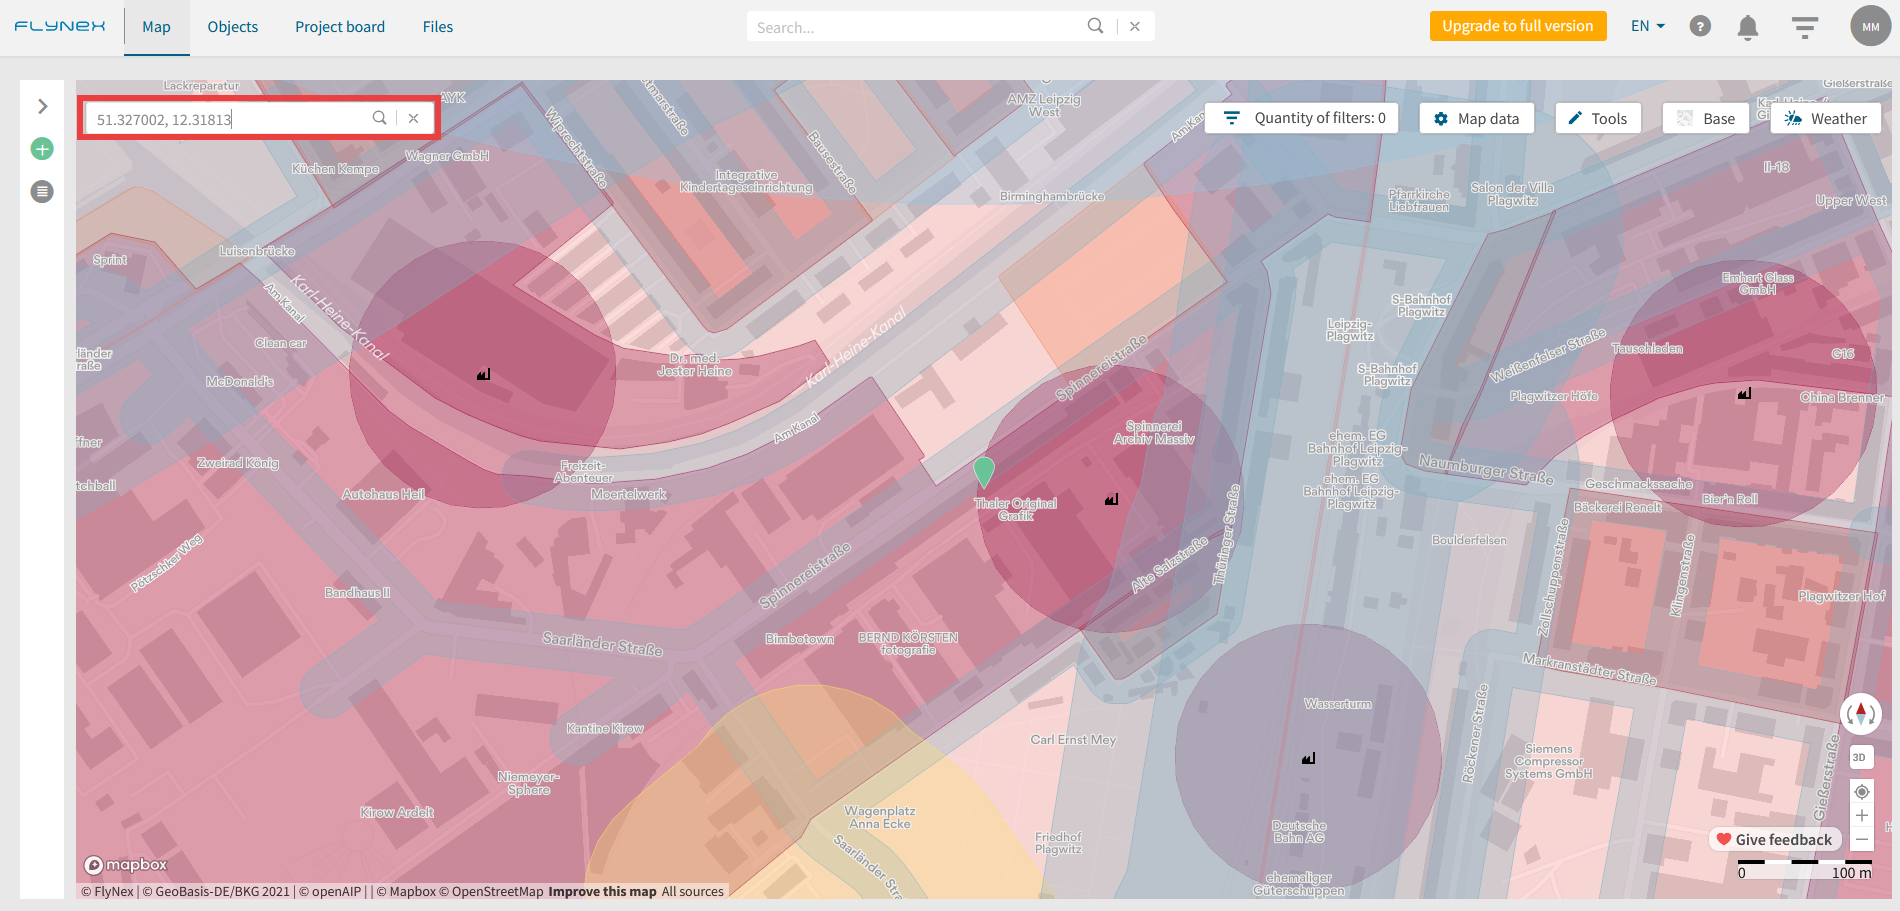
Hinweis: Nutzen Sie bei größeren Datenmengen die Upload-Funktion für KML-Dateien.
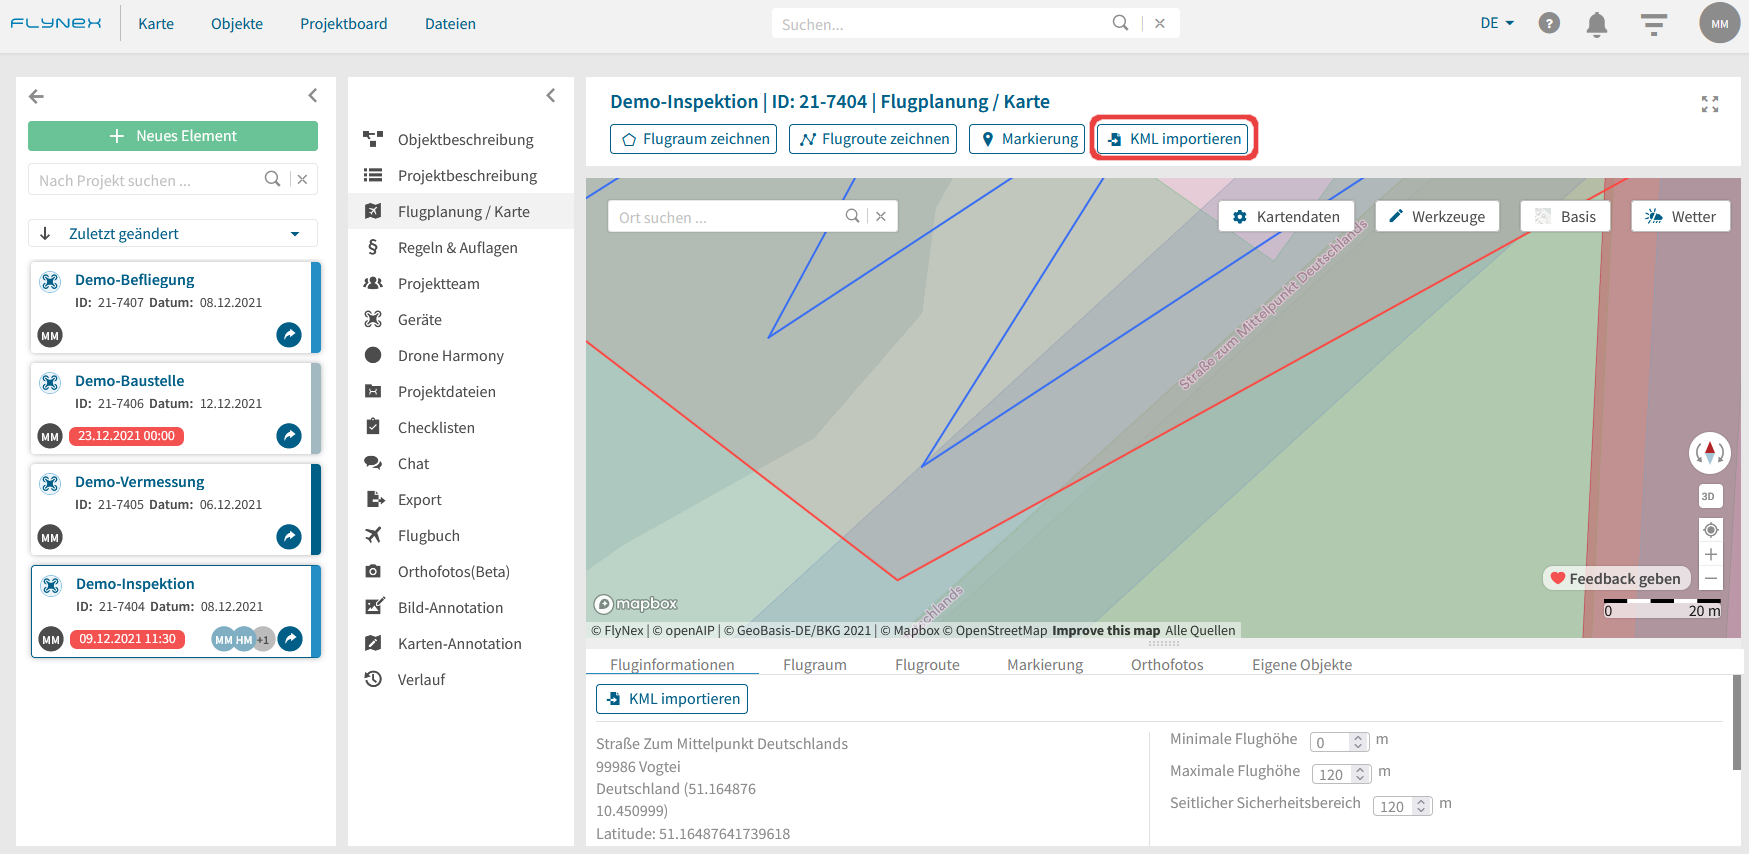
Die Keyhole Markup Language (KML) ist ein auf XML basierendes Format zum Speichern geographischer Daten und zugehörigem Inhalt. Dieses Format eignet sich vor allem zum Import mehrerer Objekte in Ihre FlyNex Plattform.
Wie importiere ich eine Datei im KML-Format?
1) Öffnen Sie ein Projekt.
2) Öffnen Sie die Funktion Flugplanung / Karte im Projekt.
3) Klicken Sie auf KML importieren und laden Sie die gewünschte KML-Datei hoch. (Flächen werden als Flugräume, Linien als Flugrouten und Punkte als Markierungen interpretiert.)
Wo finde ich die Funktion Team?
1) Wechseln Sie zu Ihrem Firmenaccount, durch Anklicken Ihres Profilbilds im Hauptmenü auf der rechten Seite. (Hinweis: Hierfür sind Administratorrechte nötig.)
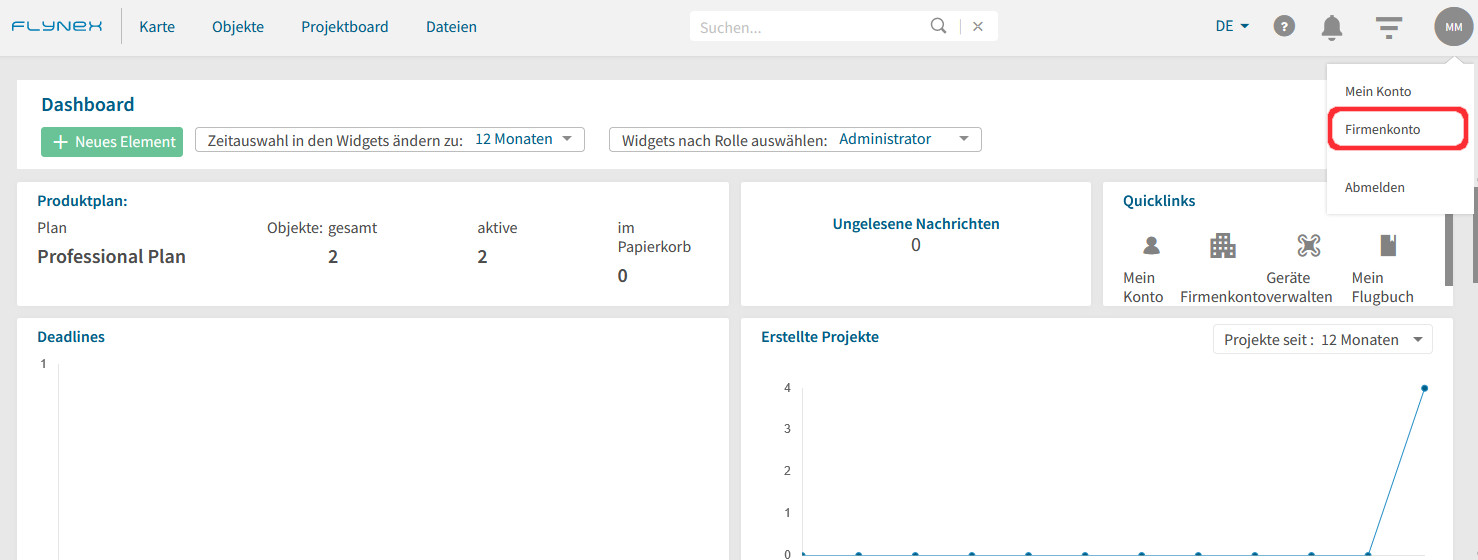
2) Öffnen Sie die Funktion Team.
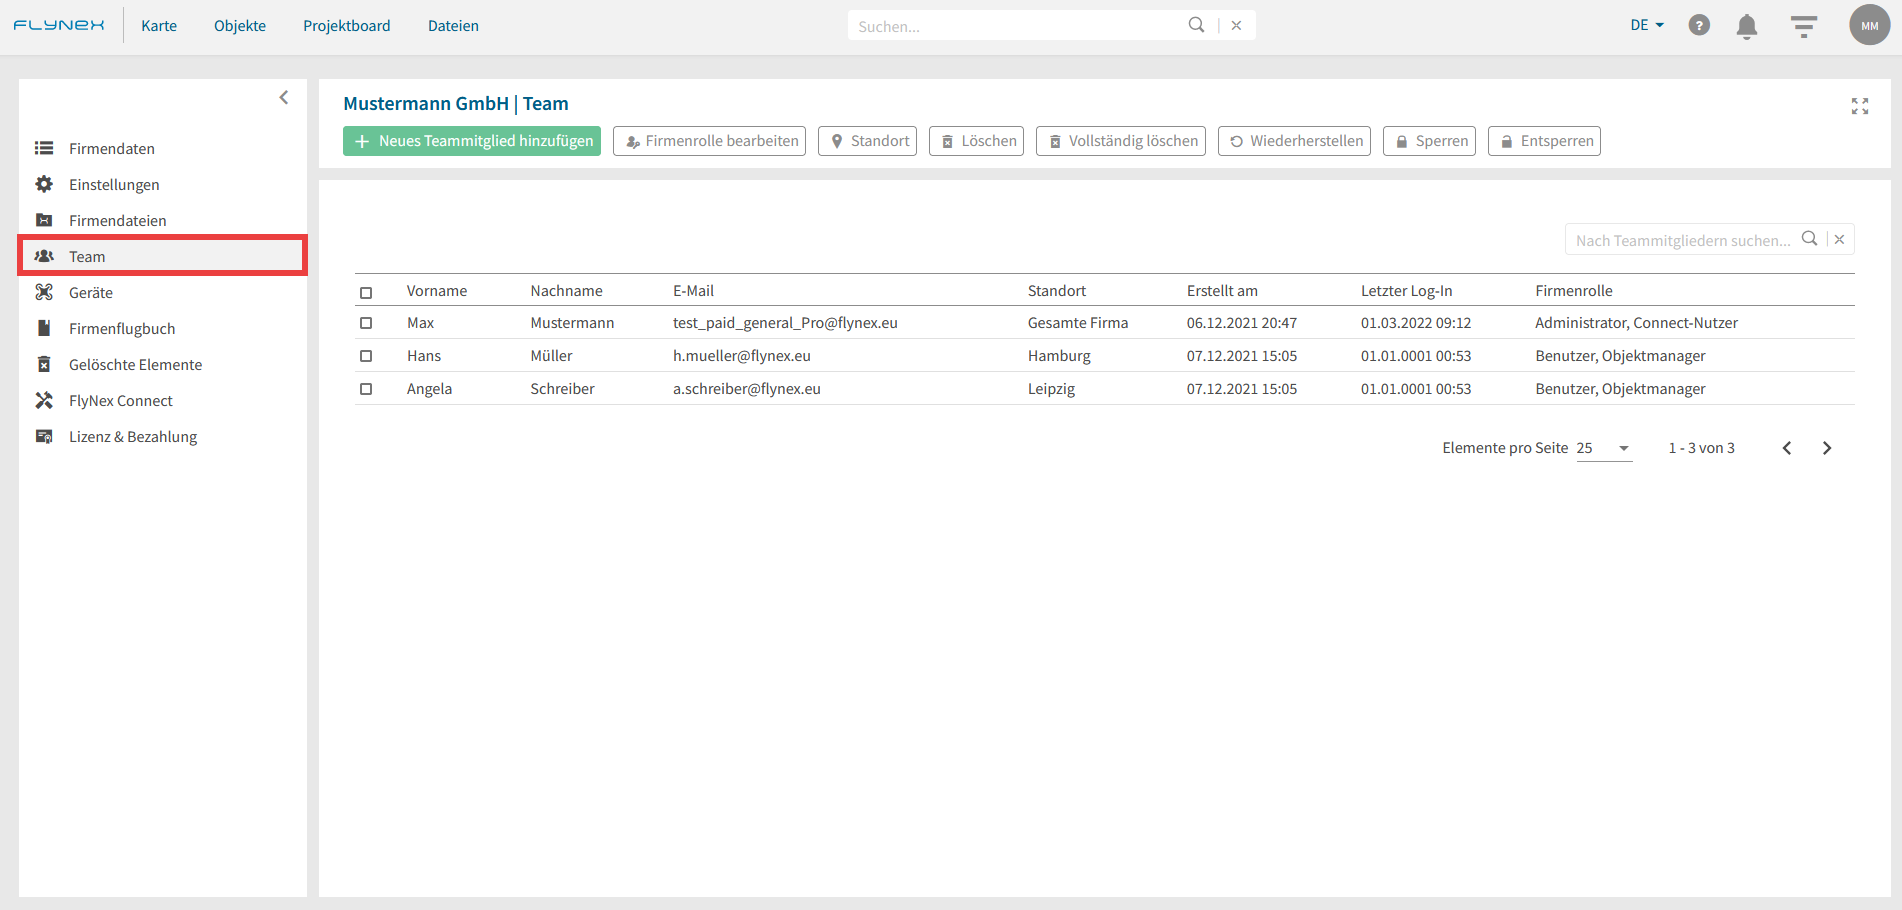
Wie kann ich Teammitglieder anlegen?
1) Klicken Sie auf Neues Teammitglied hinzufügen.
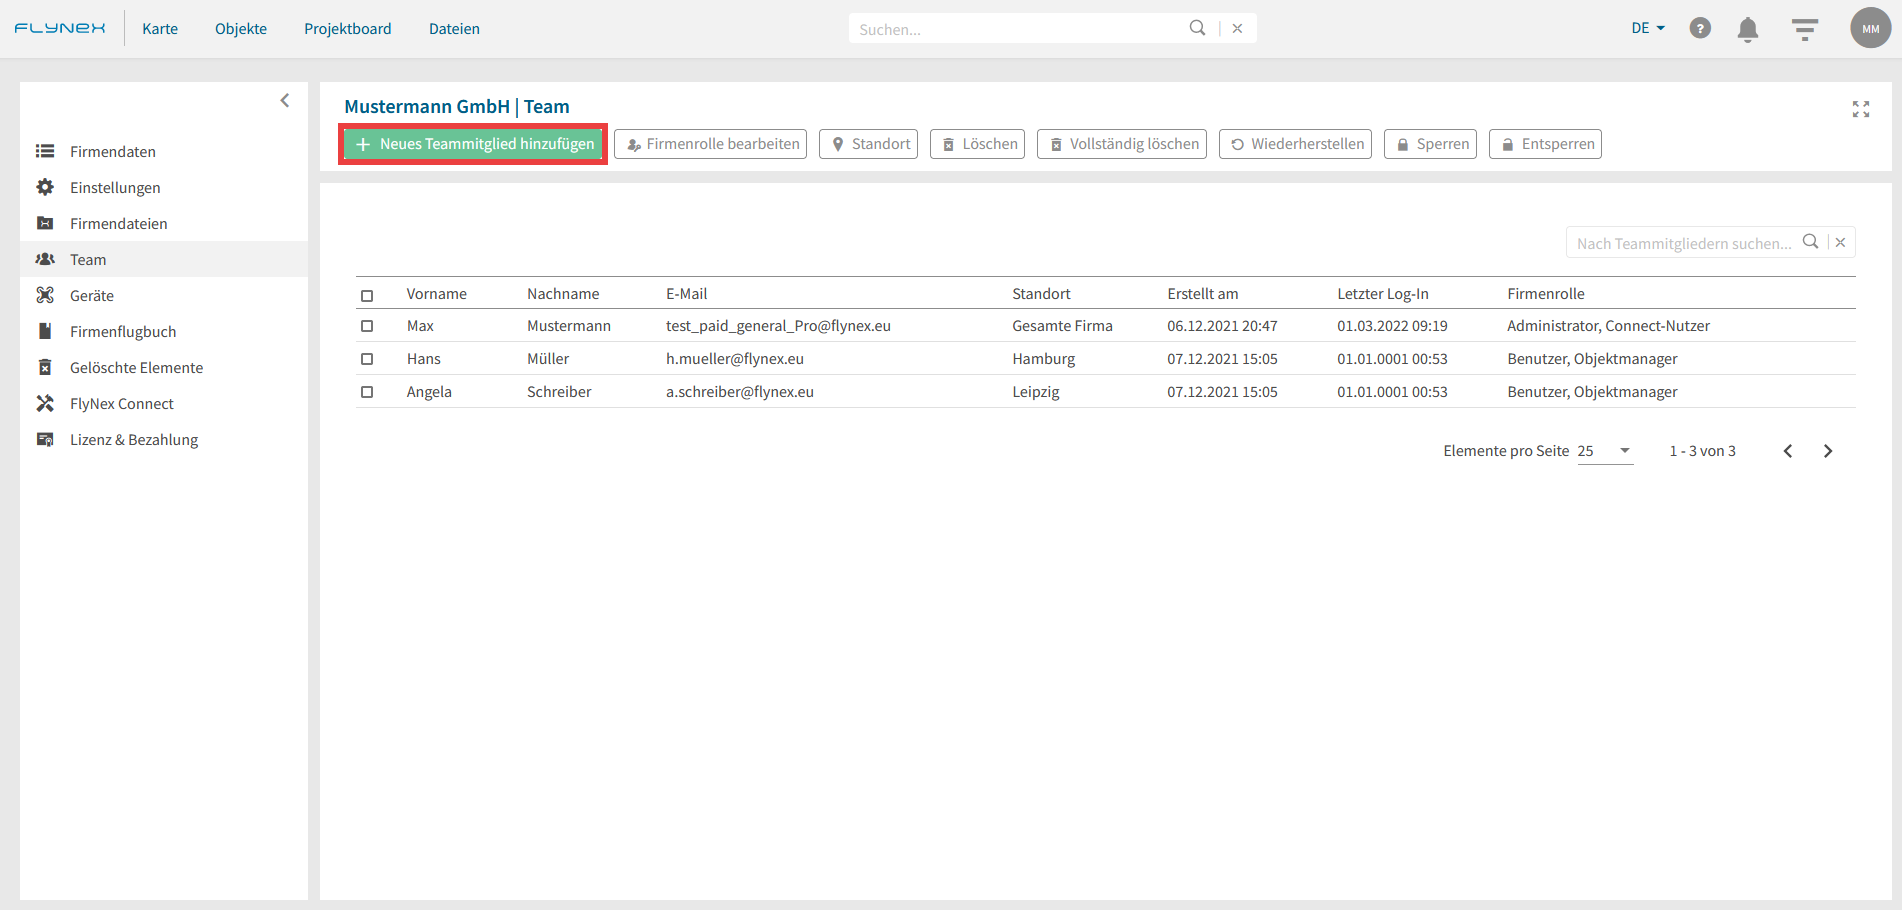
2) Hinterlegen Sie alle Daten für das neue Teammitglied und teilen Sie ihm alle nötigen Firmenrollen zu.
3) Bestätigen Sie mit Speichern.
Hinweis: Sollte das neue Teammitglied bereits unter der angegebenen E-Mail ein Konto bei FlyNex besitzen, können Sie es nicht über diesen Weg hinzufügen. Sie können diesen Nutzer direkt über Teammitglied zuweisen in Ihren Objekten oder Projekten zuteilen.
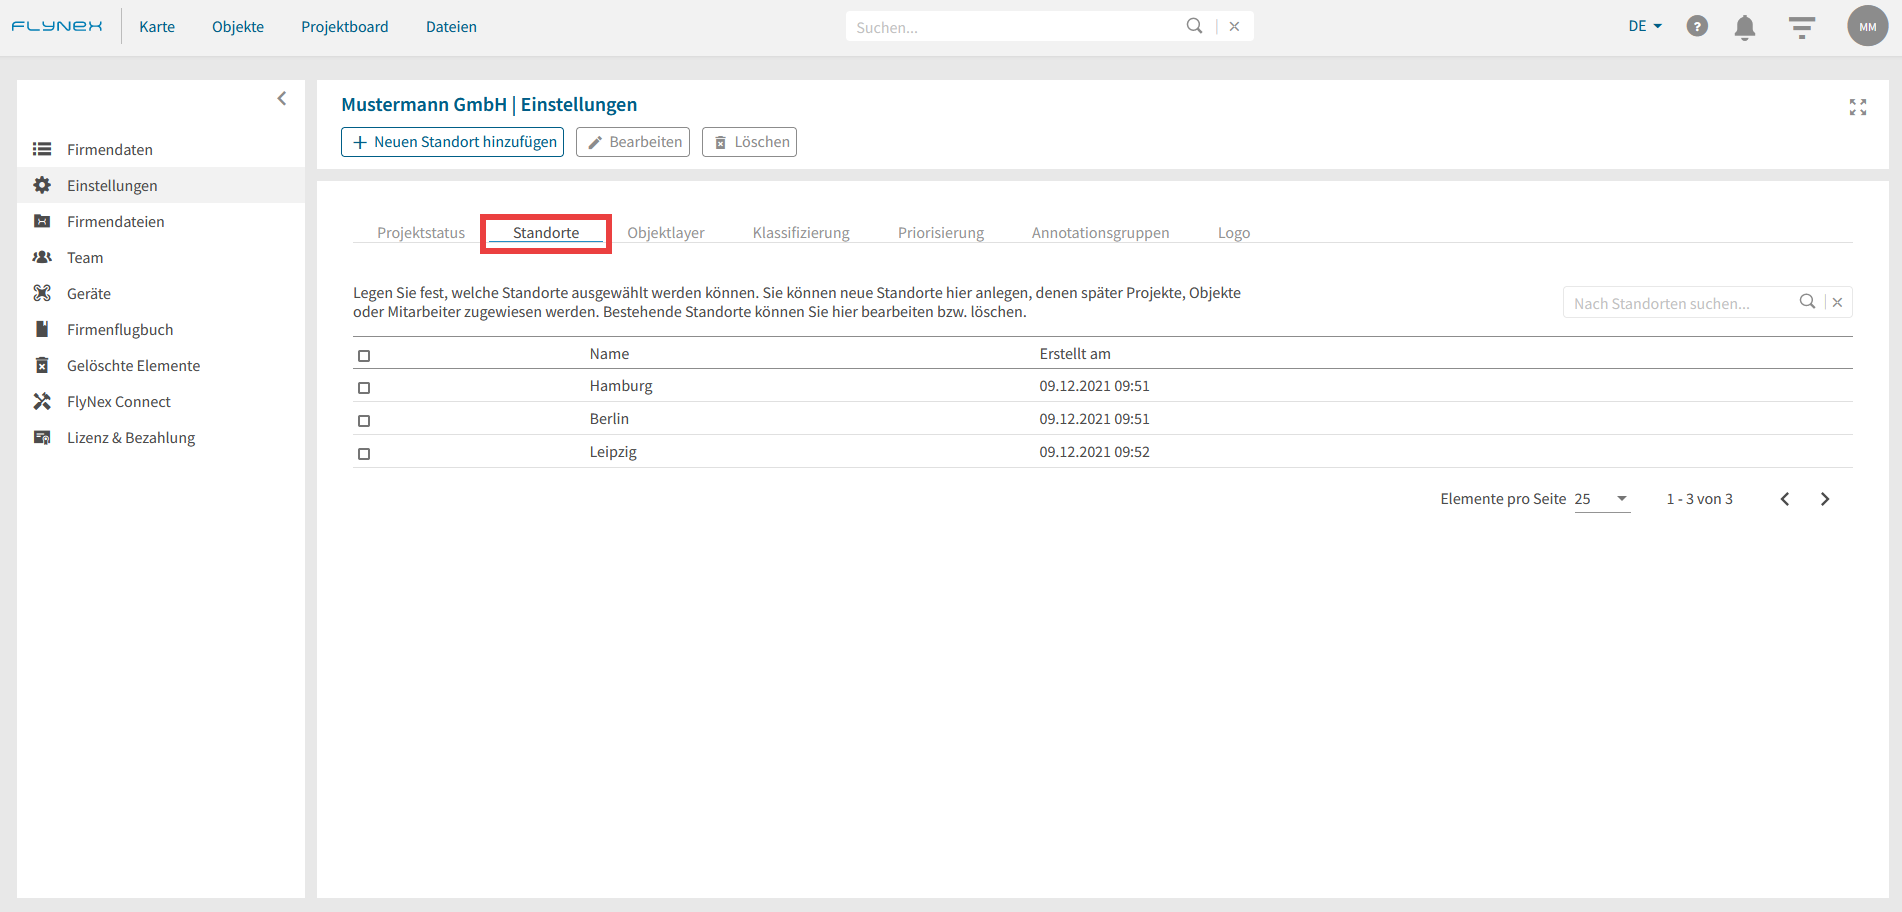
Wie kann ich für ein Teammitglied den Standort wechseln?
1) Öffnen Sie im Firmenkonto die Funktion Einstellungen.
2) Fügen Sie die gewünschten Standorte unter dem Reiter Standorte hinzu.
3) Öffnen Sie im Firmenkonto die Funktion Team.
4) Setzen Sie einen Haken beim gewünschten Teammitglied und klicken Sie auf Standort.
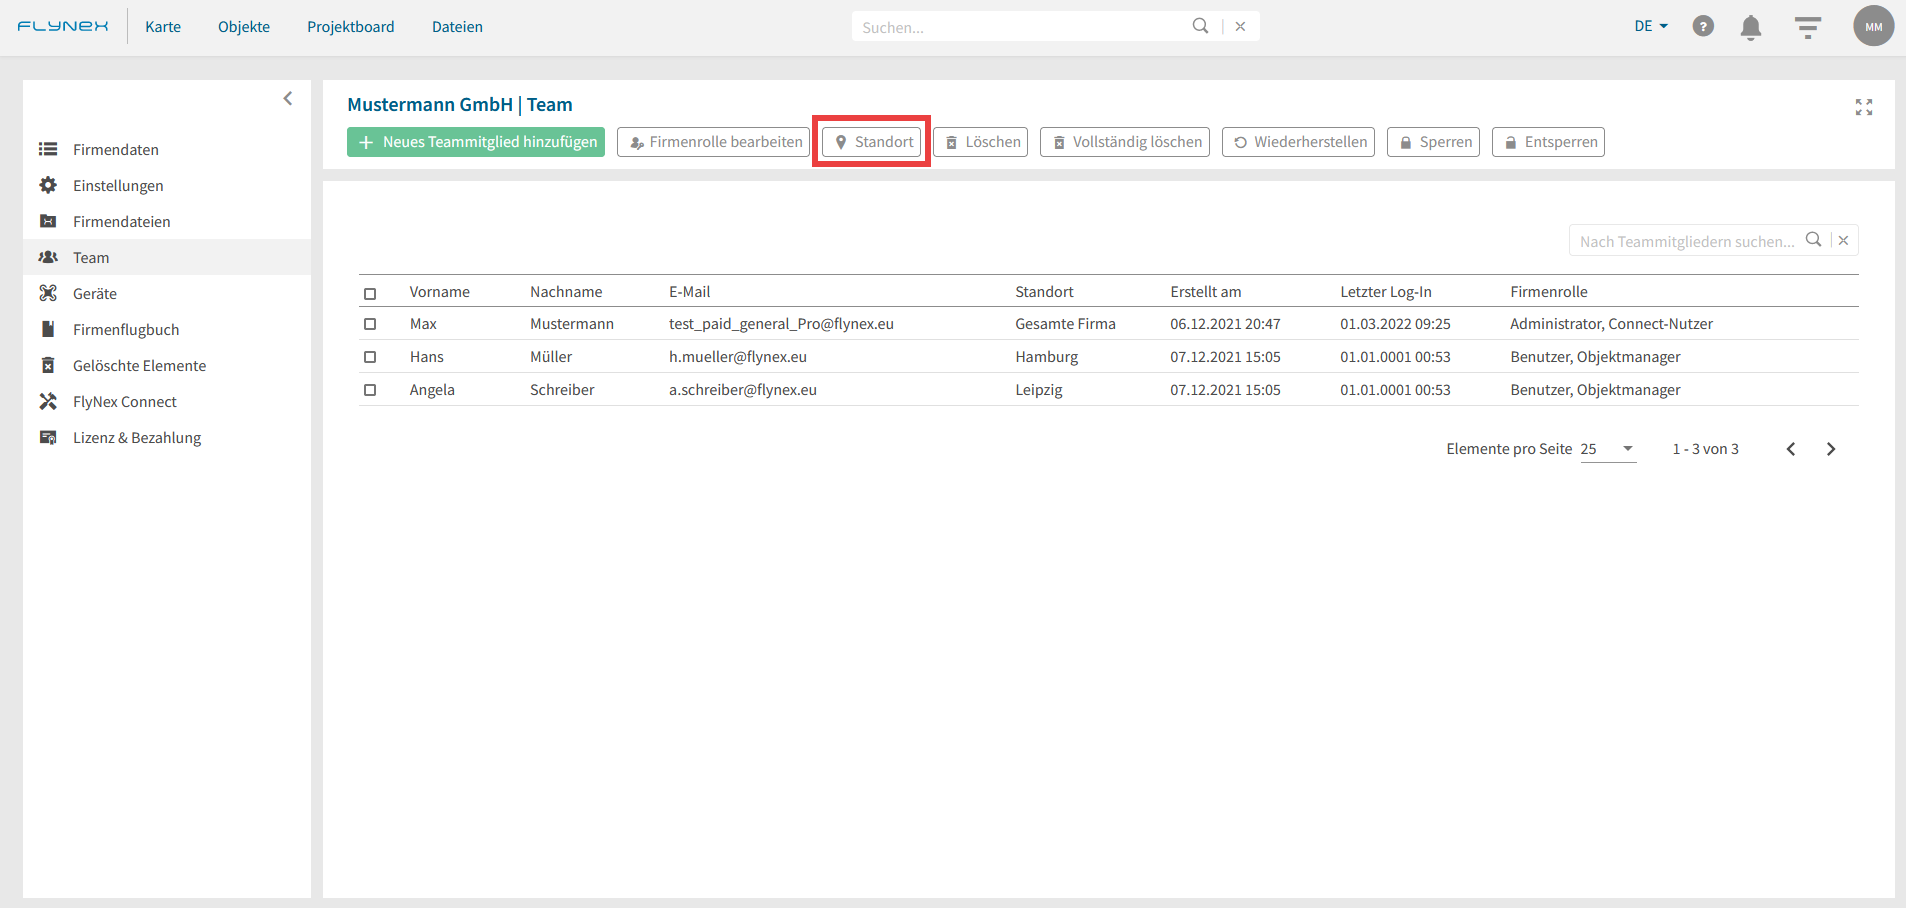
5) Passen Sie den Standort an und bestätigen Sie mit Speichern.
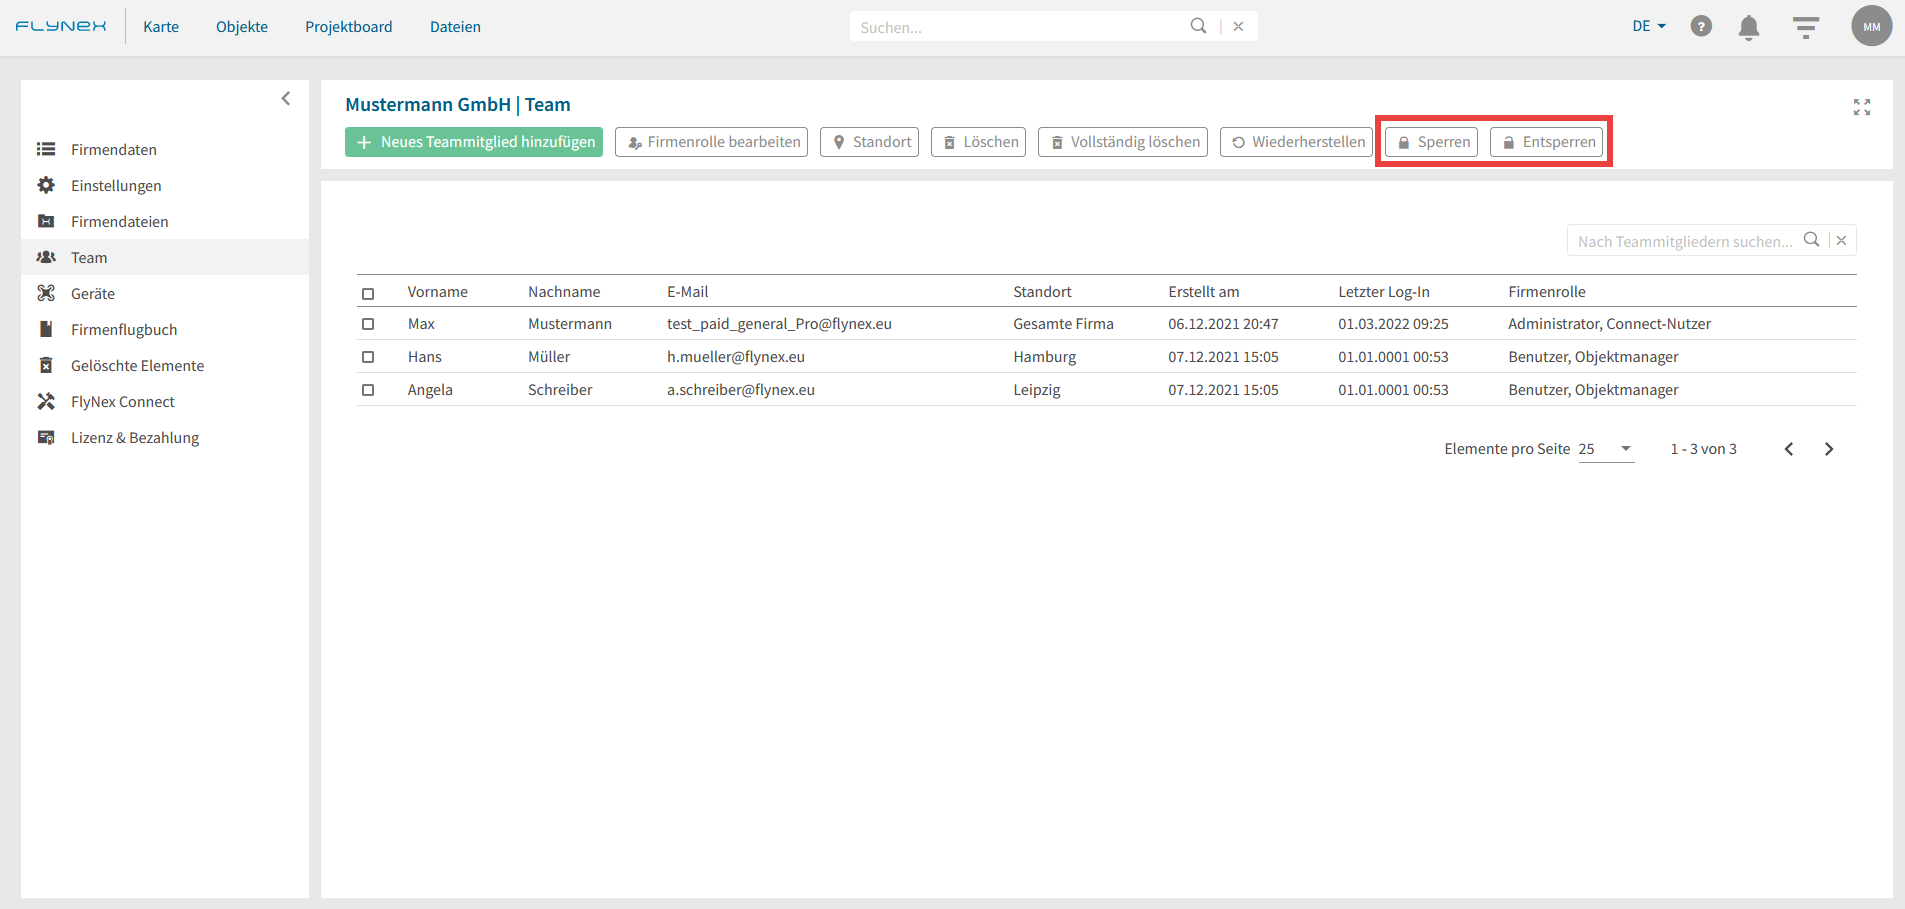
Wie kann ich Teammitglieder sperren und entsperren?
Nutzen Sie die Funktion zum Sperren/ Entsperren von Teammitglieder, um ausgewählten Teammitgliedern den Zugang zu den Elementen Ihrer Firma zu verwehren/ freizugeben.
1) Öffnen Sie im Firmenkonto die Funktion Team.
2) Wählen Sie ein Teammitglieder über die Checkbox aus.
3) Klicken Sie auf Sperren/ Entsperren.
Die Checkliste dient als Dokumentation wichtiger Aufgaben vor und während der Projektdurchführung. Checklisten können im Projekt hinterlegt und vor Ort über die FlyNex Connect App abgerufen werden. Der Stand vor Ort wird im Anschluss mit Ihrem FlyNex-Konto synchronisiert.
Zur Einbindung individueller Checklisten in Ihren Account wenden Sie sich gerne an unseren Kundenservice per E-Mail unter support@flynex.de.
Das Anlegen von Objekten auf Ihrer Plattform ist an verschiedenen Stellen möglich.
Nutzen Sie den Button Neues Element. Dieser Button ist auf dem Dashboard, unter Objekte oder Projektboard zu finden.
Es ist ebenfalls möglich zuerst den gewünschten Objektort auf der Karte zu lokalisieren und anschließend über den grünen Button mit dem Plus-Symbol ein Objekt anzulegen. Dabei wird der eingegebene Ort direkt übernommen.


Wie kann ich ein Objektbereich markieren und hinterlegen?
1) Legen Sie zunächst ein neues Objekt an oder öffnen Sie ein existierendes Objekt.
2) Klicken Sie auf Objektbereiche.
3) Wählen Sie das Werkzeug Polygon zeichnen und markieren Sie Ihr Objekt punktgenau auf der Karte. (Hinweis: Weitere Typen von Objektlayer können Sie in Ihrem Firmenkonto unter Einstellungen anlegen.)
4) Hinterlegen Sie die Höhe Ihres Objektes.
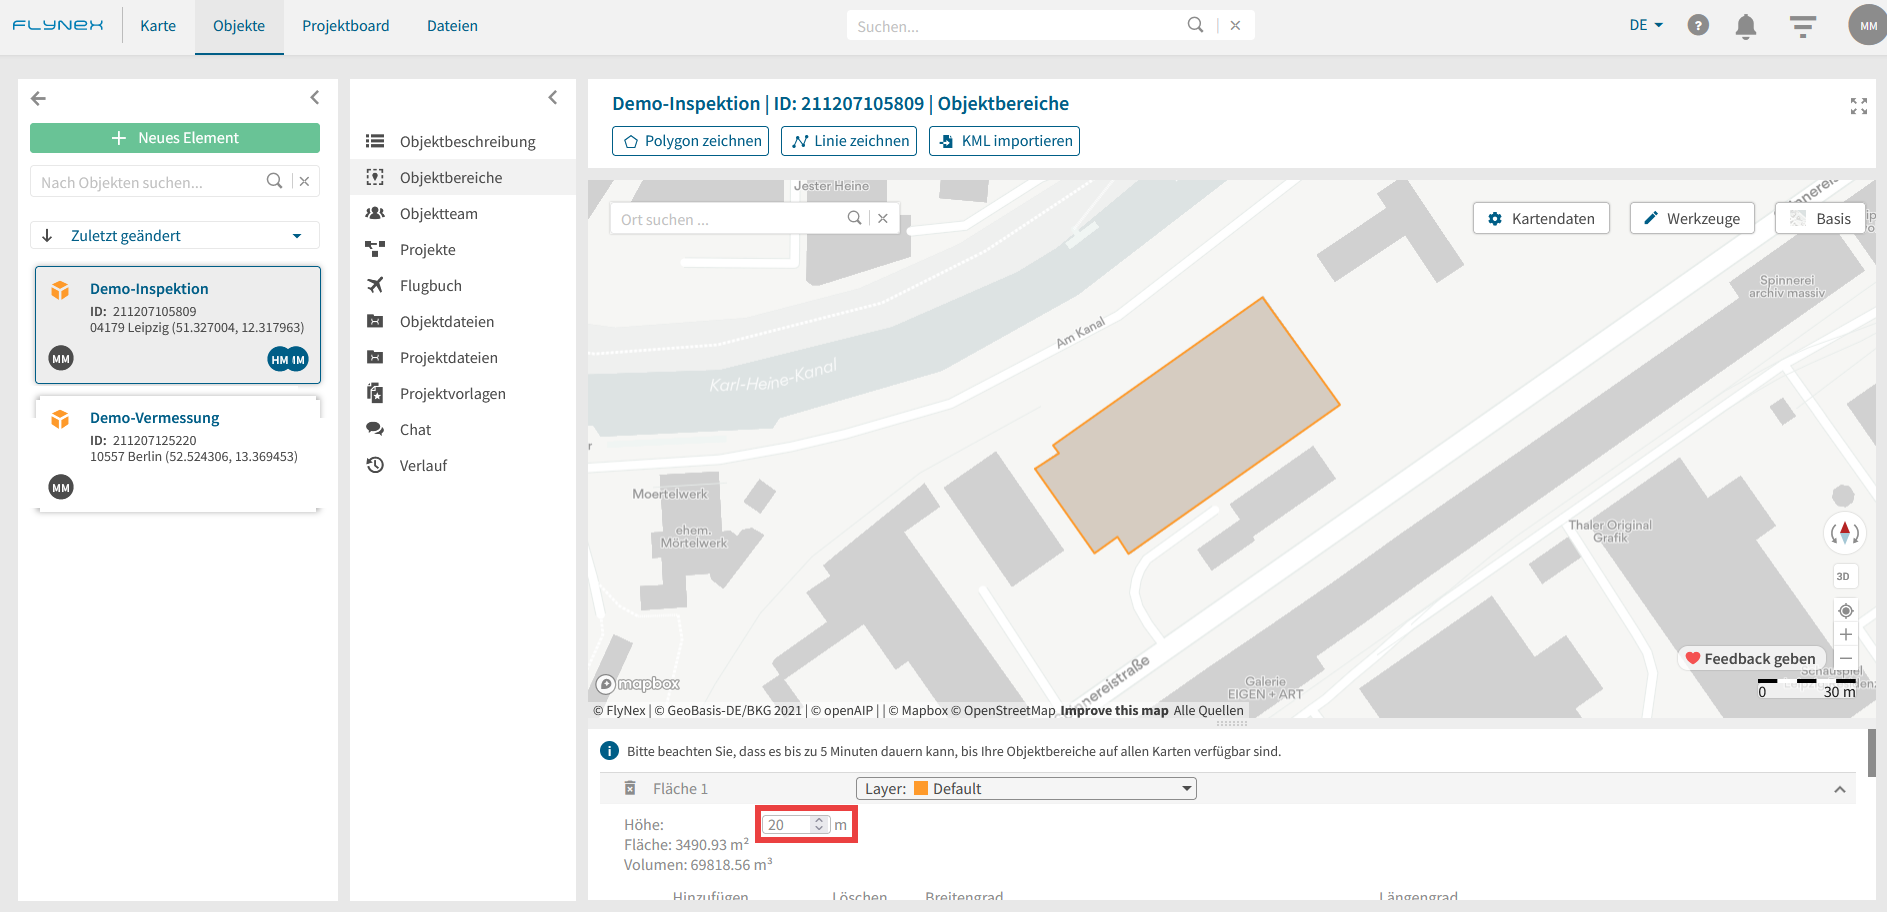
Hinweis: Sie können hinterlegte Objektebereiche auf der Karte über Kartendaten aktivieren/ deaktivieren.
Das Anlegen von Projekten auf Ihrer Plattform ist an verschiedenen Stellen möglich.
Nutzen Sie den Button Neues Element. Dieser Button ist auf dem Dashboard, unter Objekt oder Projektboard zu finden.
Es ist ebenfalls möglich zuerst den gewünschten Projektort auf der Karte zu lokalisieren und anschließend über den grünen Button mit dem Plus-Symbol ein Projekt anzulegen. Dabei wird der eingegebene Ort direkt übernommen.
Folgen Sie den Anweisungen im darauffolgenden Fenster. Nach dem erfolgreichen Anlegen eines Projektes, können Sie eine Vielzahl von Werkzeugen zur Planung Ihres Projektes nutzen.
Wichtiger Hinweis: Zur Erstellung eines Projektes ist die Verknüpfung mit einem Objekt notwendig. Diese Verknüpfung dient der genauen Ortsbestimmung für Ihr Projekt. Sollten Sie zuvor noch kein Objekt erstellt haben, werden Sie im Einrichtungsprozess zuerst dazu aufgefordert ein Objekt anzulegen. Nach dem Anlegen eines Objektes sind Sie in der Lage ein Projekt anzulegen. Ein Objekt kann eine Vielzahl von verschiedenen Projekten enthalten.
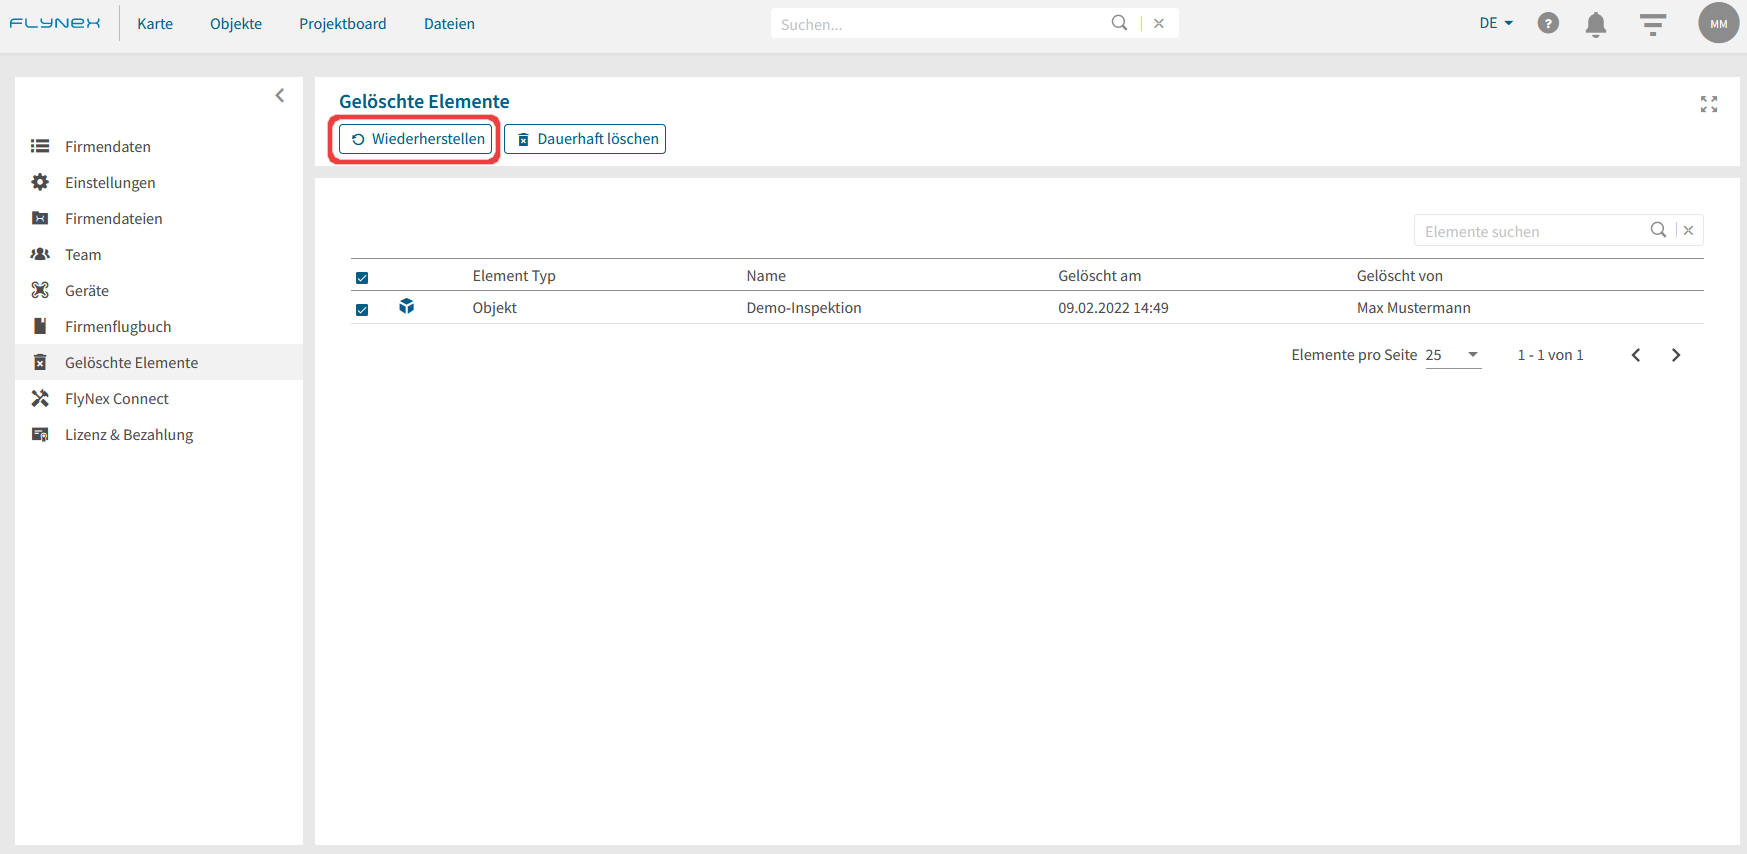
Falls Sie eine oder mehrere Dateien gelöscht haben und diese wiederherstellen möchten, folgen Sie diesen Schritten:
1) Begeben Sie sich ins Firmenkonto.
2) Öffnen Sie die Funktion Gelöschte Elemente.
3) Wählen Sie die gewünschte Datei durch das Setzen eines Hakens und klicken Sie auf Wiederherstellen.
Planen Sie bereits vor dem Drohnenflug die passenden Flugräume und Routen auf der Karte. Nutzen Sie dabei die Möglichkeit zur Validierung Ihres Fluges und prüfen Sie die Einhaltung aller behördlichen Vorgaben.
Wo kann ich einen Drohnenflug planen?
1) Öffnen Sie ein Projekt.
2) Wählen Sie die Funktion Flugplanung / Karte.
3) Wählen Sie den gewünschten Ort auf der Karte für Ihre Planung mithilfe einer Ortseingabe oder per Klicken und Verschieben der Karte.
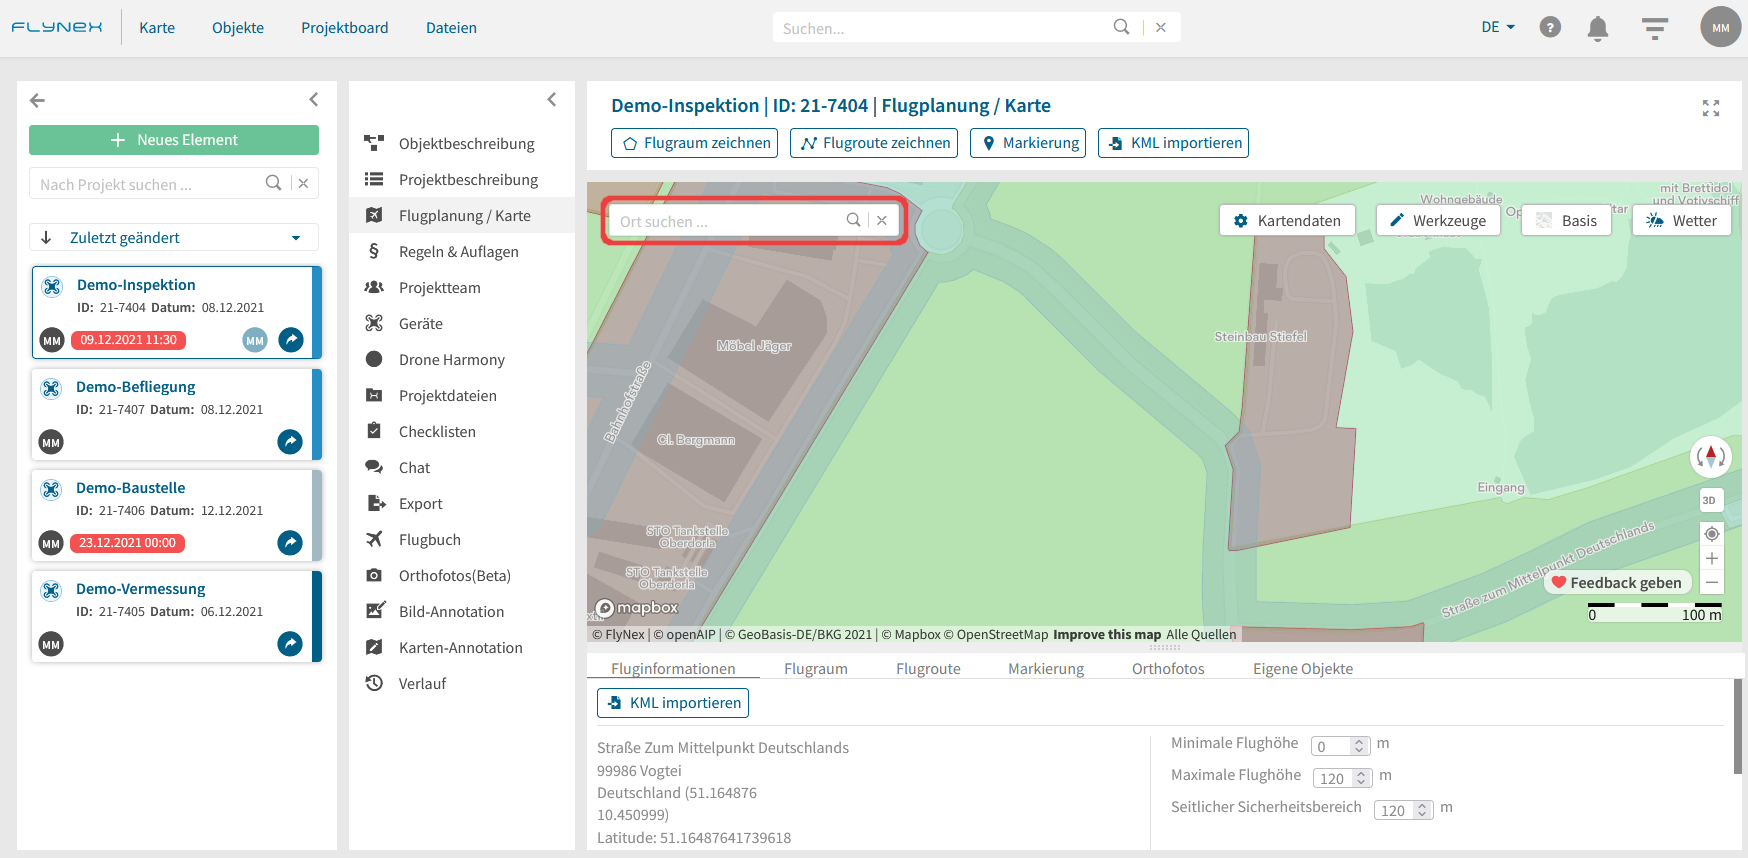
4) Nutzen Sie verschiedene Werkzeuge für Ihre Flugplanung.
Übersicht und weitere Kartendaten
Nutzen Sie die einzelnen Reiter unterhalb der Karte zur übersichtlichen Darstellung und individuellen Bearbeitung einzelner Flugräume, Flugrouten, Markierungen oder zum De-/Aktivieren eingebundener Daten.
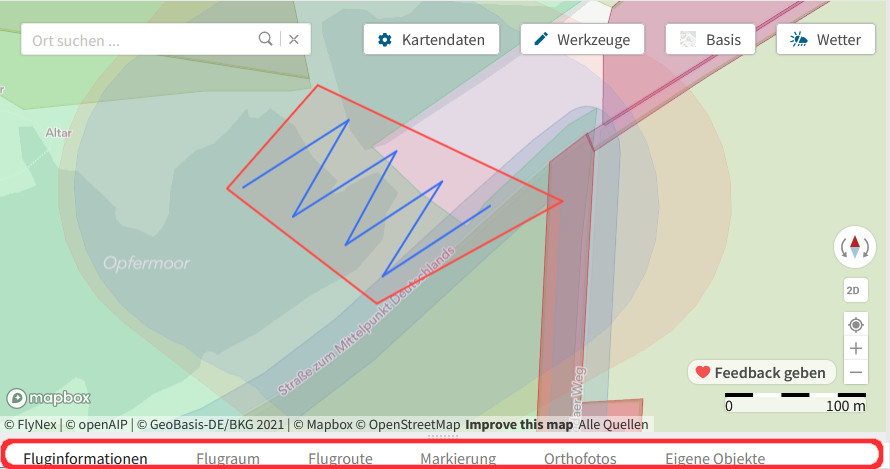
Fluginformationen: Enthält Ortsangaben des Projekts sowie generelle Projektbegrenzungen für die max./min. Flughöhe und den Operationsbereich.
Flugraum: Übersicht aller eingezeichneten Flugräume des Projekts mit individuellen Flughöheneinstellungen.
Flugroute: Übersicht aller eingezeichneten Flugrouten des Projekts mit jeweiligen Koordinaten.
Markierung: Übersicht aller eingezeichneten Markierungen mit Bezeichnungen des Projekts.
Orthofoto: Liste aller Orthofotos des Projekts zur detailgenauen Planung auf der Karte.
Eigene Objekte: Übersicht aller Notizen, Symbole und Vermessungen aus Karten-Annotation.
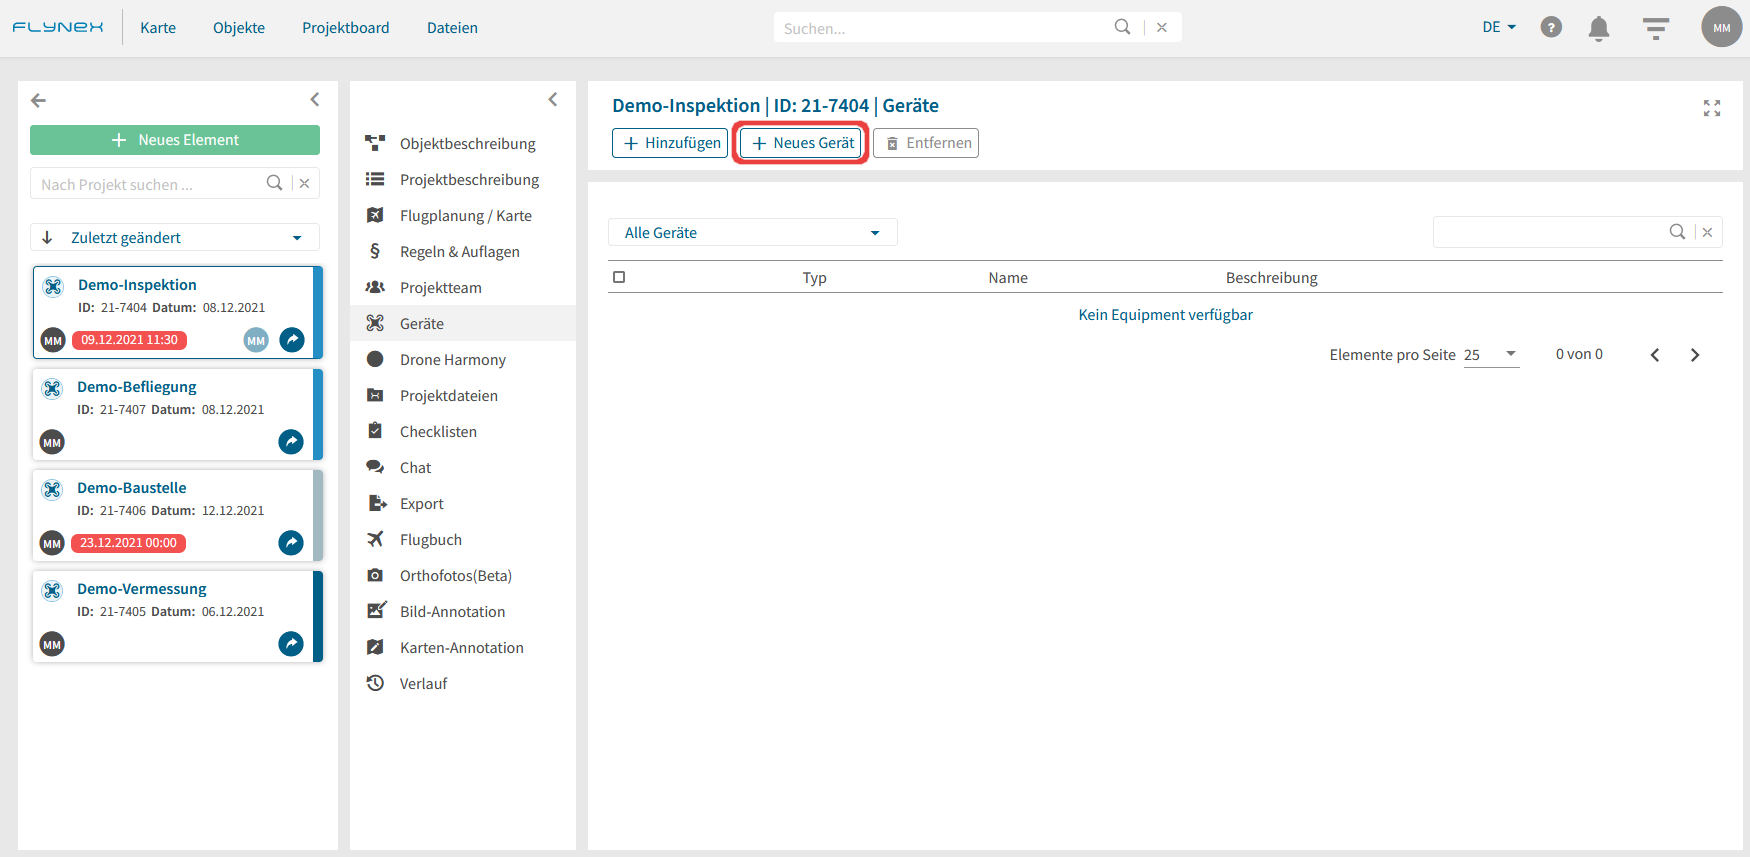
Als Geräte gelten Drohnen sowie dazugehörige Batterien, Sensoren und Versicherungen. Geräte können allgemein im Firmenkonto mit allen wichtigen Parametern hinterlegt werden und stehen im Anschluss in jedem Projekt zur Auswahl bereit.
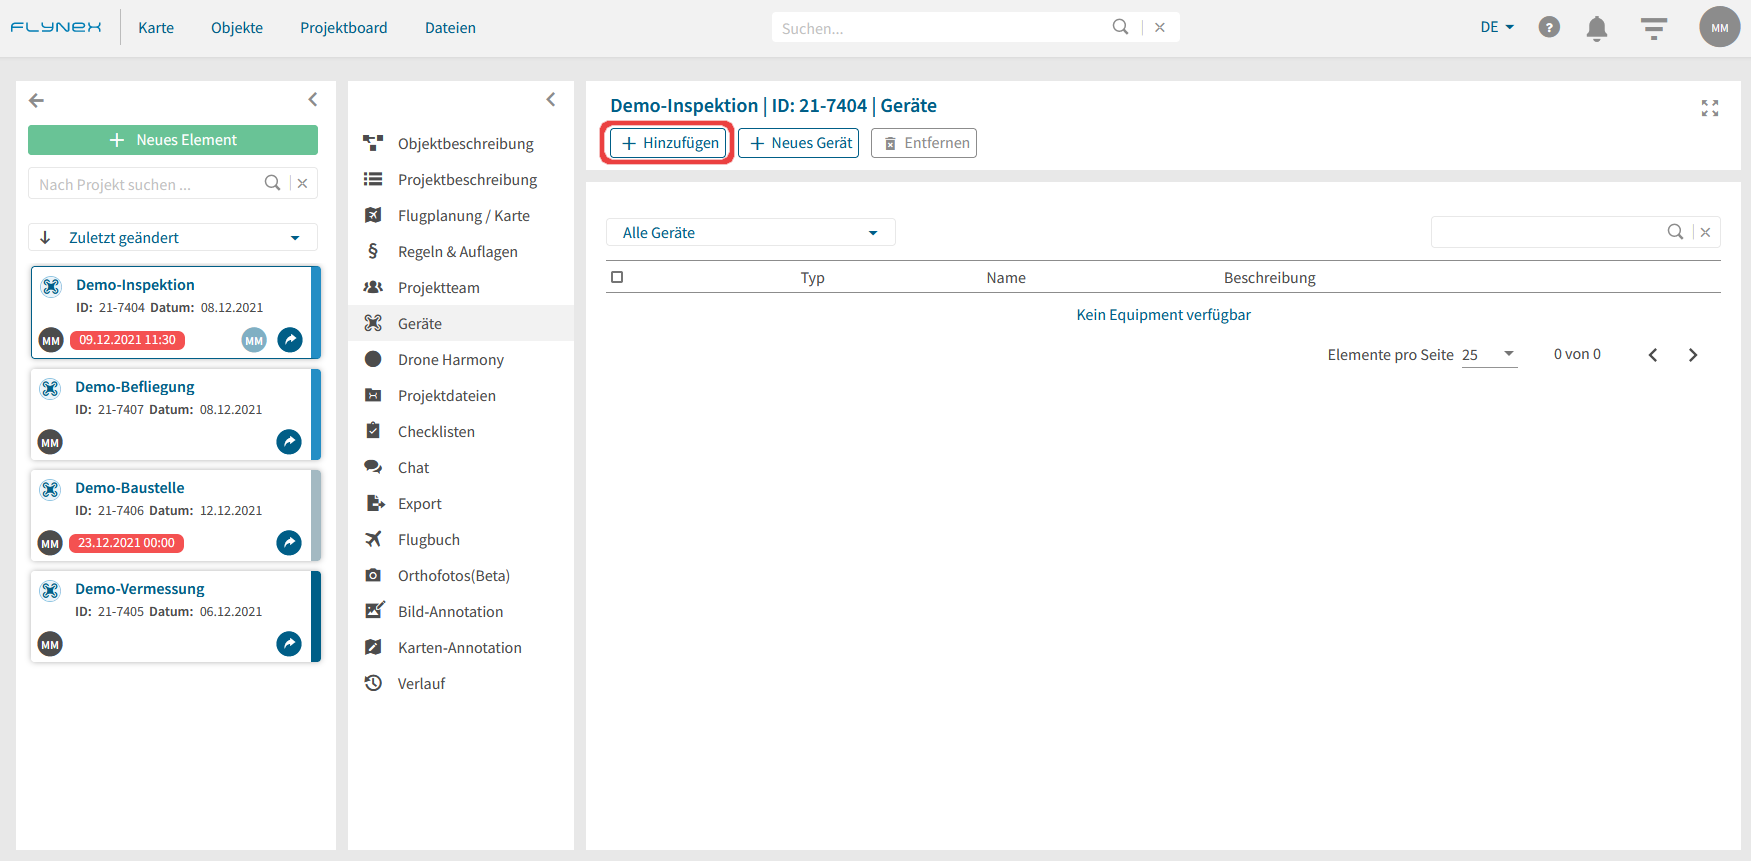
Wie teile ich meinem Projekt ein Gerät zu?
2) Öffnen Sie die Funktion Geräte.
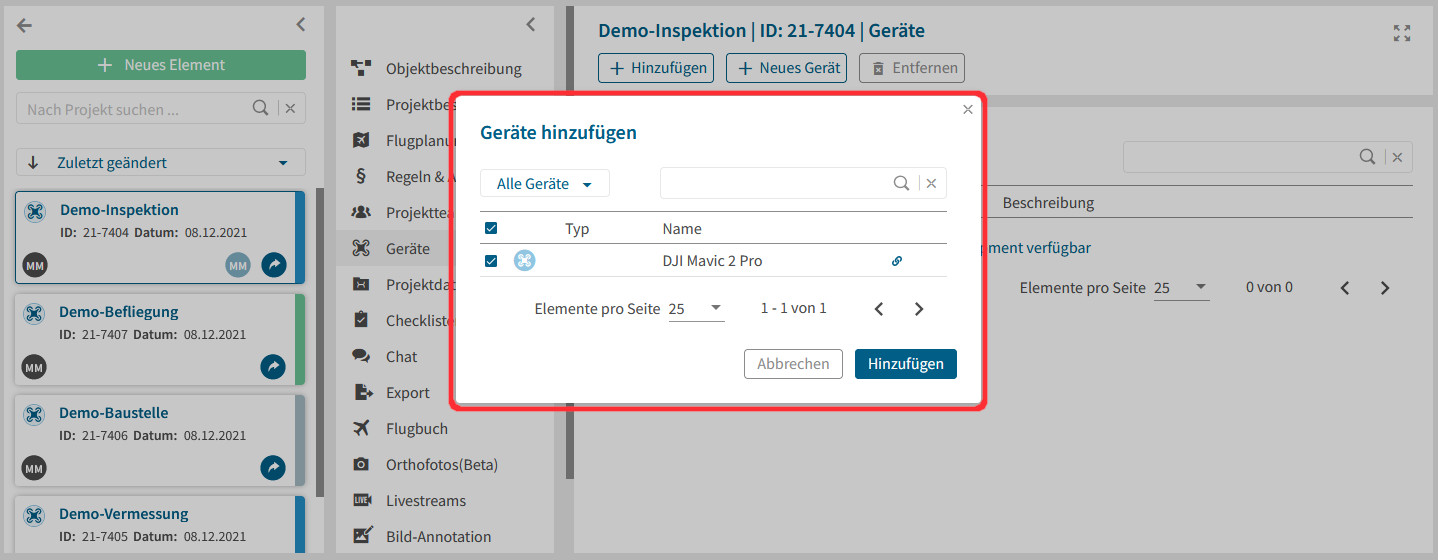
3) Klicken Sie auf Hinzufügen, um bereits angelegte Geräte aus dem Firmenkonto auszuwählen. Oder klicken Sie auf Neues Gerät, um ein neues Gerät im Firmenkonto anzulegen.
Hinweis: Ein Gerät kann nicht mehreren zur gleichen Zeit geplanten Projekte zugeteilt werden.
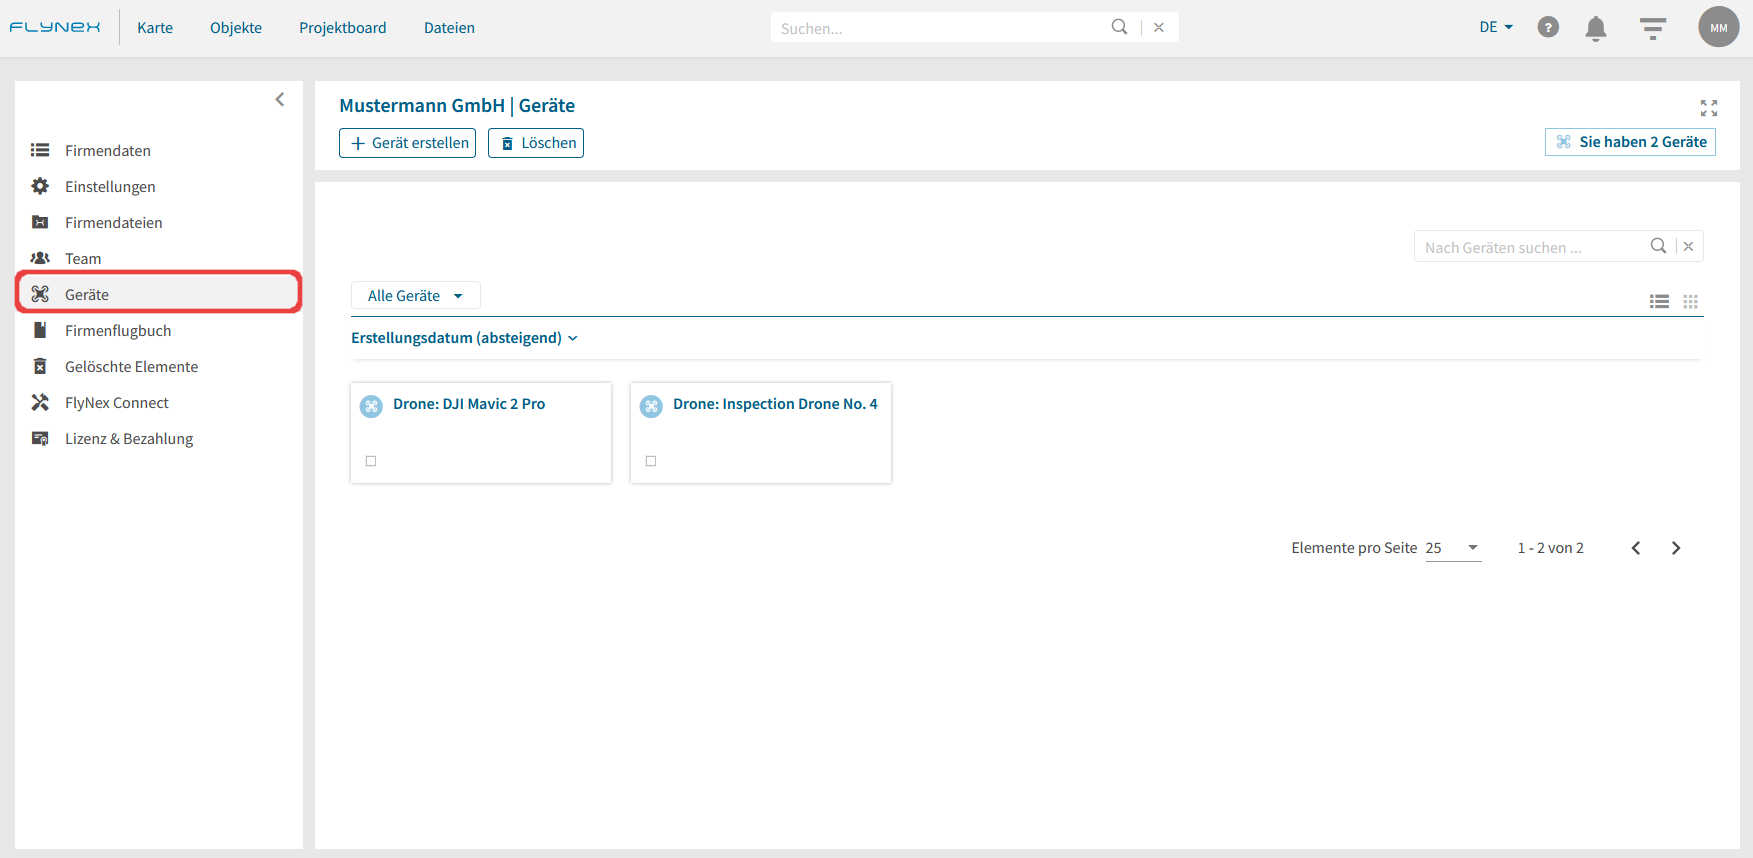
Wie kann ich ein neues Gerät anlegen?
Sie haben die Möglichkeit Geräte permanent, mit allen technischen Daten anzulegen und im Anschluss in Ihren Projekten zuzuteilen. Es bieten sich hierfür zwei Möglichkeiten an:
Variante A) Wechseln Sie zu Ihrem Firmenkonto (Hinweis: Adminrechte notwendig). Wählen Sie die Funktion Geräte. Klicken Sie auf den Button Gerät erstellen.
Variante B) Klicken Sie direkt im Projekt auf die Funktion Geräte. Klicken Sie auf den Button Neues Gerät, um ein neues Gerät im Firmenkonto anzulegen. Klicken Sie anschließend auf den Button Gerät erstellen.
Fahren Sie nach Variante A oder B mit dem Anlegen des Geräts fort:
1) Wählen Sie das gewünschte Modell aus und vergeben Sie einen Namen.

2) Hinterlegen Sie im Falle von Drohnen die Spannweite und Gewichtsklasse.
Hinweis: Unbedingt erforderlich zur Validierung von Flugplanungen.

Sie besitzen die Möglichkeit die Plattform nach Ihren Wünschen anzupassen (Hinweis: Sie benötigen hierzu die Administratorrechte).
Plattformelemente und Kategorien anpassen
Folgen Sie diesen Schritten:
1) Öffnen Sie das Firmenkonto.
2) Öffnen Sie die Funktion Einstellungen.
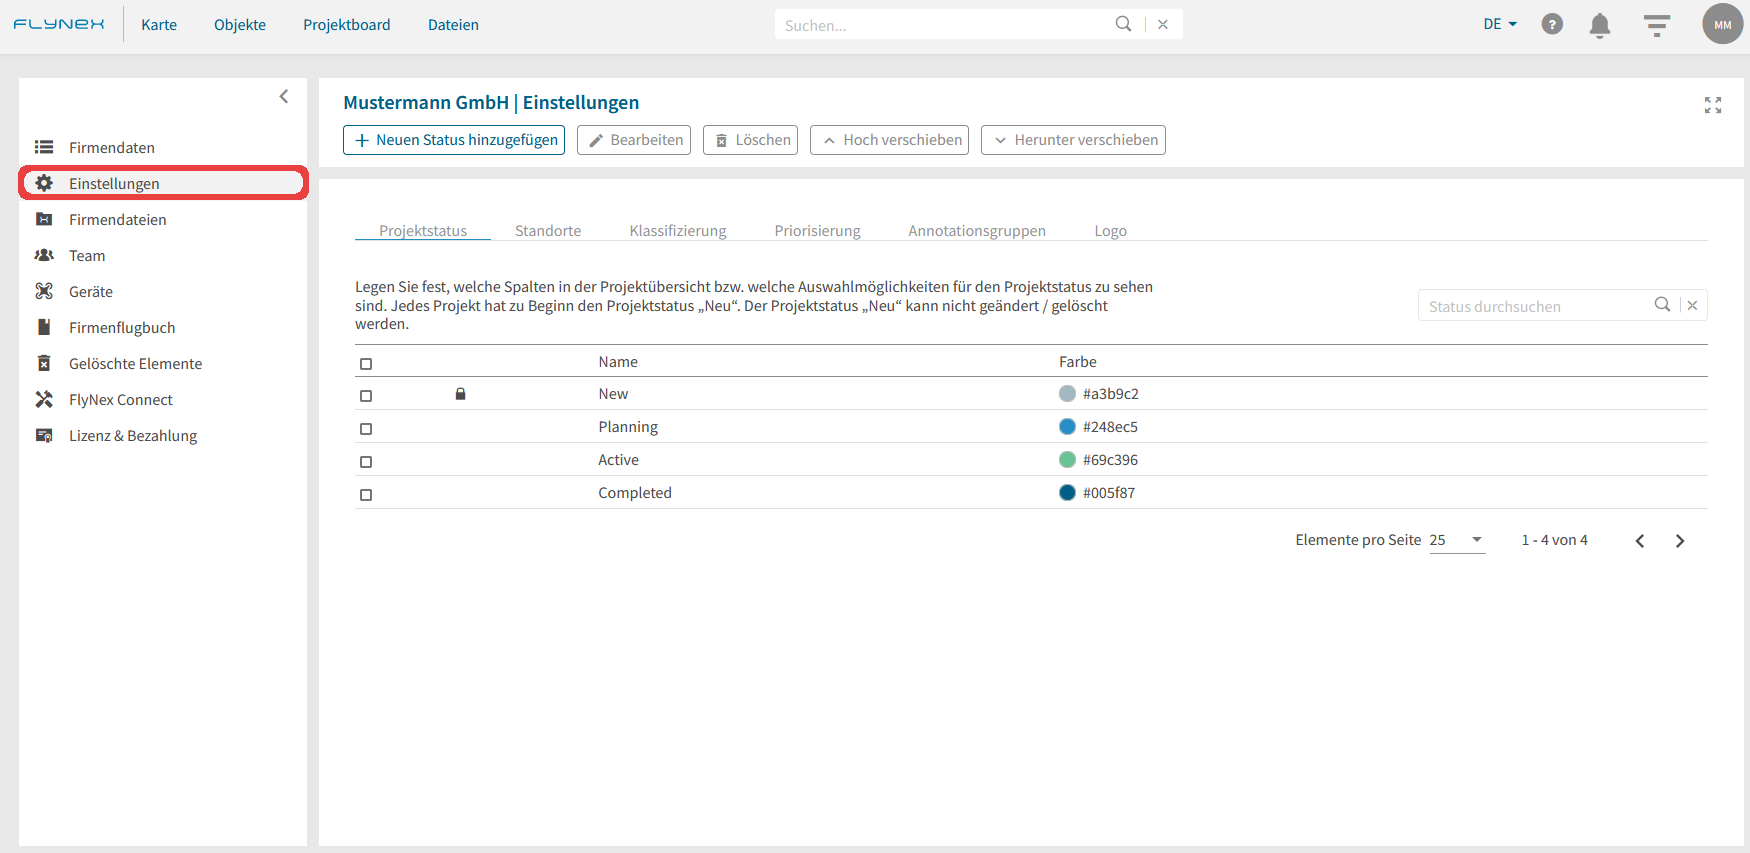
Projektstatus: Anpassung der Kategorien für das Projektboard, z. B. Planung, Aktiv, Abgeschlossen
Standorte: Anpassung der Standorte der Firma für Teammitglieder in Team, z. B. Berlin, Hamburg, Leipzig
Klassifizierung: Anpassung der Klassifizierung für Objekte in Bild-Annotation, z. B. Dach, Fassade, Fenster
Priorisierung: Anpassung der Liste für Priorisierung von Schäden in Bild-Annotation, z. B. Leicht, Mittel, Schwer
Annotationsgruppen: Anpassung der Liste zur Einordnung der Symbole in Karten-Annotation, z. B. Vermessungen, Gefahren, Hinweise
Eine Validerung dient zur Überprüfung der behördlichen Vorgaben für einen Drohnenflug. Zur Durchführung einer Validierung für einen geplanten Flug sind folgende Voraussetzungen nötig:
1) Führen Sie eine Flugplanung für Ihr Projekt durch.
2) Fügen Sie ein Teammitglied dem Projekt zu und erteilen Sie diesem die Berechtigung als Pilot.
3) Fügen Sie eine Drohne dem Projekt zu (Hinweis: Bitte hinterlegen Sie für die jeweilige Drohne Gewichtsklasse und Spannweite unter Geräte im Firmenkonto).
4) Öffnen Sie im Projekt die Funktion Validieren.
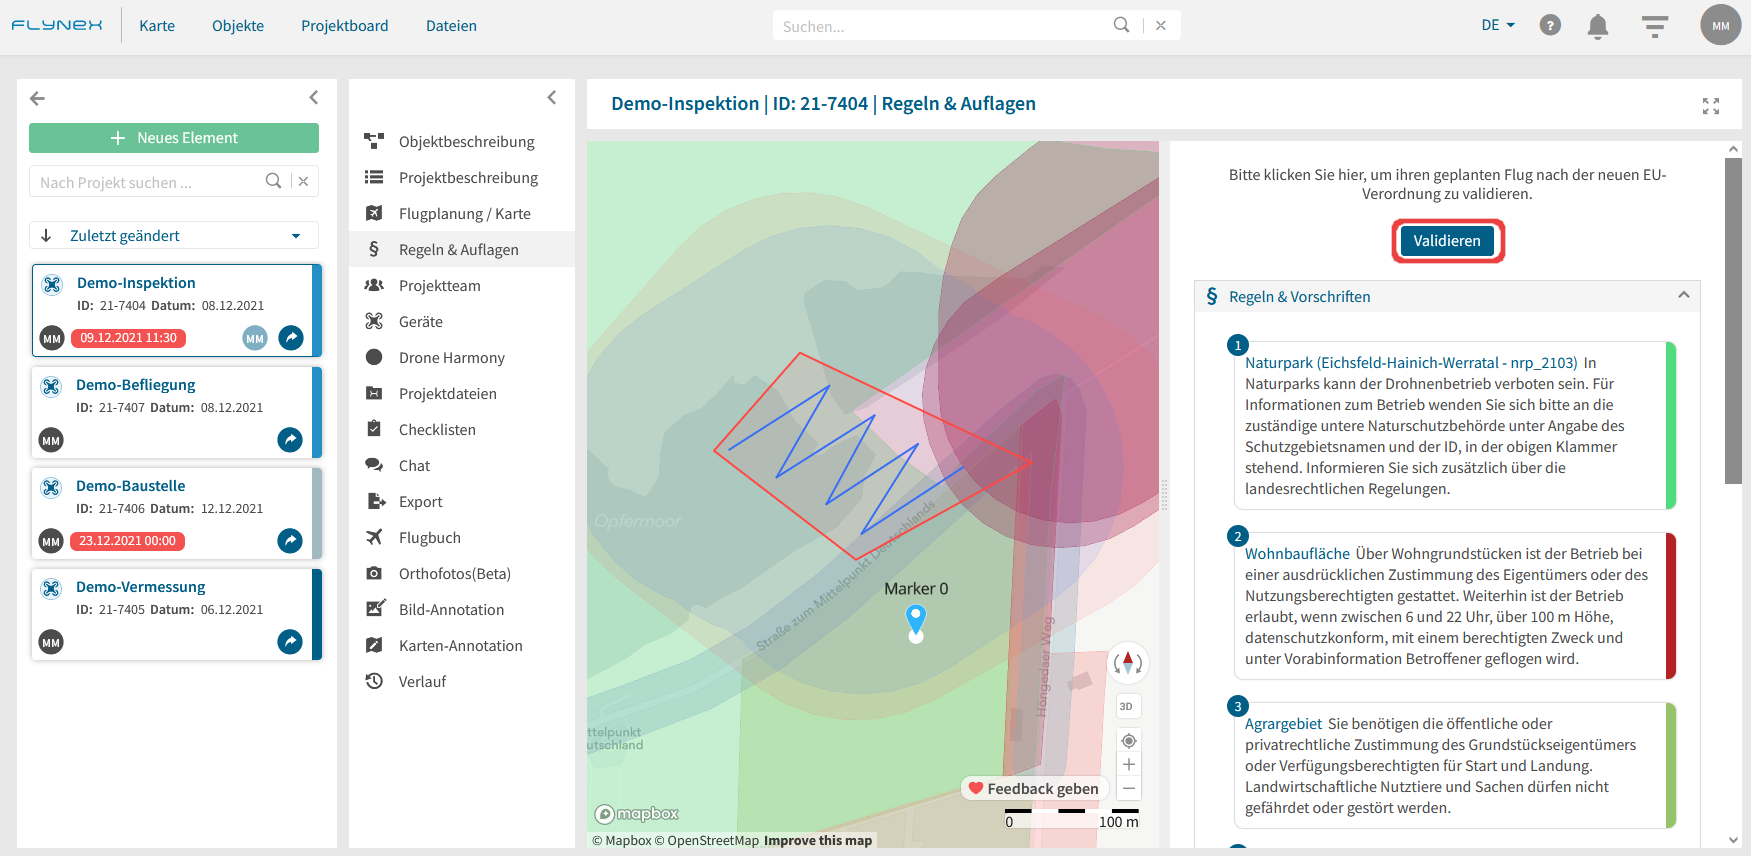
5) Füllen Sie alle notwendigen Angaben aus und bestätigen Sie mit Validieren.
Hinweis: Drohnenführerscheine können unter Pilotinformationen im eigenen Konto hinterlegt werden.

Nutzen Sie die Möglichkeit Projekte mit Teammitgliedern oder externen Nutzern zu teilen.
Folgen Sie diesen Schritten:
2) Öffnen Sie die Funktion Projektbeschreibung.
3) Klicken Sie auf Teilen.
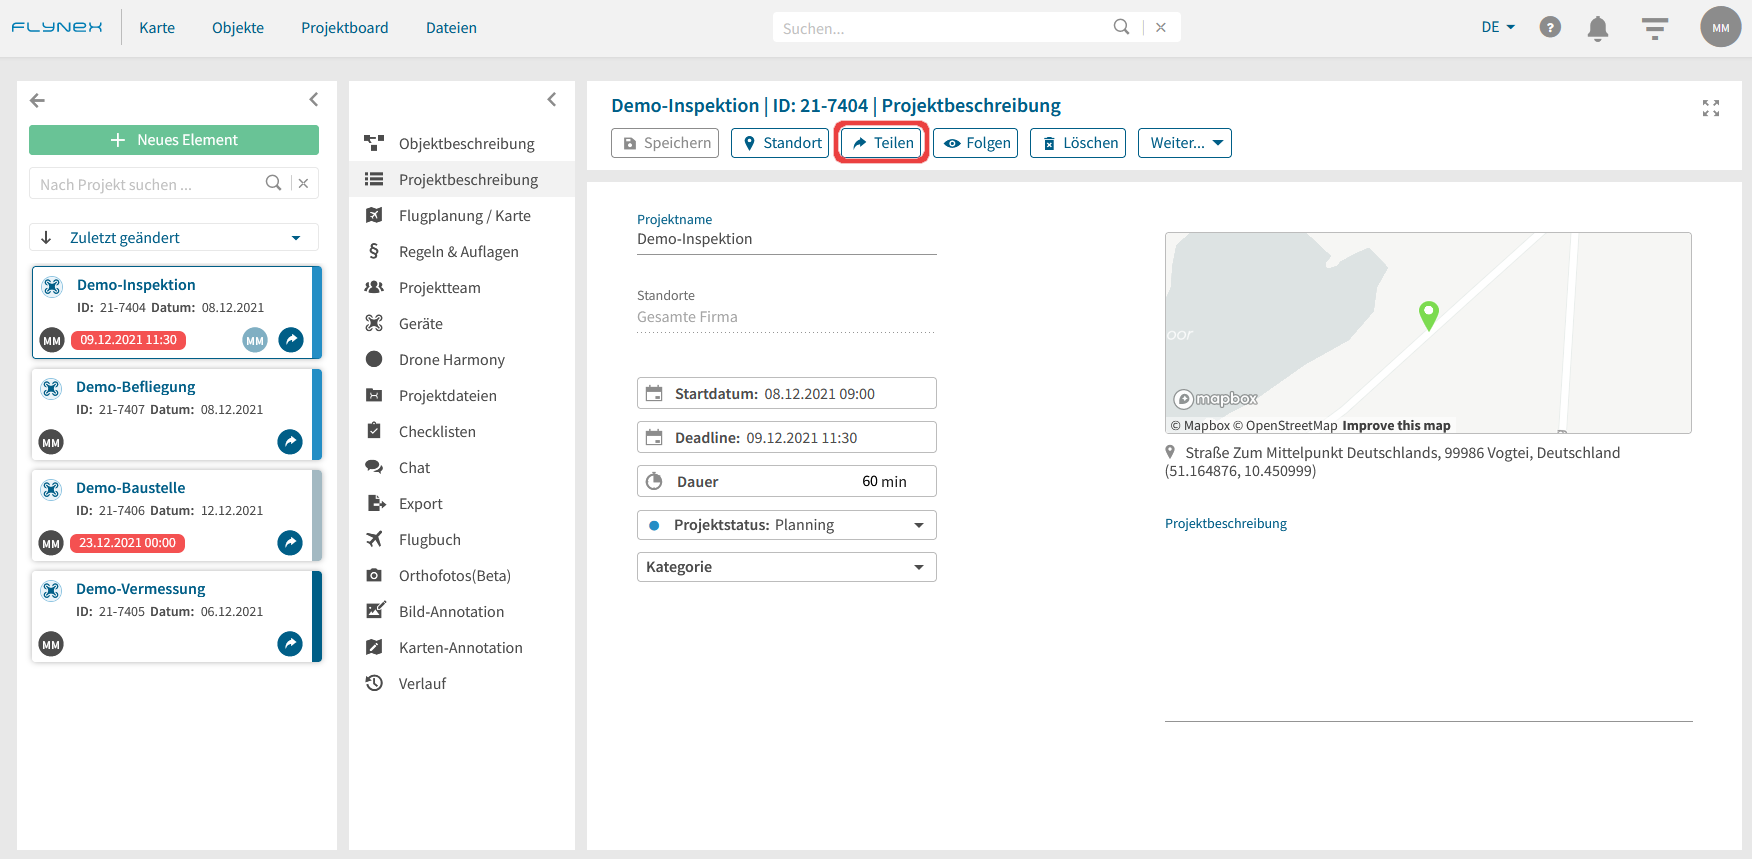
Hinweis: Geteilte Projekte sind im Projektboard im Dropdown-Menü unter Geteilte Projekte aufzufinden.
Zugeteilte Teammitglieder in Objekten haben die Möglichkeit auf alle dem Objekt zugeordneten Projekte zuzugreifen. Führen Sie hierfür folgende Schritte durch:
2) Öffnen Sie die Funktion Objektteam.
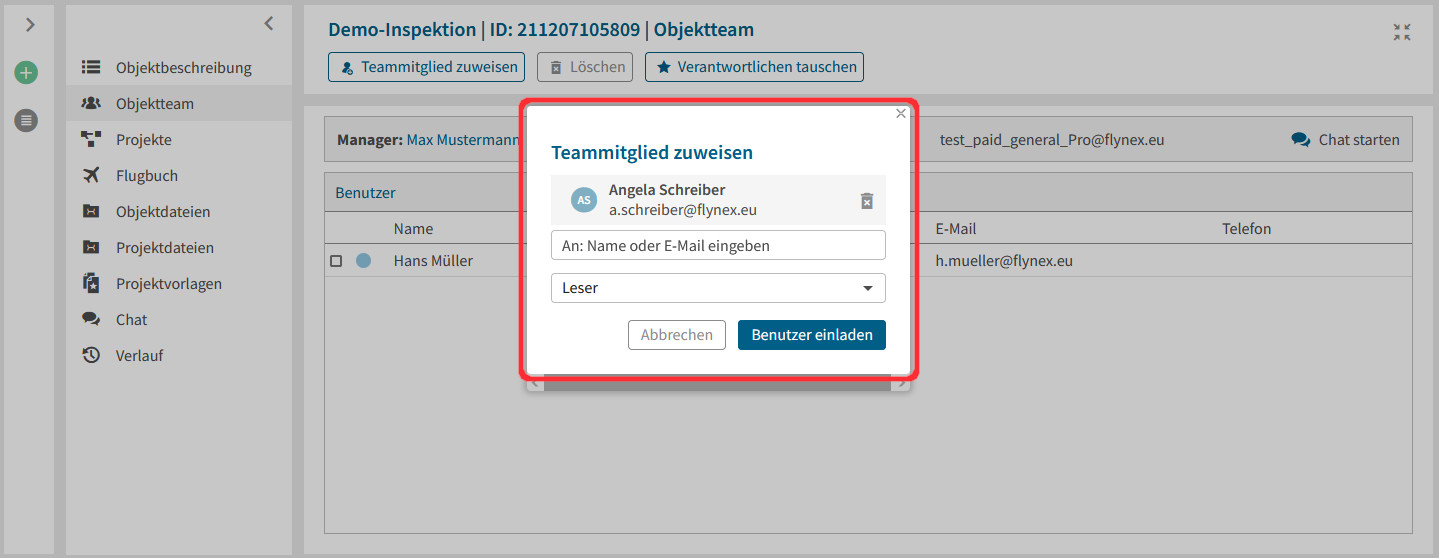
3) Klicken Sie auf Teammitglied zuweisen.
4) Wählen Sie das gewünschte Teammitglied aus Ihrer Firma oder geben Sie die E-Mail-Adresse eines externen Nutzers ein. (Hinweis: Zum Anlegen von Teammitgliedern finden Sie hier weitere Informationen)
5) Wählen Sie die gewünschte Berechtigung für das Teammitglied und bestätigen Sie mit Benutzer einladen.
Zugeteilte Teammitglieder in Projekten haben nur auf das zugeordnete Projekt Zugriff. Führen Sie hierfür folgende Schritte durch:
2) Öffnen Sie die Funktion Projektteam.
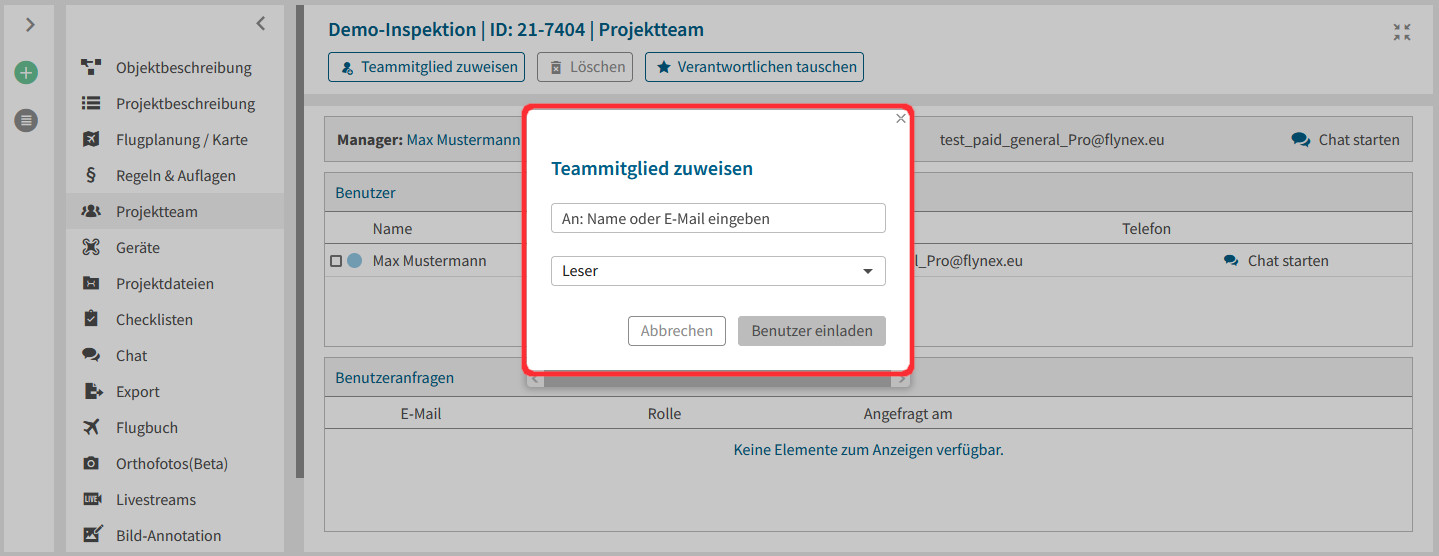
3) Klicken Sie auf Teammitglied zuweisen.
4) Wählen Sie das gewünschte Teammitglied aus Ihrer Firma oder geben Sie die E-Mail-Adresse eines externen Nutzers ein (Hinweis: Zum Anlegen von Teammitgliedern finden Sie hier weitere Informationen).
5) Wählen Sie die gewünschte Berechtigung für das Teammitglied und bestätigen Sie mit Benutzer einladen.
Hinweis: Eingeladene externe Nutzer erhalten eine E-Mail mit einer Einladung zum Projekt. Nach darauffolgender Bestätigung kann der jeweilige externe Nutzer geteilte Projekte über das Projektboard auffinden.
Markieren Sie mithilfe der Bild-Annotation Besonderheiten in Ihren Aufnahmen und hinterlegen Sie diese in einem Bericht (PDF).
Wo finde ich die Bild-Annotation?
2) Öffnen Sie die Funktion Bild-Annotation.
3) Wählen Sie das zu bearbeitende Foto durch das Setzen eines Hakens aus. (Hinweis: Sollten noch keine Fotos hinterlegt sein, laden Sie bitte zunächst georeferenzierte Fotos als Projektdateien im Projekt hoch.)
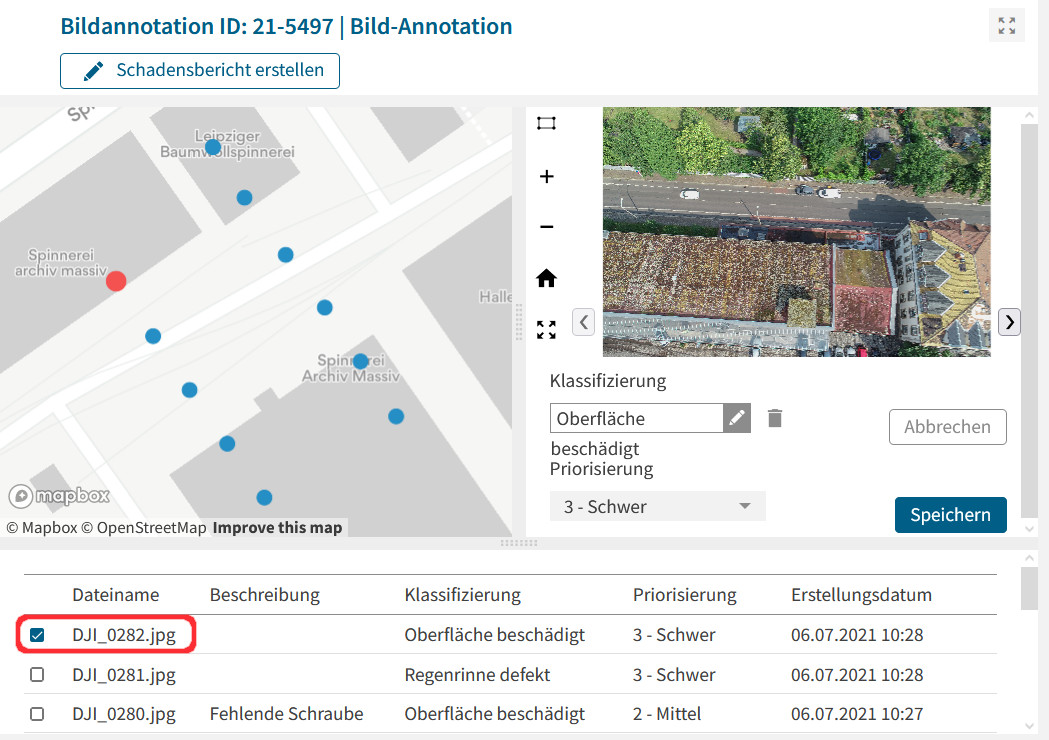
Nutzen Sie folgende Werkzeuge:
A: Setzen von Markierungen auf dem Bild für Besonderheiten.
B: Vergrößern, Verkleinern und Zurücksetzen des Bildes.
C: Umschalten in den Vollbildmodus zur besseren Bearbeitung.
D: Klassifizierung der Besonderheit auf dem Bild. Erstellen Sie eigene Klassifizierungen in Ihren Einstellungen.
E: Priorisierung der Besonderheit. Erstellen Sie eigene Kategorien in Ihren Einstellungen.

4) Klicken Sie zum Abschluss auf Speichern. Bezeichnungen, Klassifizierung und Priorisierung wird in der Liste hinterlegt.
5) Klicken Sie auf Bericht erstellen und erhalten Sie alle Informationen zusammengefasst als PDF-Datei.
Führen Sie in Kartenannotation Messungen durch oder fügen Sie zusätzliche Notizen und Symbole auf der Karte hinzu. Erhöhen Sie dabei zusätzlich die Detailgenauigkeit durch die Einbindung eines Orthofotos.
Wo finde ich die Kartenannotation?
2) Öffnen Sie die Funktion Kartenannotation.
3) Lokalisieren Sie den gewünschten Ort auf der Karte durch Eingabe des Ortes oder Verschieben der Karte durch Klicken und Ziehen mit der Maus.
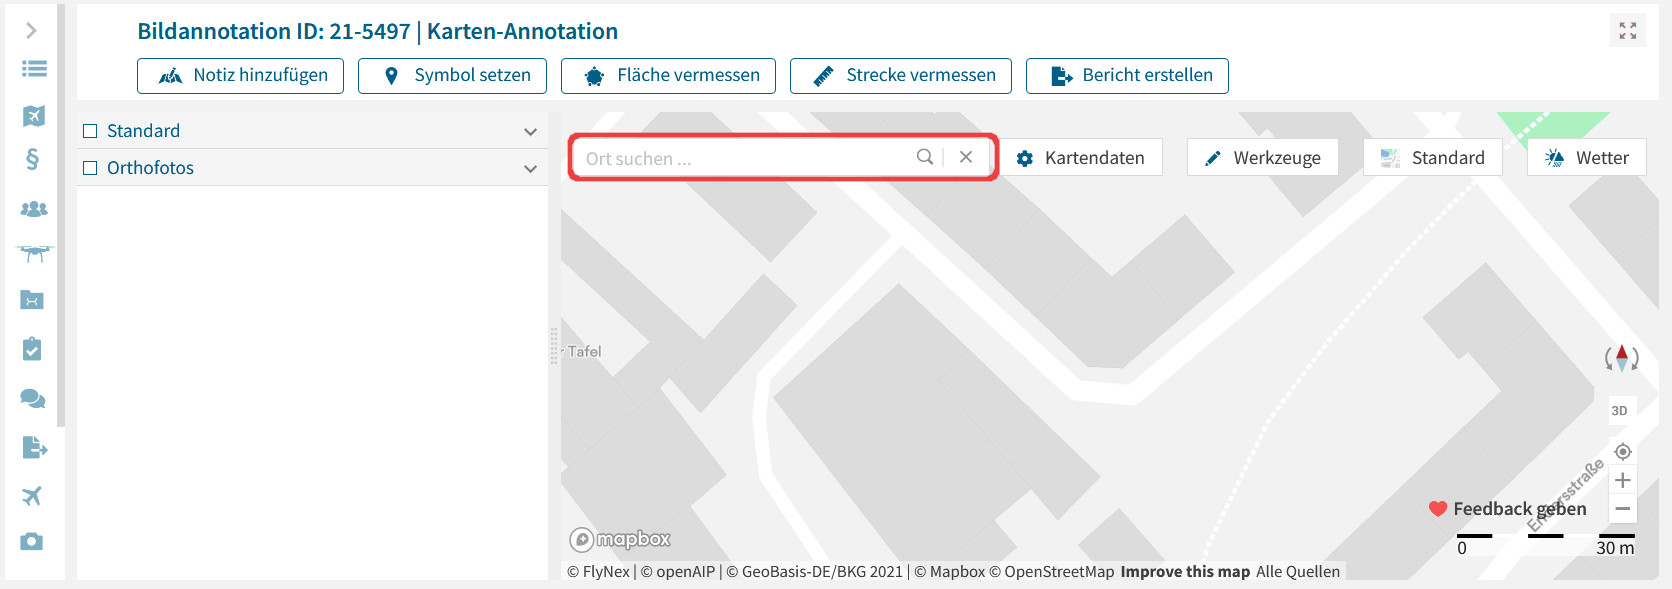
4) Wählen Sie zwischen verschiedenen Werkzeugen:
Setzen von Notizen und Symbolen
Wählen Sie das entsprechende Werkzeug und klicken Sie auf die gewünschte Stelle in der Karte für eine Notiz oder verschiedene Symbole. Erstellen Sie eigene Kategorien in Ihren Einstellungen.
Vermessungen durchführen
Wählen Sie das Werkzeug Fläche vermessen oder Strecke vermessen für genauere Planungsvorhaben. Erstellen Sie eigene Kategorien in Ihren Einstellungen.
Bericht erstellen
Fassen Sie alle Ergänzungen auf der Karte in einem Bericht als PDF-Datei zusammen.
Hinweis: Alle Notizen, Symbole und Vermessungen sind parallel in der Funktion Flugplanung / Karte unter Eigene Objekte verfügbar und können für die Planung einbezogen werden.
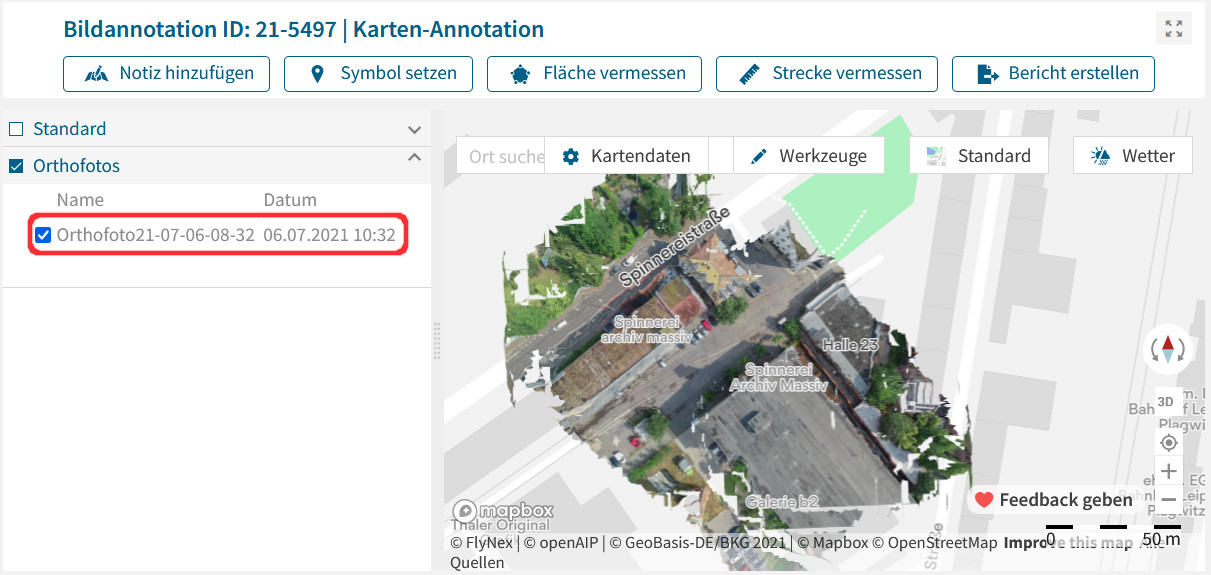
Wie kann ich ein Orthofoto einbinden?
Voraussetzung zur Einbindung ist ein fertig berechnetes Orthofoto im gleichen Projekt. Zur Aktivierung des Orthofotos setzen Sie einen Haken in der vorgesehenen Liste.
Hinweis: Sollte kein Orthofoto in der Liste vorzufinden sein, ist zunächst die Berechnung eines Orthofotos notwendig.
Löschen von Objekten
Zum Löschen eines Objektes wechseln Sie im Hauptmenü zu Objekte. Klicken Sie beim gewünschten Objekt auf die erweiterten Einstellungen und wählen Sie Löschen.
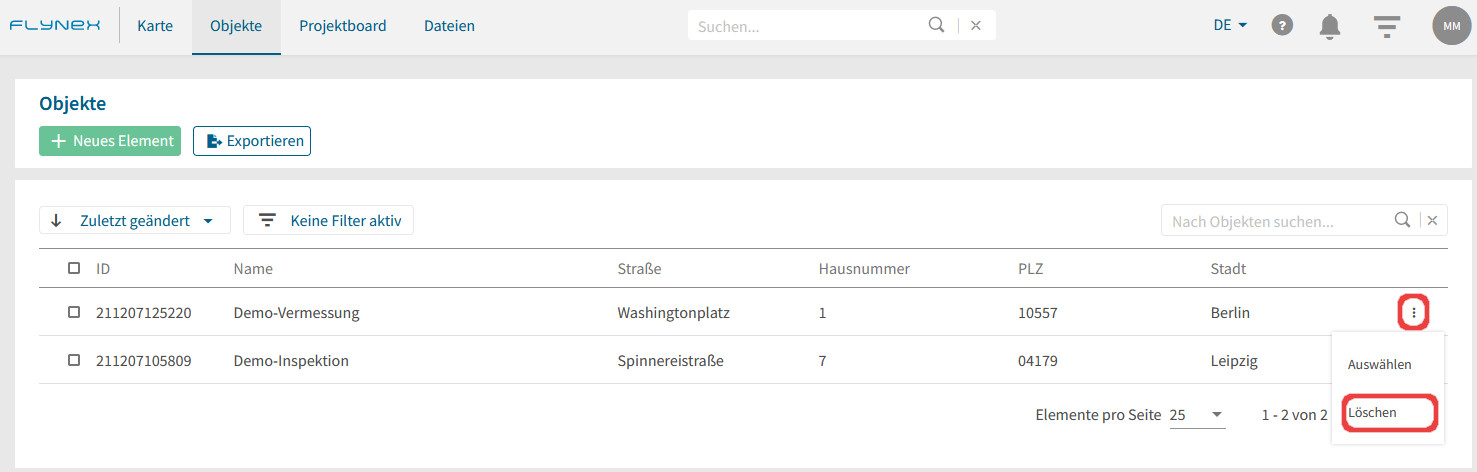
Alternativ haben Sie in jedem Objekt die Möglichkeit unter Objektbeschreibung das Objekt zu löschen.
Löschen von Projekten
1) Wechseln Sie in das Projektboard im Hauptmenü.
2) Klicken Sie in der Projektkachel des gewünschten Projekts auf erweiterte Einstellungen und wählen Sie Projekt löschen.
Alternativ haben Sie die Möglichkeit direkt im Projekt unter Projektbeschreibung das gewünschte Projekte zu löschen.
Hinweis: Alle gelöschten Dateien sind über das Firmenkonto wiederherstellbar.
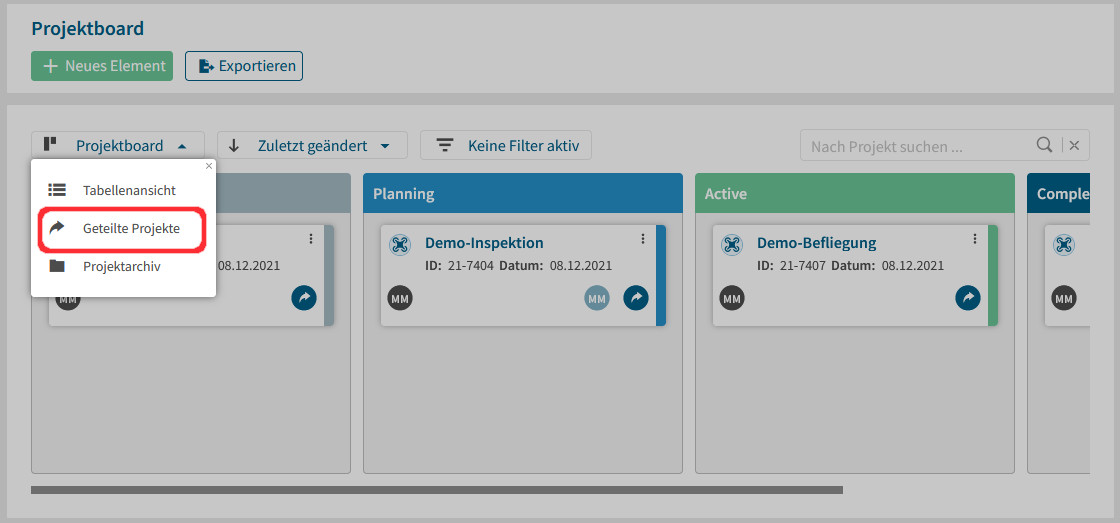
Geteilte Projekte sind im Projektboard des Hauptmenüs wiederzufinden.
1) Klicken Sie auf das Dropdown-Menü über dem Projektboard.
2) Klicken Sie auf Geteilte Projekte.
Hinweis: Sollten Sie Projekte nicht bearbeiten können, fehlt Ihnen die notwendige Berechtigung. Bitte wenden Sie sich an den Projektverantwortlichen.
Ihre Benachrichtigungen werden Ihnen oben rechts neben Ihrem Profilbild angezeigt.
Die rote Zahl neben dem Glocken-Symbol zeigt an, wie viele Nachrichten Sie haben.

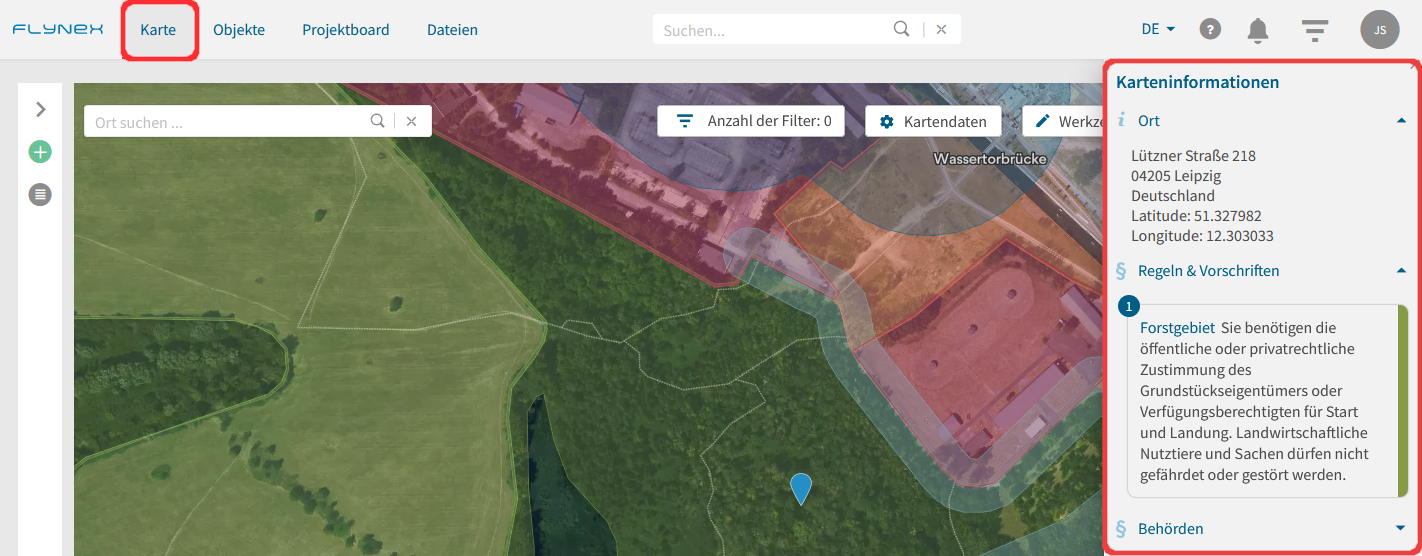
Mit der FlyNex Plattform erhalten Sie aktuelle Regeln und Vorschriften nach der EU-Drohnenverordnung sowie dazugehörige Behördendaten zum jeweiligen Fluggebiet. Nutzen Sie hierfür zwei Möglichkeiten:
Ausgabe der Informationen direkt auf der Karte:
1) Öffnen Sie die Funktion Karte im Hauptmenü.
2) Suchen Sie den gewünschten Ort auf der Karte.
3) Setzen Sie einen Rechtsklick auf die gewünschte Stelle auf der Karte zur Ausgabe der behördlichen Informationen (Hinweis: Weitere Informationen zu Kartenlayern auf der Karte finden Sie hier).
Ausgabe der Informationen für Ihren geplanten Flug im Projekt:
1) Öffnen Sie zunächst ein Projekt.
2) Wählen Sie die Funktion Regeln & Auflagen zur Ausgabe der behördlichen Informationen.
Hinweis: Sollten keine Informationen abrufbar sein, ist es zunächst nötig eine Flugplanung für Ihr Projekt vorzunehmen.
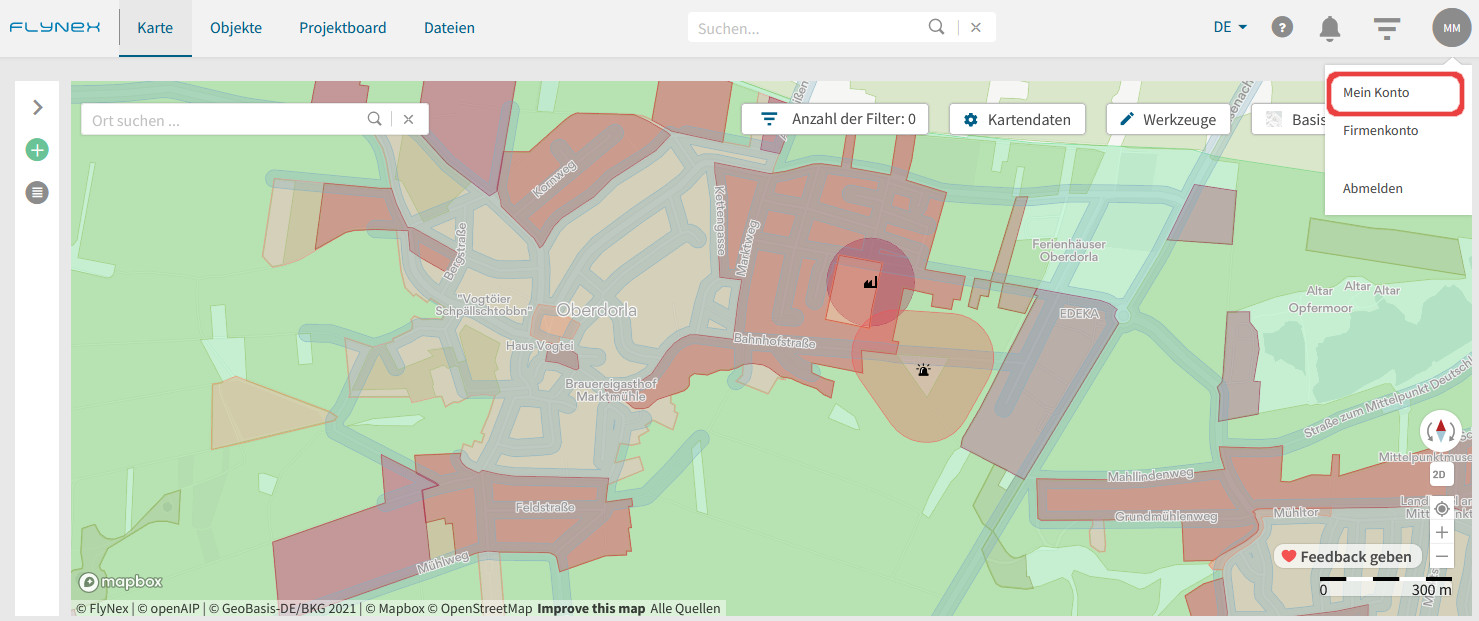
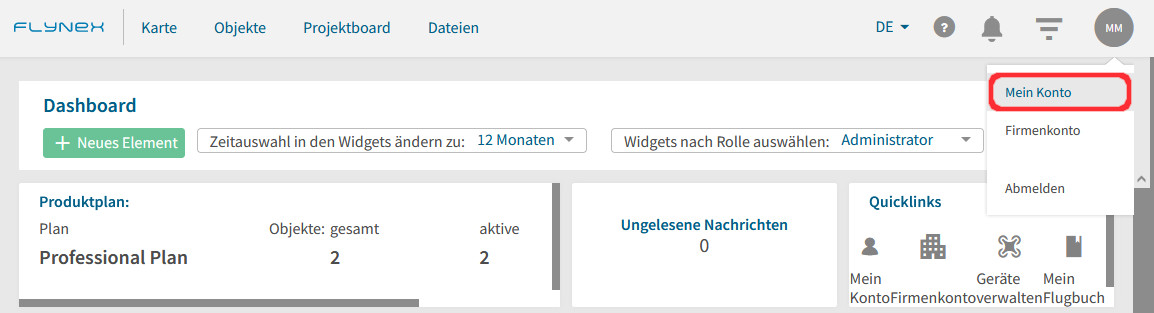
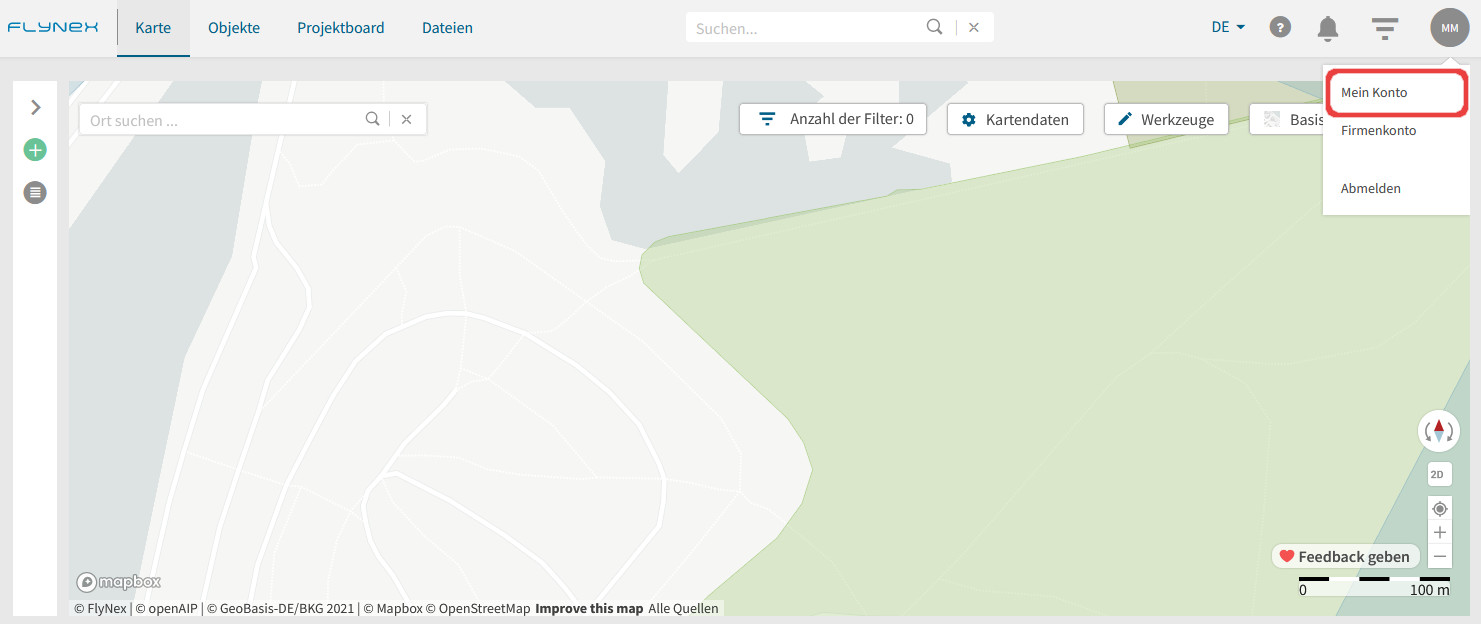
1) Wechseln Sie zu Ihrem persönlichen Profil über Mein Konto.
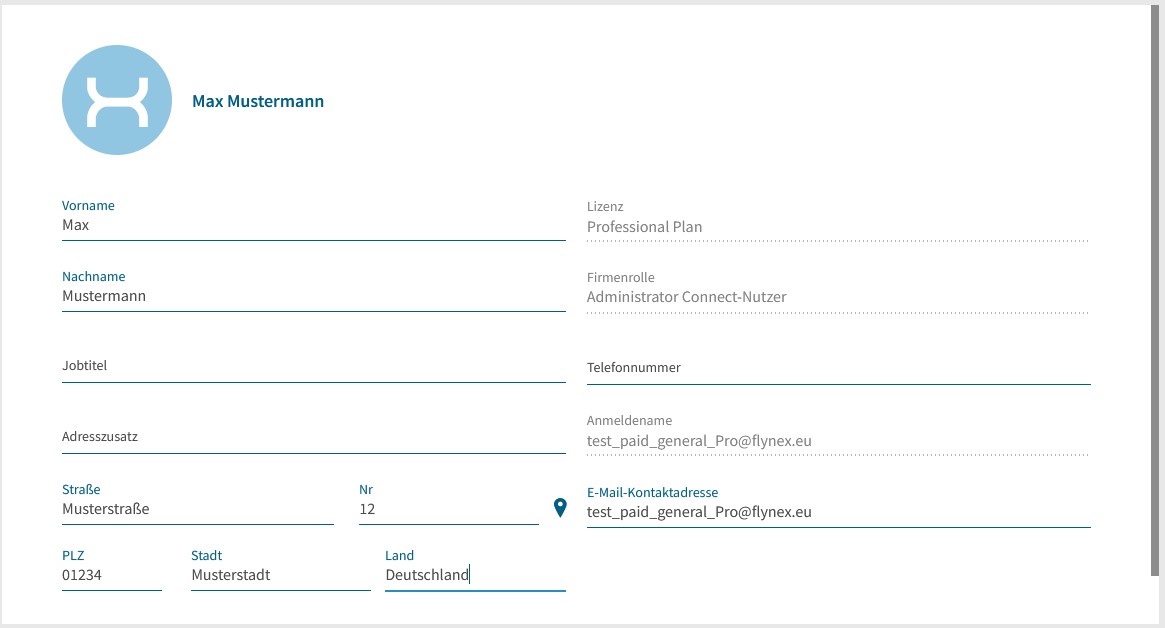
2) Passen Sie alle persönlichen Daten unter Mein Profil an.
Der Drohnenführerschein dient u.a. als Grundlage zur Validierung Ihrer Flugplanung in einem Projekt. Zum Hinterlegen folgen Sie diesen Schritten:
1) Öffnen Sie Mein Konto über Ihr rundes Profilfoto im Hauptmenü.
2) Klicken Sie im Menü auf Piloteninformationen.
3) Hinterlegen Sie relevante Daten und Dokumente.
Sie können Ihr Passwort jederzeit in Ihrem persönlichen Konto unter Mein Konto aktualisieren.
Wählen Sie in Ihrem persönlichen Konto die Funktion Passwort ändern.
1) Wechseln Sie zu Ihrem persönlichen Profil über Mein Konto.
2) Öffnen Sie Mein Profil und klicken Sie auf den Profilbild-Avatar.

Die Zeichenwerkzeuge zur Flugplanung finden Sie im Projekt unter der Funktion Flugplanung / Karte. Alle Zeichenwerkzeuge finden Sie auch oberhalb der Karte.
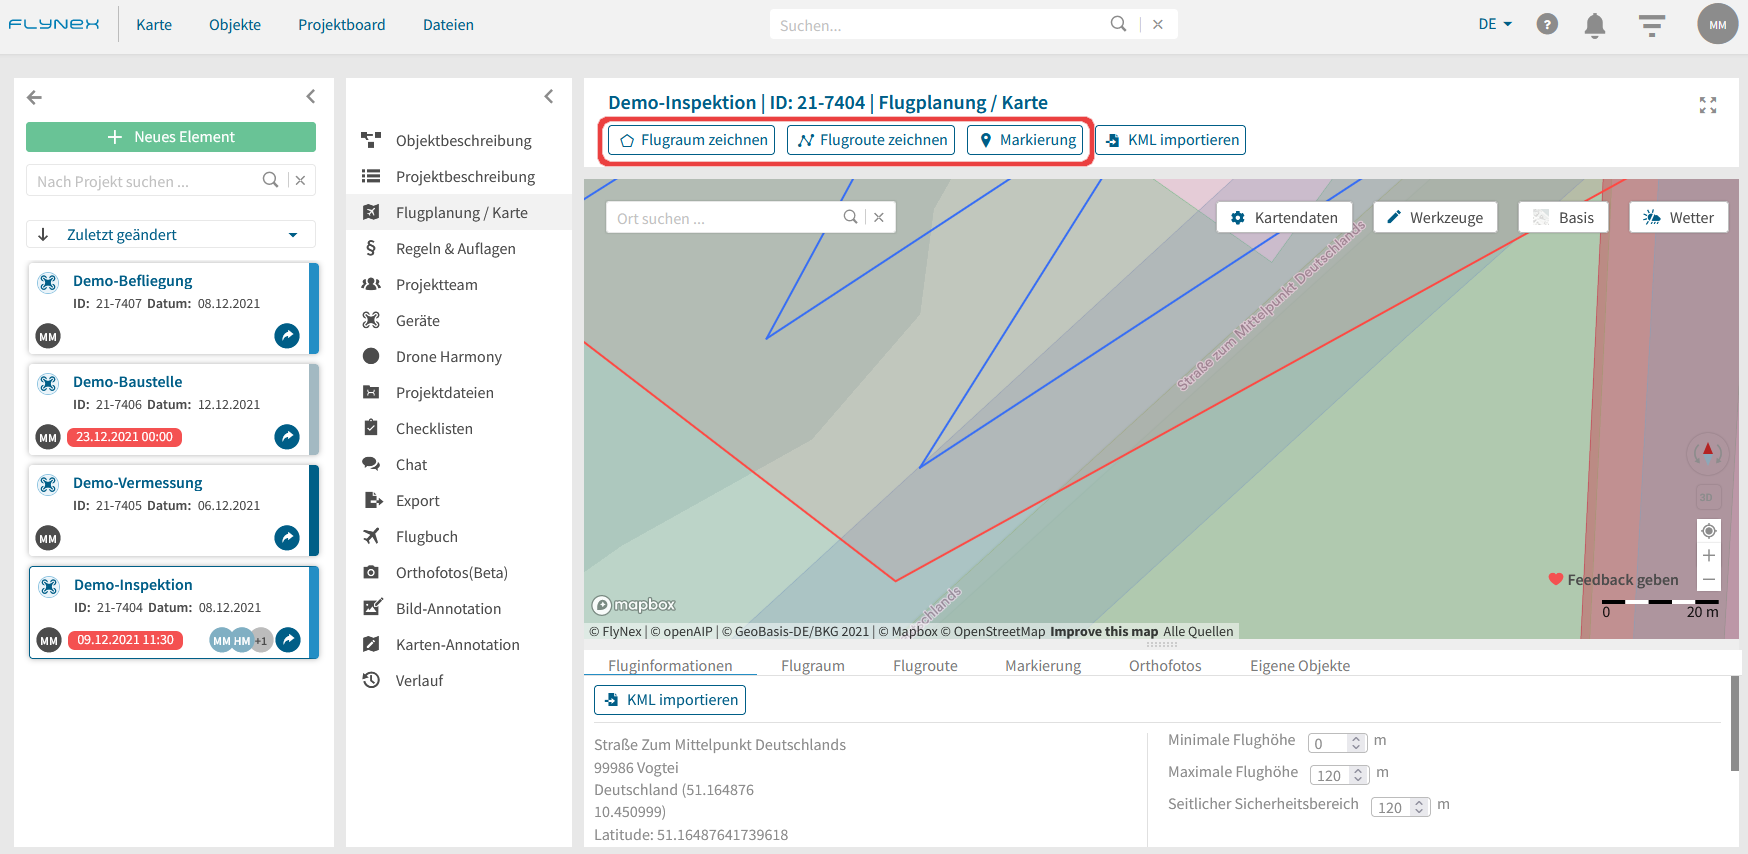
Flugraum zeichnen
Hiermit können Sie einen Flugraum zur Durchführung Ihres Projekts einzeichnen.
1) Klicken Sie dazu auf Flugraum zeichnen.
2) Setzen Sie mithilfe des Kreuzes in der Karte Ihren ersten Punkt. Ergänzen Sie anschließend beliebig viele Punkte bis Ihr Luftraum fertig gezeichnet ist.
3) Schließen Sie das Zeichnen Ihres Luftraums mit einem Doppelklick ab.
Hinweis: Sollten Sie auf das separate Zeichnen eines Luftraumes verzichten wollen, können Sie auch direkt eine Flugroute zeichnen.
Flugroute zeichnen
Hiermit können Sie individuell Ihre Flugroute zeichnen.
1) Klicken Sie dazu auf Flugroute zeichnen.
2) Setzen Sie mithilfe des Kreuzes in der Karte Ihren ersten Punkt. Ergänzen Sie anschließend die weiteren Punkte Ihrer Flugroute.
3) Schließen Sie das Zeichnen Ihrer Flugroute mit einem Doppelklick ab.
Hinweis: Klicken Sie in der fertig eingezeichneten Flugroute nacheinander auf die einzelnen Punkte, um diese eventuell nochmal zu korrigieren oder zu löschen. Außerdem können Sie neue Punkte ergänzen, indem Sie zwischen zwei vorhandene Flugroutenpunkte auf die kleineren Punkte klicken.
Markierung setzen
Dient zum Setzen eigener punktueller Markierungen.
1) Klicken Sie auf Markierung.
2) Klicken Sie in der Karte auf die Stelle, an welcher Sie die Markierung setzen möchten.
3) Beschriften und beschreiben Sie Ihren Marker unter Markierung und geben Sie ihm auf Wunsch eine eigene Farbe.
Strecke vermessen
Mit diesem Werkzeug können Sie eine Linie einzeichnen und vermessen lassen.
Fläche vermessen
Mit diesem Werkzeug können Sie ein beliebiges Polygon zeichnen und die Fläche wird für Sie von uns vermessen.
Löschen
Mithilfe des Werkzeugs Löschen können Sie einzelne Bestandteile Ihrer bisherigen Routenzeichnung oder die gesamte Zeichnung löschen. Um einen einzelnen Bestandteil (z. B. Punkt, Strecke) zu löschen, klicken Sie diesen Bestandteil zunächst an und klicken Sie danach auf das Symbol für Löschen.
Wenn Sie die gesamte Planung löschen möchten, klicken Sie in der Karte auf einen beliebigen Punkt außerhalb Ihrer Zeichnung und klicken Sie danach auf Löschen. Sie werden anschließend nach einer Bestätigung gefragt.